
 by CoreWave Studio
Start here
1 Welcome to TurtleNest
TurtleNest is a private personal finance organiser. It keeps your bank accounts, cash, cards, loans, shares, bonds, deposits and funds in one place, so you can see what you own, what you owe and where the money goes.
You record what happened, and TurtleNest does the adding up. It does not connect to your bank, stream share prices or tell you what to buy. Everything you enter stays on your own computer in an encrypted file that only your login can open.
How to use this guide
The guide is written around things you want to do, such as "record a transfer" or "back up my data". Read it from start to finish once, or jump to the task you need from the contents list. The last part is a reference to the account types, and a short list of rules that are good to know.
This guide describes TurtleNest for Windows. An Android app and cloud sync are planned but are not part of this version.
Conventions used here
- Click and tap mean the same thing. Screens use the word "tap" because the app is designed to work on a phone too.
- Names in bold are buttons, tabs or fields as they appear on screen.
- An orange box on a picture marks the part being discussed. Click any picture to open it full size.
- The examples use made-up people, banks and amounts. Your own screens will show your own data.
The one rule about signs
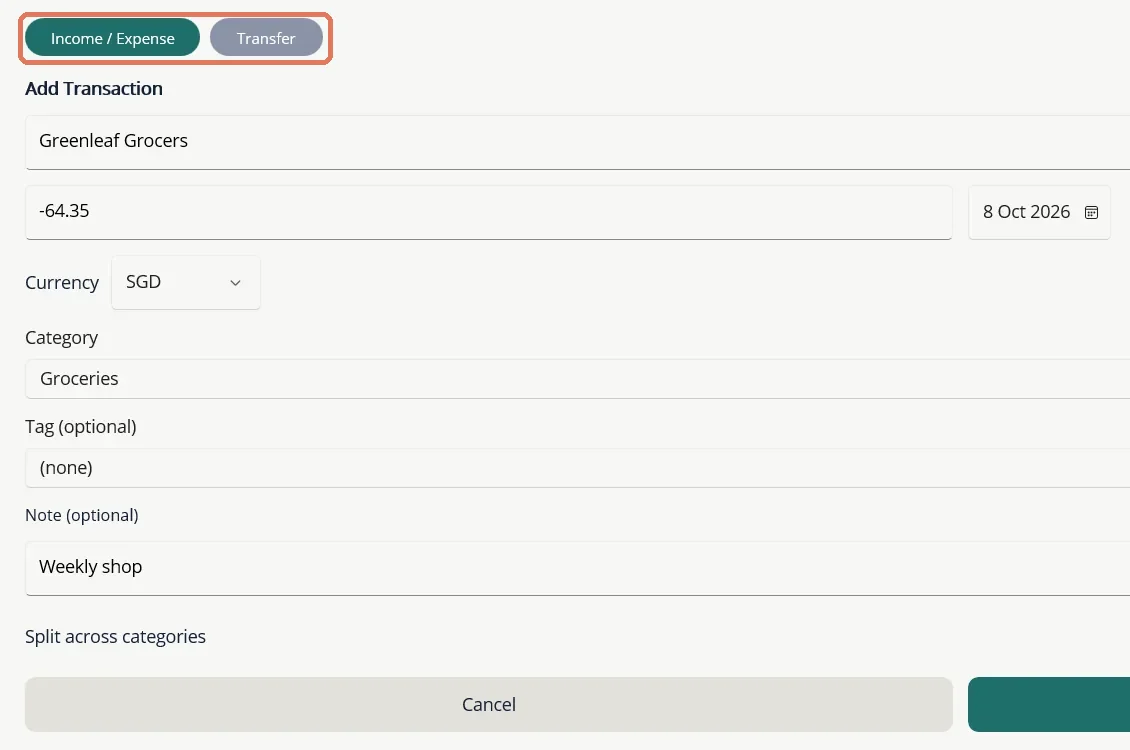
Money out of an account is a negative amount and money in is a positive amount. When you record a grocery bill of 64.35, you type -64.35. If the category you pick does not match the sign you typed, TurtleNest shows a warning before you save.
2 Sign in and create your login
Each person who uses TurtleNest on a computer has their own login. Each login has its own private, encrypted data, so other users on the same computer never see your accounts.
Create your login
- When TurtleNest opens for the first time, choose Add another user on the sign-in screen.
- Enter your Name. An Email is optional and is only kept for the cloud sign-in that comes later.
- Choose a password of at least 8 characters and type it again to confirm.
- TurtleNest now shows your recovery key, a code made of six groups of five characters. Copy it or write it down, tick I have saved my recovery key, then choose Continue.
Sign in
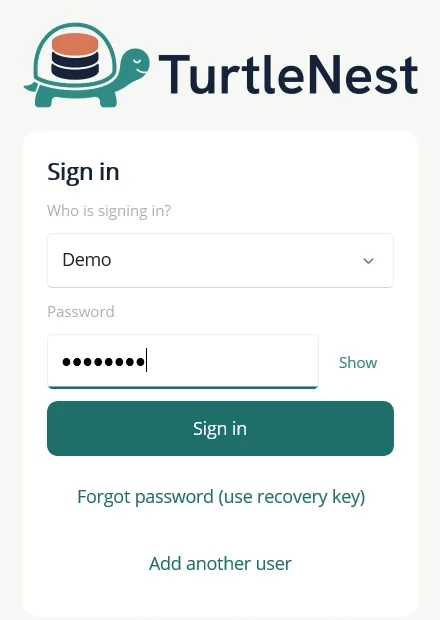
- Choose your name from the Who is signing in? list.
- Type your password. Choose Show if you want to see what you typed.
- Choose Sign in.
If you type a wrong password a few times, TurtleNest makes you wait a little before the next try, and the wait grows with each further mistake. Closing and reopening the app does not reset the wait.
If you forget your password
- On the sign-in screen choose Forgot password (use recovery key).
- Type the recovery key you saved when you created the login.
- Choose a new password, confirm it, then choose Reset password and sign in. Your data is not changed.
Add another person
Choose Add another user on the sign-in screen and follow the same steps as for your own login. The new person starts with an empty TurtleNest of their own. To open a backup made on a different computer as a new login, see Back up and restore.
3 Find your way around
A row of tabs runs along the top of every screen: Dashboard, Accounts, Transactions and More.... When you open a screen on top of another, a round teal back button appears at the top right. Tap it to return.
The Dashboard
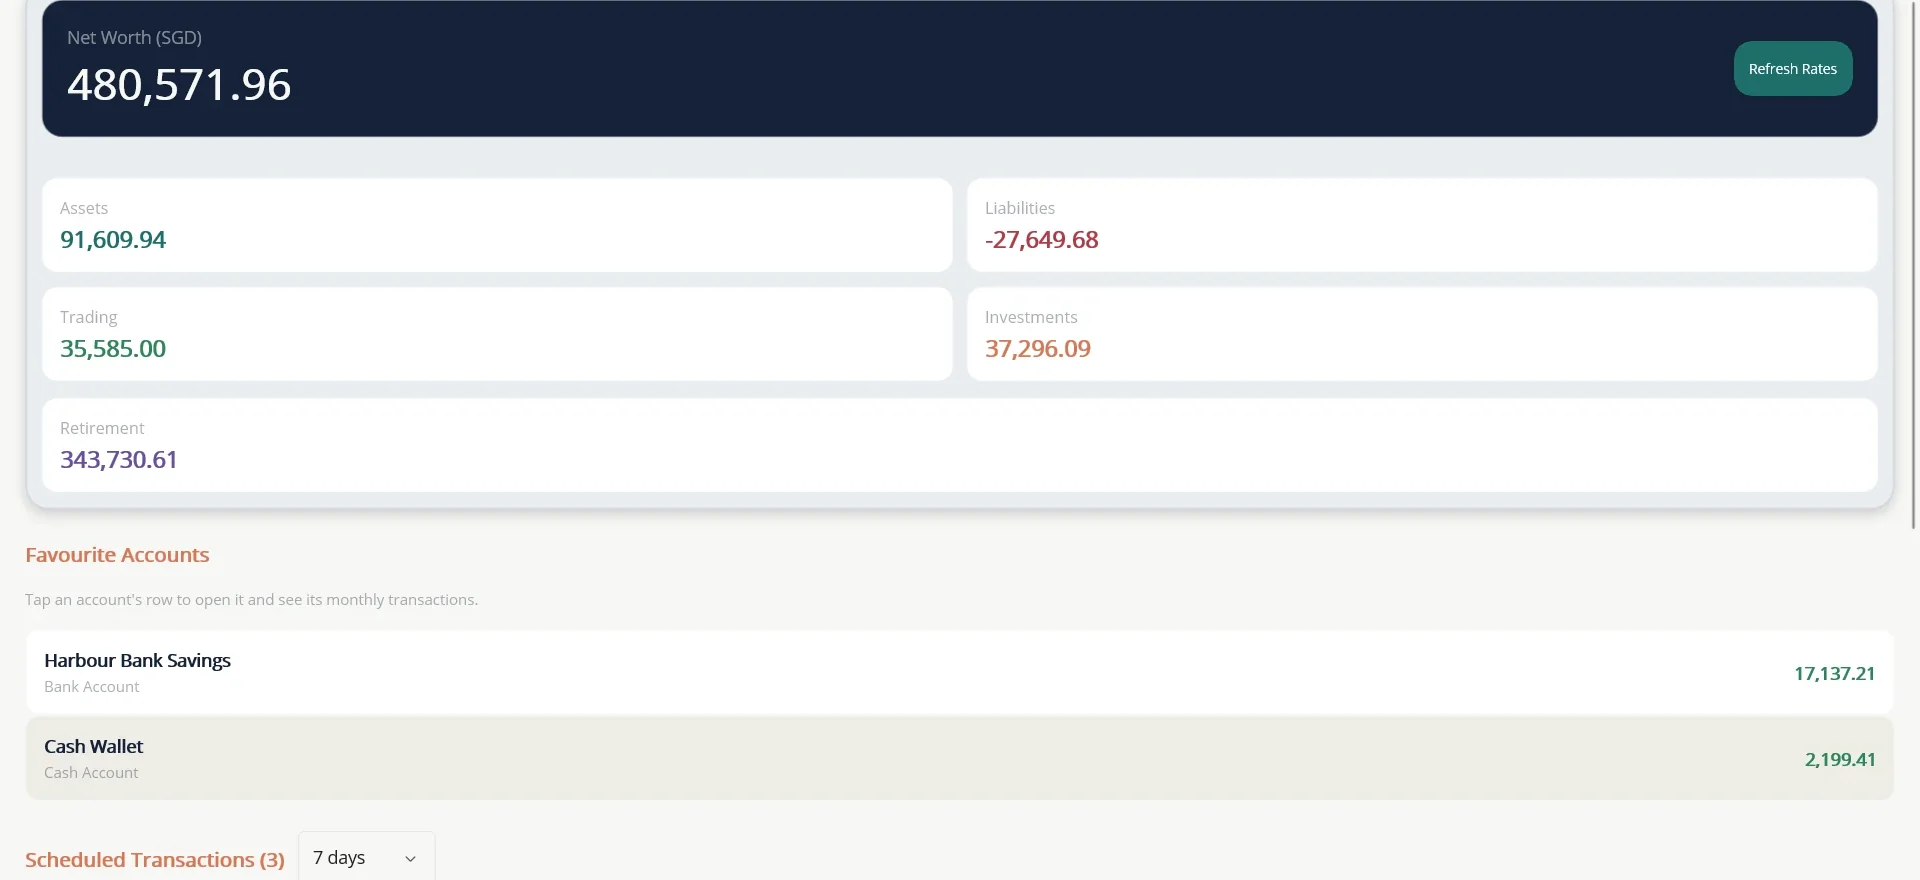
The Dashboard is your overview. At the top is your Net Worth in your base currency, which is everything you own less everything you owe. Underneath are tiles for each bucket your accounts fall into:
- Assets: bank, cash, digital wallet, fixed deposit and receivable accounts.
- Liabilities: credit cards, loans and payables, shown as negative figures.
- Trading: CFD and equities accounts.
- Investments: ETFs, bonds and mutual funds.
- Retirement: CPF or other locked-away retirement savings. It counts in net worth but is shown on its own line so it is not mistaken for money you can spend.
Below the tiles are your Favourite Accounts, then your scheduled transactions and alerts (see Plan ahead). Tap a favourite account to open it.
If you have accounts in other currencies, the Refresh Rates button on the net worth card updates the exchange rates. See Currencies and exchange rates.
The More tab
Everything that is not an everyday screen lives under More...: Categories, Payees, Currencies, Reports, Calendar, Planner, Budget, Tags, Settings, Account & Security and Database. Each is covered in the chapters that follow.
Set up
4 Choose your account types
TurtleNest can keep fourteen kinds of account, from a simple bank account to a fixed deposit or a loan. Most people use only a few. To keep the list short when you add an account, switch on only the types you use.
- Open More... and choose Settings.
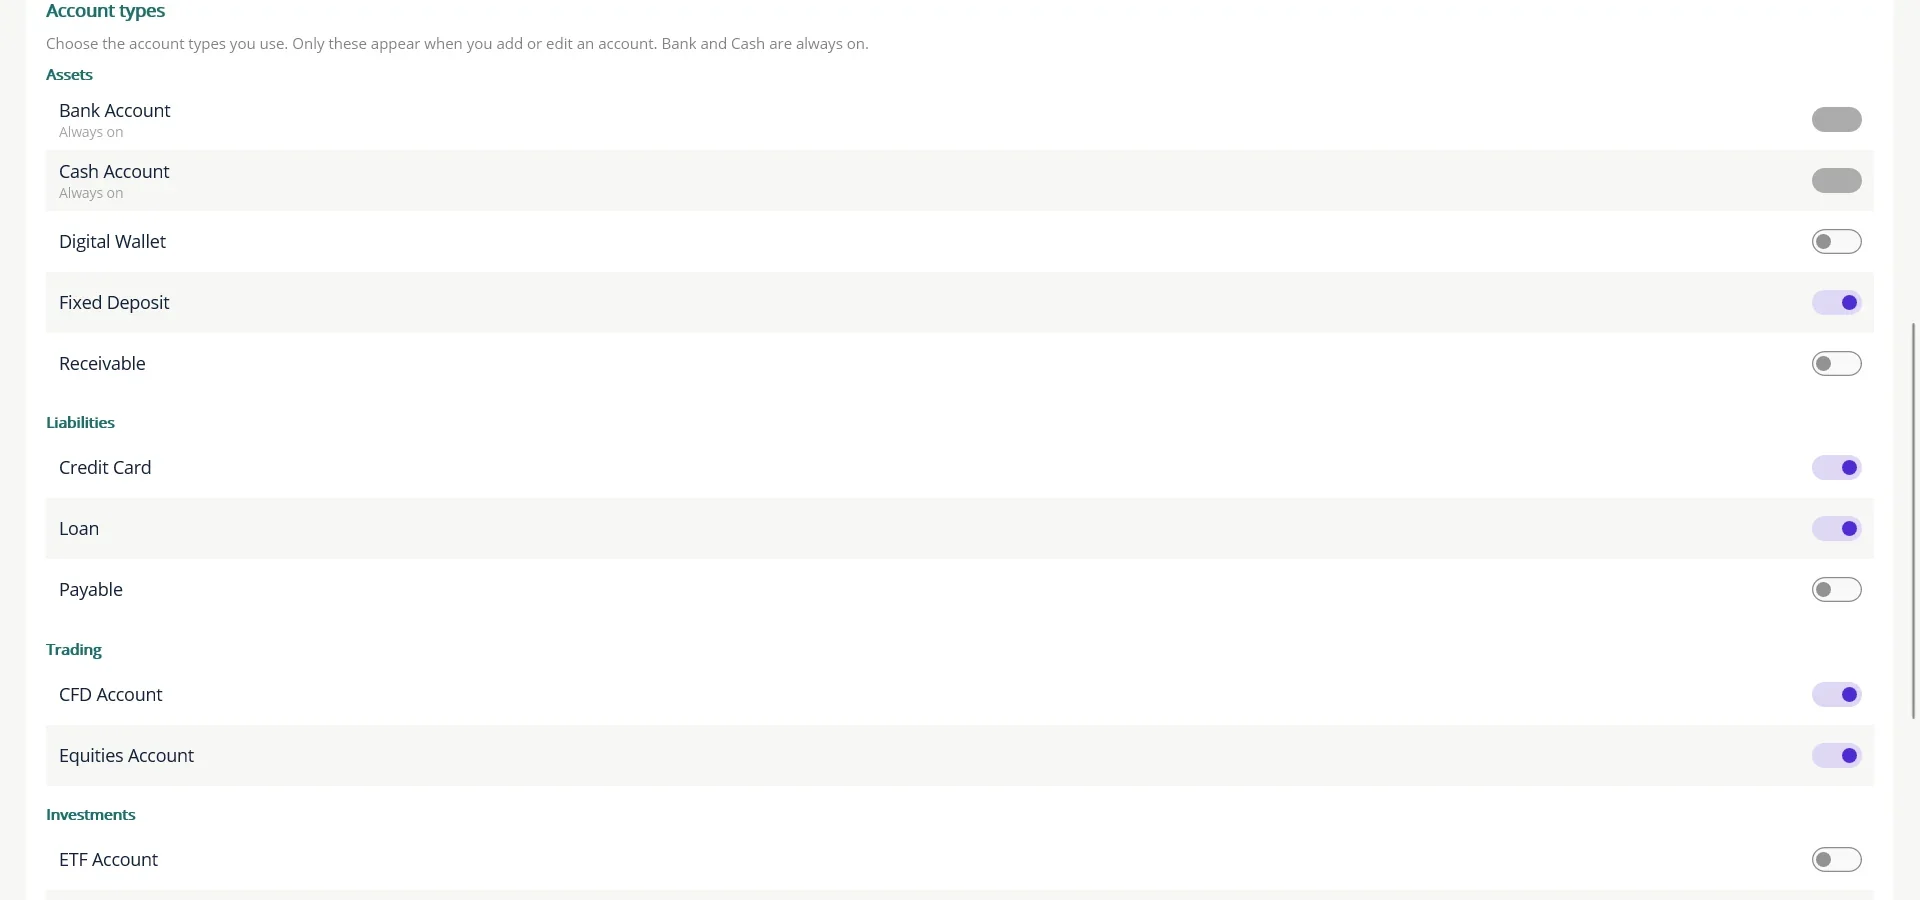
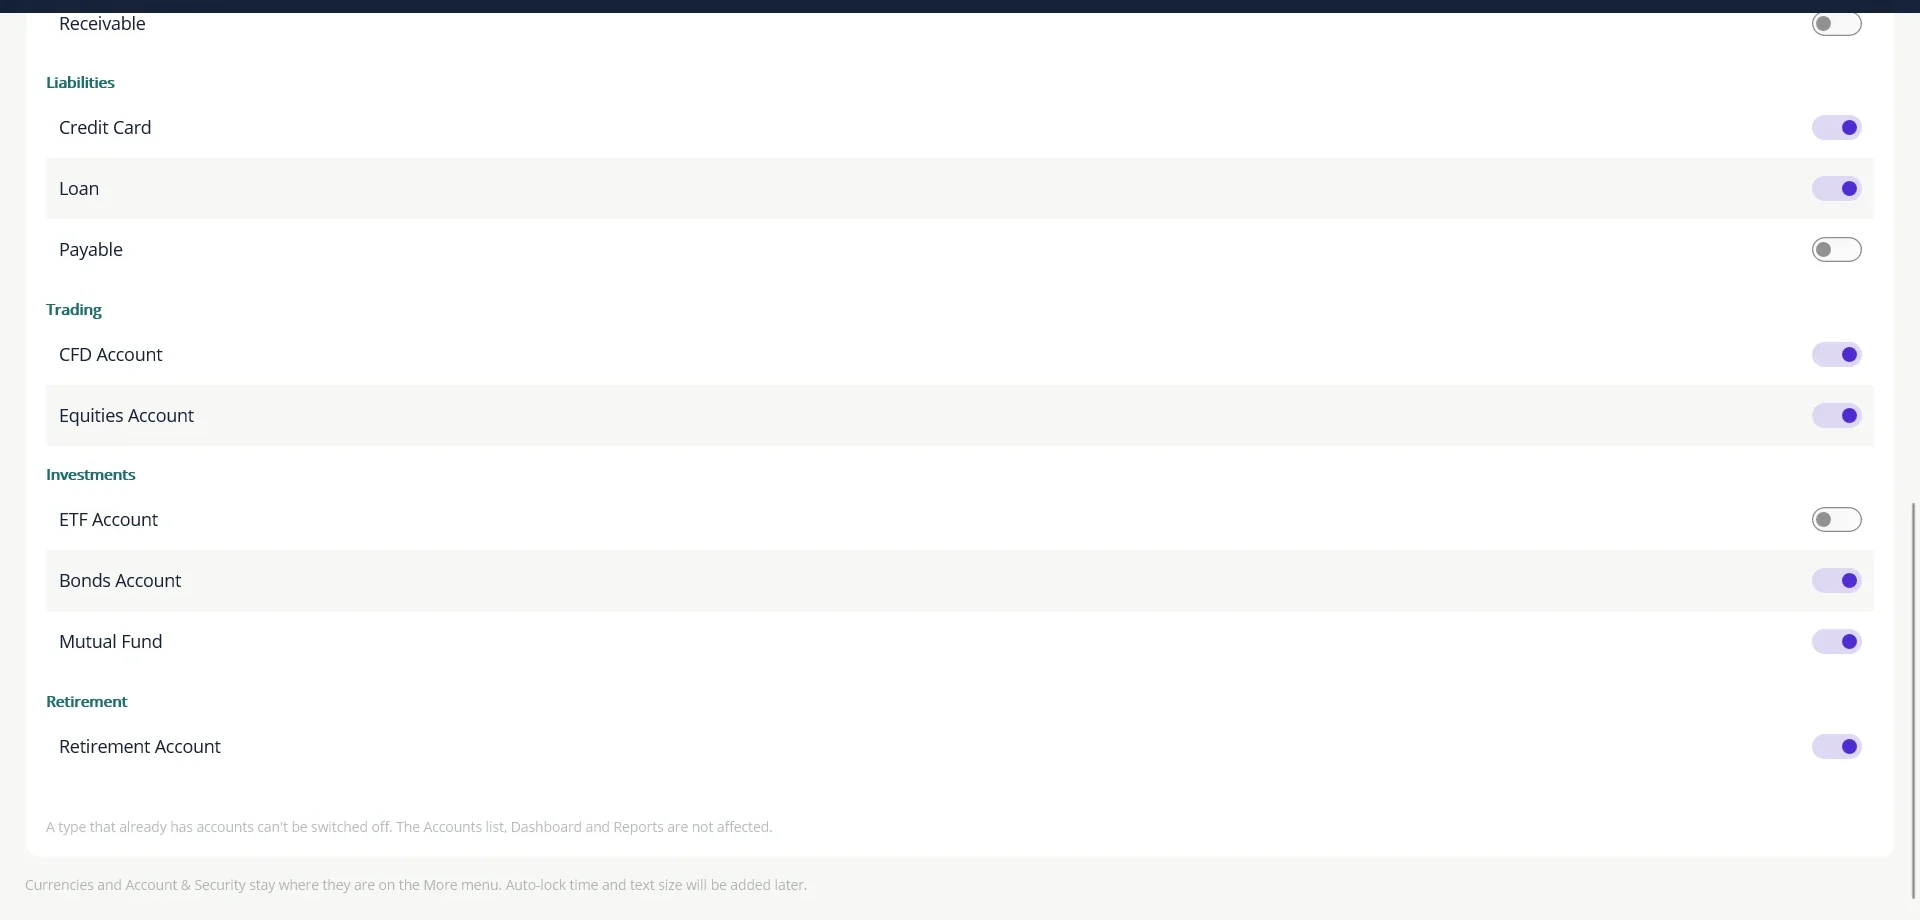
- Scroll to Account types. The types are grouped under Assets, Liabilities, Trading, Investments and Retirement.
- Switch a type on or off. Bank Account and Cash Account are always on.
The same Settings screen sets three other things:
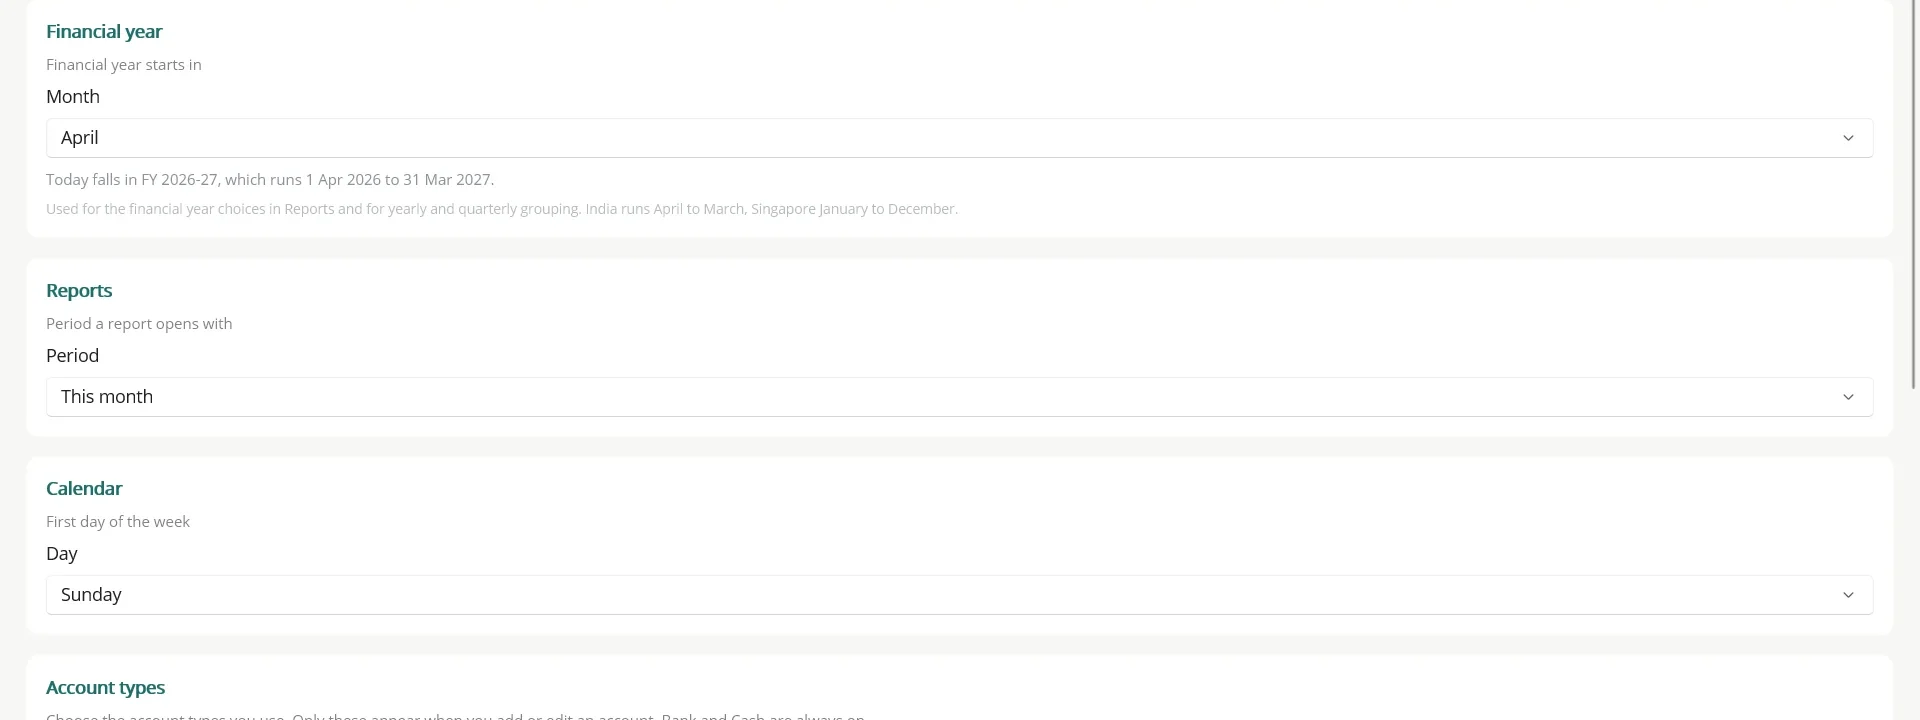
- Financial year: the month your financial year starts. India runs April to March, Singapore January to December. Reports use it for yearly and quarterly grouping.
- Reports: the period a report opens with, for example This month or Last 12 months.
- Calendar: the first day of the week.
5 Add an account
An account is any place your money sits or any debt you owe: a bank account, your wallet, a credit card, a share account, a loan. Add each one once, then record its transactions.
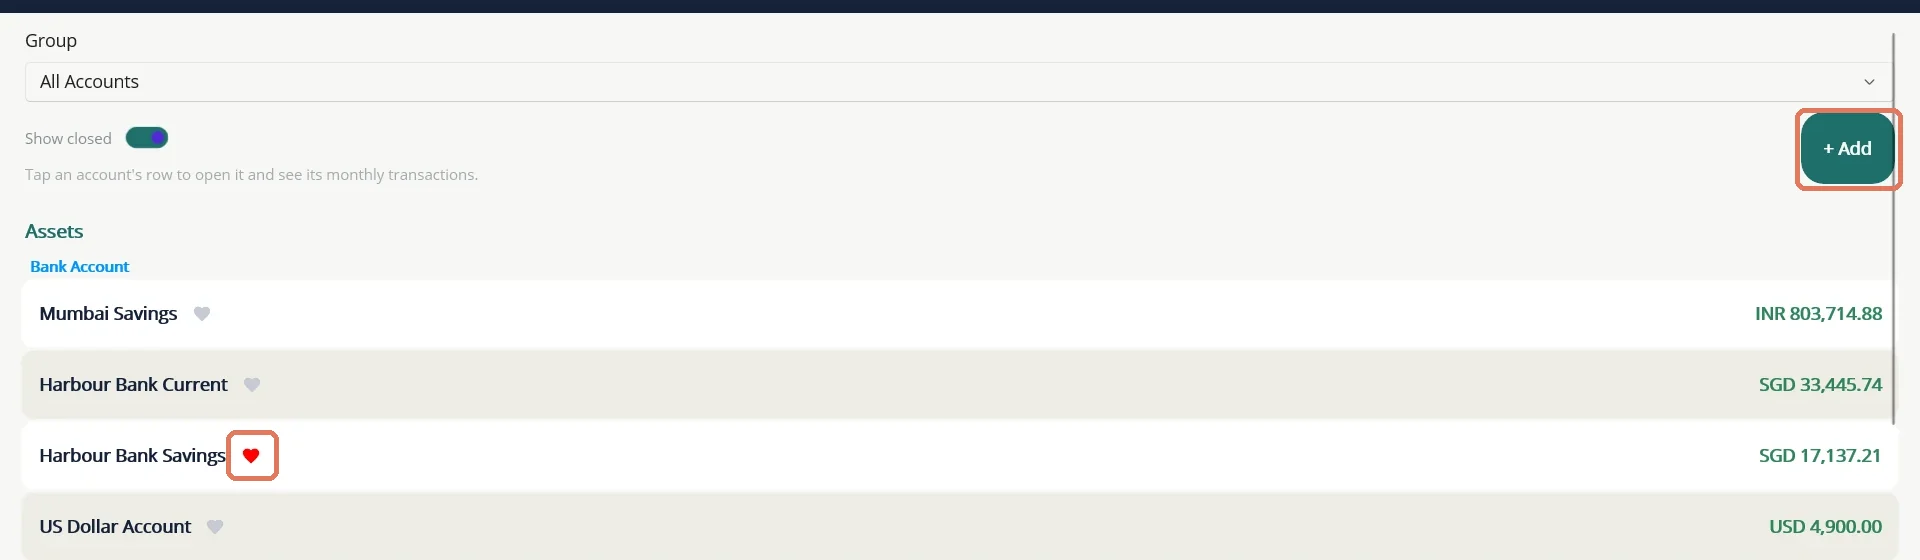
- Open the Accounts tab and choose + Add.
- Type an Account Name, for example "DBS Savings".
- Choose the Account Type. Only the types you switched on in Settings are listed.
- Choose the account's Currency.
- For most accounts, enter the balance the account had when you start tracking it, as the opening balance. For a loan, see Loans.
- Add a note if you wish, then choose Save.
Some types ask for extra details. A Fixed Deposit needs its amount, rate, dates, payout frequency, tax rate and a Linked Bank Account (see Fixed deposits). A Mutual Fund asks how much you had invested before you began using TurtleNest. A CFD Account can note the path of the MetaTrader history file (see CFD trading). A Retirement Account needs only a name, currency and opening balance (see Retirement accounts).
Favourites and groups
Tap the heart beside an account to make it a favourite. Favourites are listed on the Dashboard. A red heart is on, a grey one is off.
To group related accounts, for example "Family" or "Singapore", open an account with Edit Account, create a group under Account Groups, and tick the groups it belongs to. The Accounts tab and Dashboard have a Group picker so you can look at one group at a time.
Close or delete an account
When you stop using an account, open it, choose Edit Account, switch on Account is closed and save. A closed account disappears from lists and pickers, but its history is kept. Use Show closed on the Accounts tab to see it again.
A closed account is read-only. You cannot add, edit or delete transactions on it until you reopen it. Delete Account is available only for an account with no history. An account that has trades, loan payments or other linked entries cannot be deleted.
6 Categories, payees and tags
These three labels turn a list of transactions into something you can analyse. They live under More....
Categories
A category says what a transaction was for, such as Groceries, Salary or Utilities. Each category is either income or expense, and a category can have subcategories (Utilities can hold Electricity and Water).
- Open More... then Categories and choose + Add.
- Type the Category name and choose its Type.
- To make a subcategory, choose the parent under Subcategory of.
- Choose Save. Use the pencil to rename a category and the cross to delete one.
Tap a category row to see its transactions. A few categories are created and used by TurtleNest itself, for example for investment charges, bond interest and loan interest. These are protected and cannot be renamed or deleted.
Payees
A payee is whoever you pay or receive money from. You do not need to set payees up. They are created automatically the first time you type a name on a transaction, and the name is suggested as you type next time. Under Payees you can add one ahead of time, rename one (all its transactions follow) or tap a payee to see everything you have paid them.
Tags
A tag is an optional extra label that cuts across categories, for example "Holiday 2026" or "Home renovation". Create tags under Tags, then pick one on any transaction or split line. The Tag report and Tag monthly report then show everything under each tag.
7 Currencies and exchange rates
Each account has its own currency. To add them all up, TurtleNest converts every balance into your base currency for the Dashboard and Net Worth.
- Open More... then Currencies.
- Choose your Base Currency. You can change it at any time.
- Under Exchange Rates, choose Refresh Live Rates to pull a daily rate table, or type a rate by hand next to a currency and save it. Whichever was set most recently wins.
A currency appears in the list the first time an account uses it. Tap the heart beside up to three currencies to pin them. Pinned currencies get a button on the Dashboard that shows your net worth in that currency.
Everyday money
8 Record an expense or income
Most of what you do in TurtleNest is recording transactions. You can start from an account or from the Transactions tab.
- Open the Accounts tab and tap the account, for example your bank account.
- Choose Add Transaction. The first tab, Income / Expense, is already selected.
- Type the Payee. Names you have used before are suggested.
- Type the Amount, negative for money out and positive for money in. Change the date if it was not today.
- Pick a Category. Add a Tag or a Note if you want to.
- Choose Save.
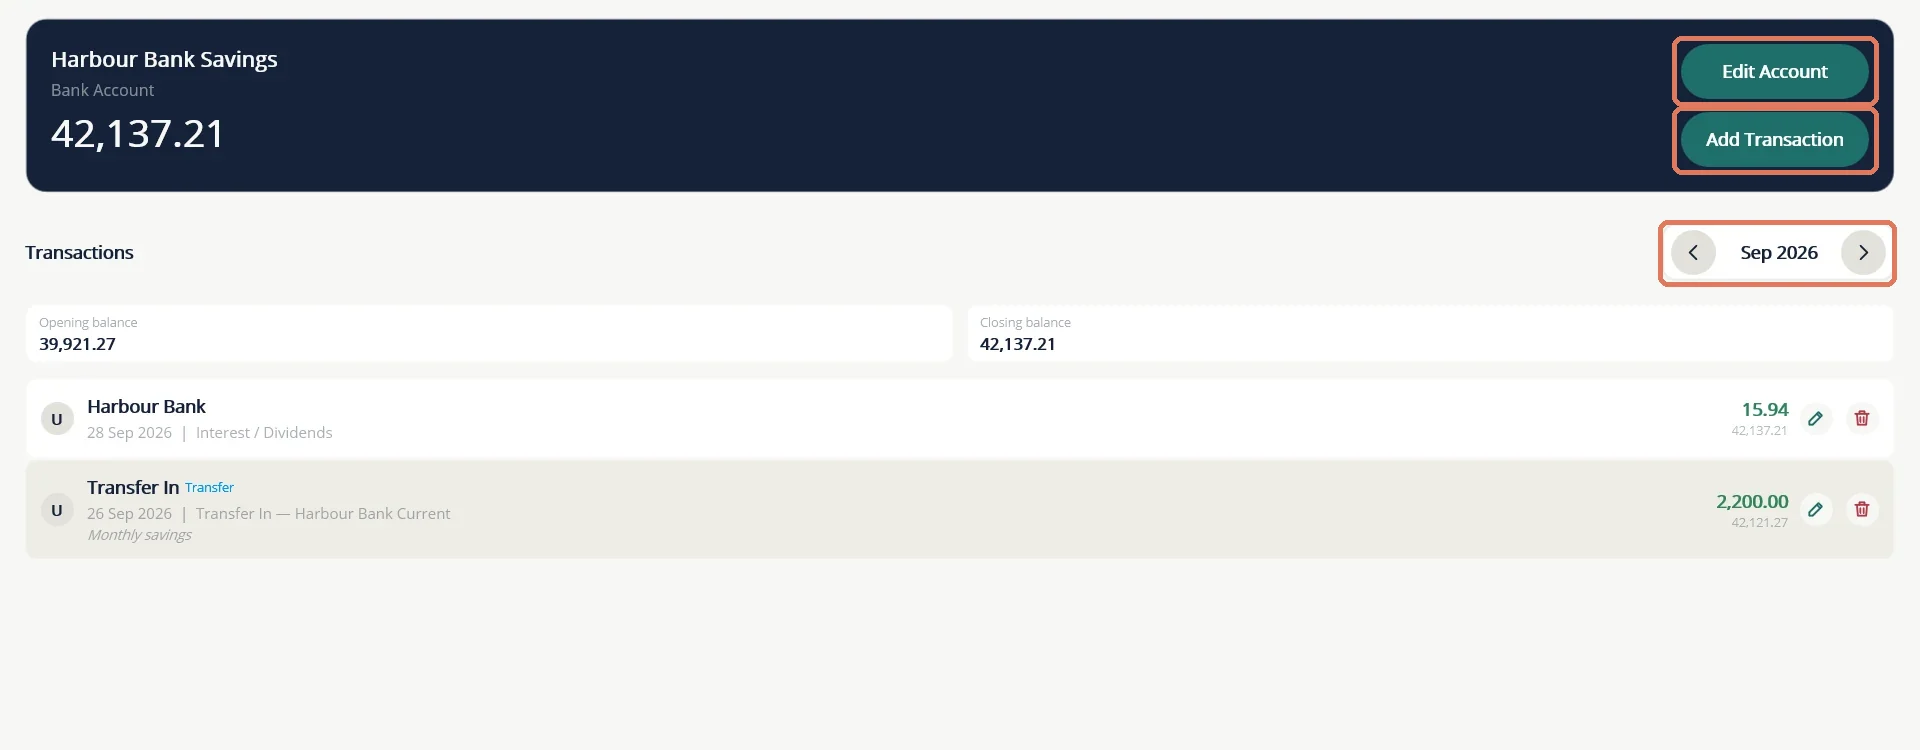
The account page lists one month of transactions at a time, with the opening and closing balance for that month and a running balance on every row. Use the arrows beside the month name to move back and forward.
Spending in another currency
Type the Amount in the account's own currency, which is what your bank actually debited. Then change Currency to the currency you really paid in. A Foreign Amount field appears for the figure in that currency, and TurtleNest shows the rate it implies. This keeps the account matching your statement while remembering what the purchase cost abroad.
9 Split one purchase across categories
One receipt can cover several things, for example groceries and household goods. A split keeps the total as one transaction while sending each part to its own category.
- On the Add Transaction form, switch on Split across categories.
- For each line, pick a Category and type its amount. Choose + Add Split Line for more lines.
- Watch Remaining to allocate. Save when it reaches zero. The lines must add up to the total.
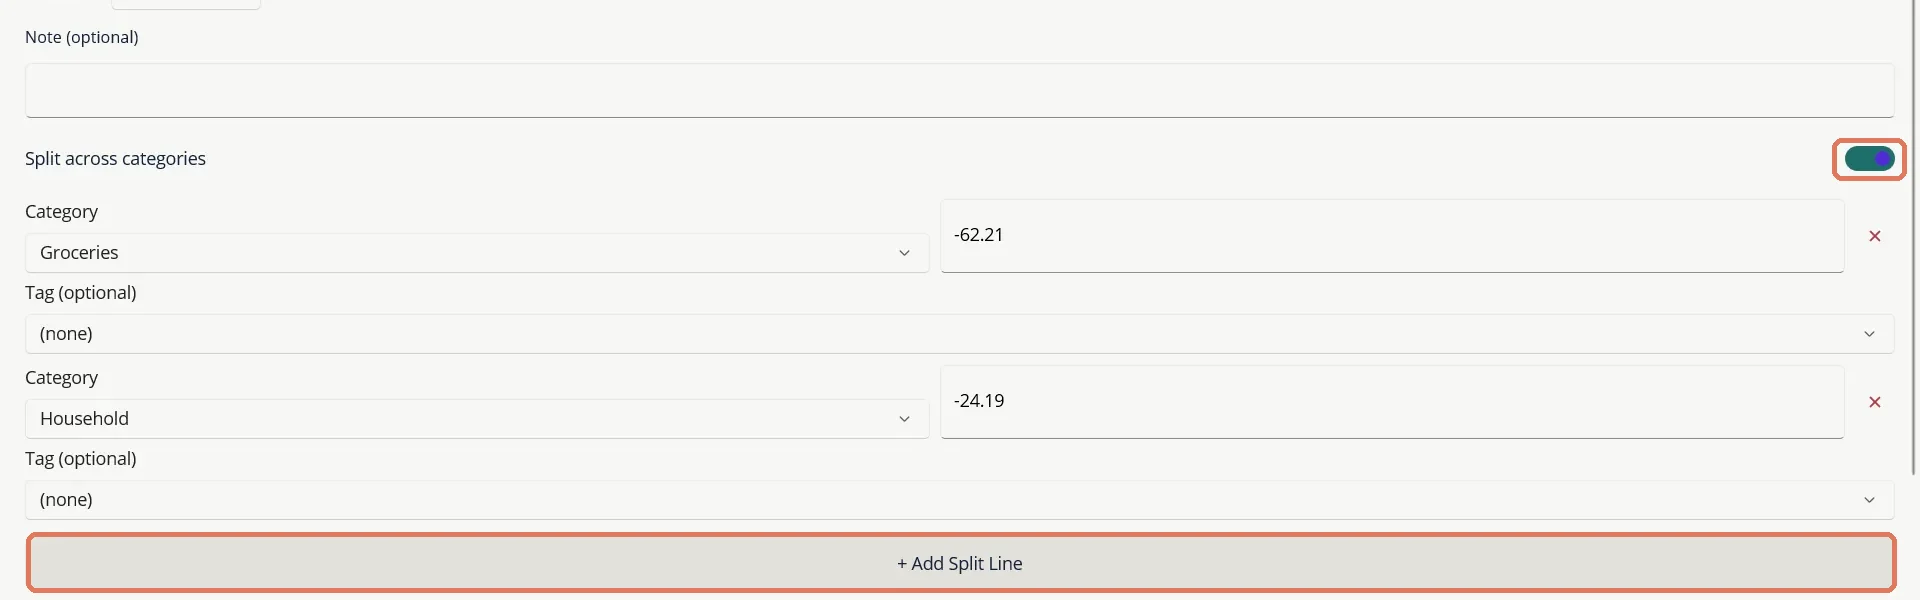
The cross at the end of a line removes it. In reports, each line counts under its own category.
10 Move money between accounts
A transfer moves money from one of your accounts to another. It is not income or expense, so it never affects your profit and loss. Paying a credit card from your bank, moving savings, topping up a wallet and putting money into a broker account are all transfers.
Account transfer
- Open the account the money leaves or arrives in and choose Add Transaction, then the Transfer tab.
- Keep Account Transfer selected. Choose Transfer Out or Transfer In.
- Pick the Other account.
- Type the amount and date, add a note, then Save. The matching entry appears in the other account automatically.
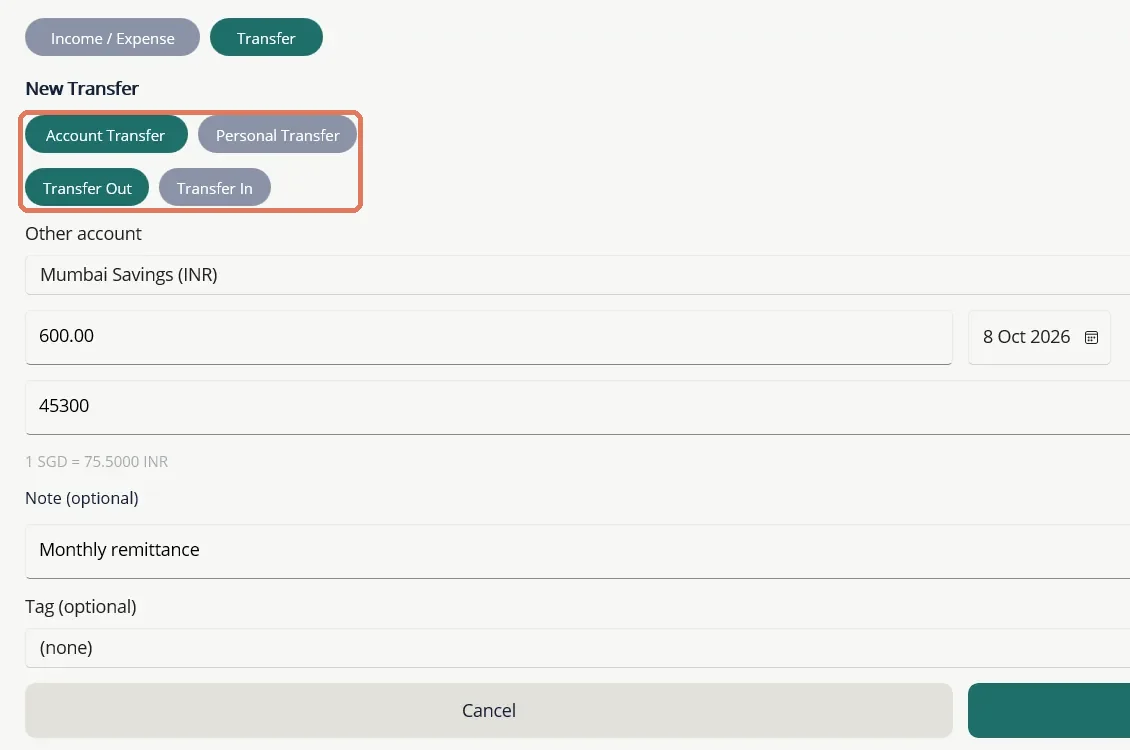
When the two accounts use different currencies, TurtleNest asks for both amounts, the one leaving and the one arriving, and shows the rate they imply. In the example above, 600.00 Singapore dollars became 45,300 Indian rupees, a rate of 75.5.
Personal transfer
A Personal Transfer is a one-way movement with no repayment tracked: a gift, money for family, a loan to a friend that you do not want to follow up, or a suspense entry. It records a single entry on one account against a person or description, with no category, and it stays out of income and expense totals.
If you do want to track whether money comes back, use a Receivable or Payable account instead.
11 Find, edit and delete transactions
The Transactions tab lists transactions from every account together, newest month first.
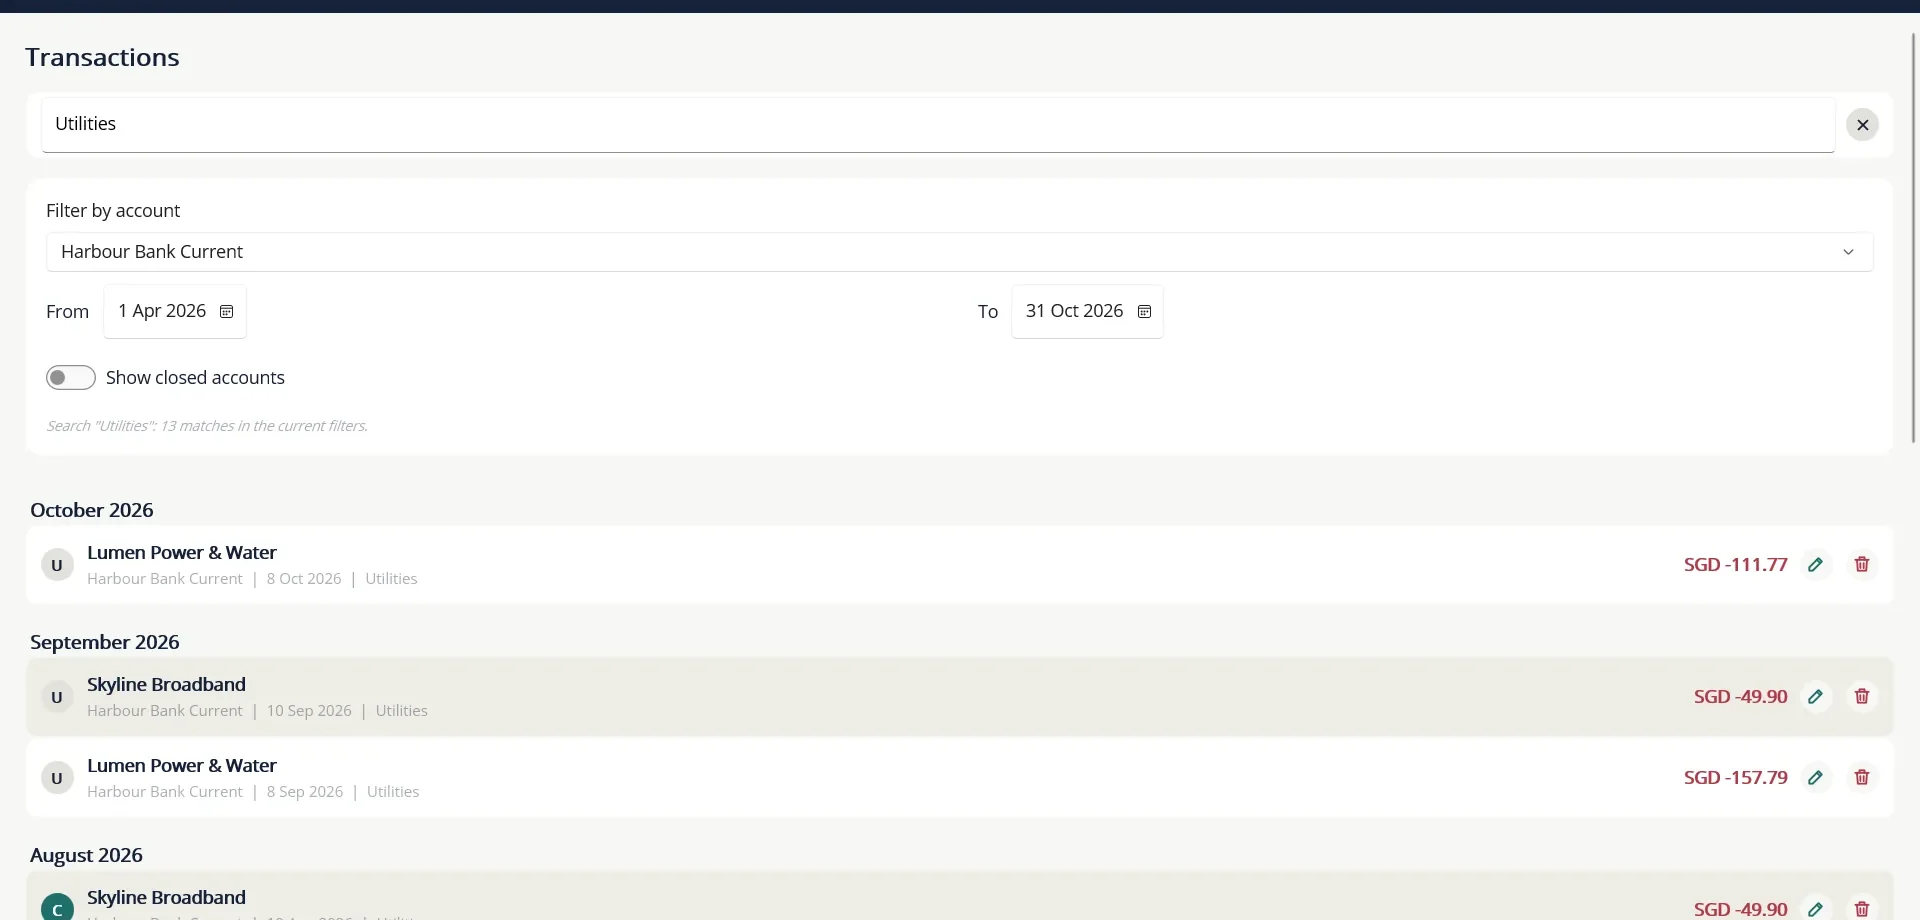
- Search for a word using the box at the top. TurtleNest says how many matches it found under the current filters.
- Filter by account to look at one account, and set the From and To dates.
- Switch on Show closed accounts to include accounts you have closed.
- Tap the pencil on a row to edit it, or the bin to delete it.
Rows you cannot change directly
Some rows belong to something bigger, so TurtleNest locks them to stop the two getting out of step. A locked row shows a line of red text saying why.
- Rows posted by a share, ETF or bond trade are changed from the investment account's Trades tab, and the bank rows follow.
- Rows posted by a loan payment are changed from the loan's Payments list.
- Rows on a closed account cannot be edited or deleted until the account is reopened. Transfers to or from a closed account cannot be made at all.
12 Check against your statement
Each transaction has a small round badge on its left with a letter: U for unreconciled, C for cleared and R for reconciled. They are yours to set, so you can tick off transactions as you match them to your bank statement.
- Open your account and compare a row with the statement.
- Tap the badge once to make it C when the row has cleared, and again for R when the whole statement is checked. A further tap returns it to U.
Marks are never changed automatically. For share and bond accounts, the trade and the bank rows it posted each have their own mark.
Plan ahead
13 Plan ahead with the Planner
The Planner holds payments and income you know are coming: rent, a subscription, an insurance premium, your salary. Each one is a schedule that TurtleNest reminds you about. Nothing is posted automatically. You decide when to post it.
Add a scheduled transaction
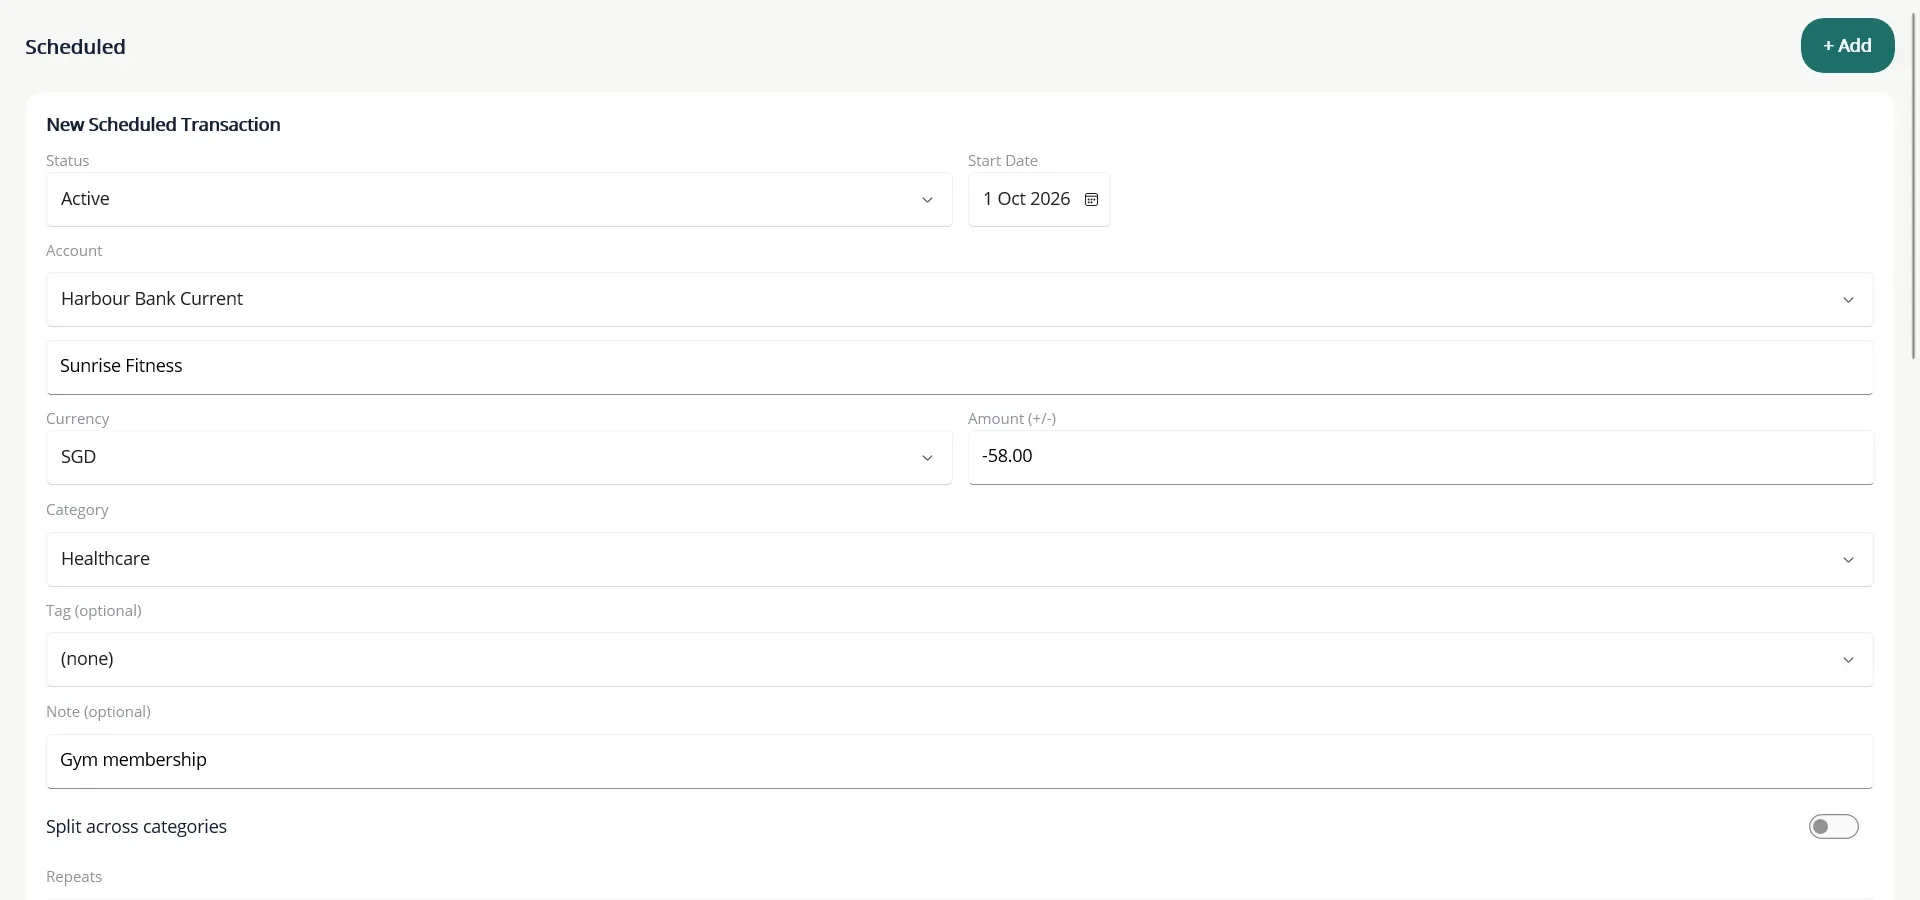
- Open More... then Planner and choose + Add.
- Set the Status (Active or Inactive), the Account and the Start Date.
- Fill in the payee, currency, amount, category, tag and note exactly as for a normal transaction. You can split the amount across categories.
- Choose how it Repeats: Once, Weekly, Monthly, Last day of Month, Quarterly or Annually. Optionally set Ending On.
- Choose Save.
Post it when it happens
Each row in the list has a Post button, a pencil to edit it and a cross to delete it. Choose Post when the payment really happened. TurtleNest then creates the full transaction. A repeating schedule moves on to its next date, and a one-off schedule closes. A late item shows Post (past due) and its date in red.
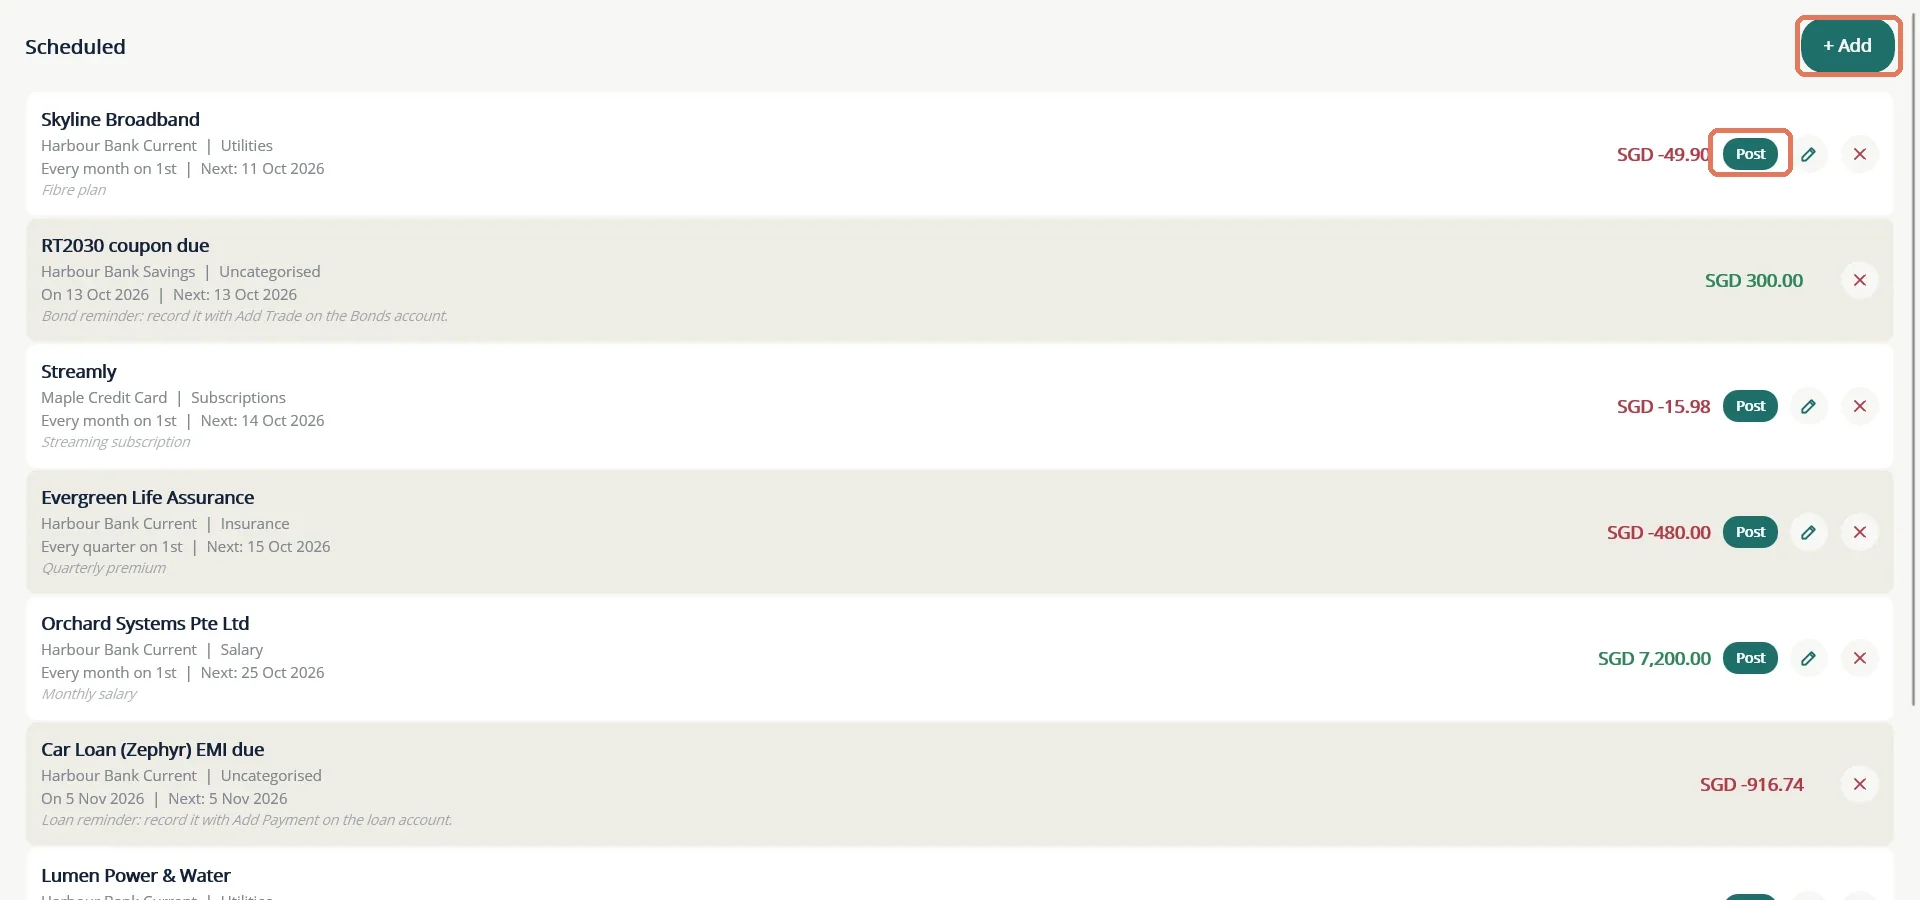
Inactive schedules appear greyed out and never reach the Dashboard. A schedule with an Ending On date turns inactive by itself once its last occurrence has passed. Loan instalment and bond coupon reminders also appear here, but you record them on the loan or bond account.
14 Set a budget
A budget caps what you plan to spend in a category. TurtleNest compares it with what you actually spent.
- Open More... then Budget and choose + Add.
- Pick a Category. A parent category counts its own spending plus all its subcategories, and is listed as "Name (all)".
- Choose Budget per Monthly or Yearly and type the amount. A yearly amount is spread evenly over 12 months in the monthly view.
- Choose Save.
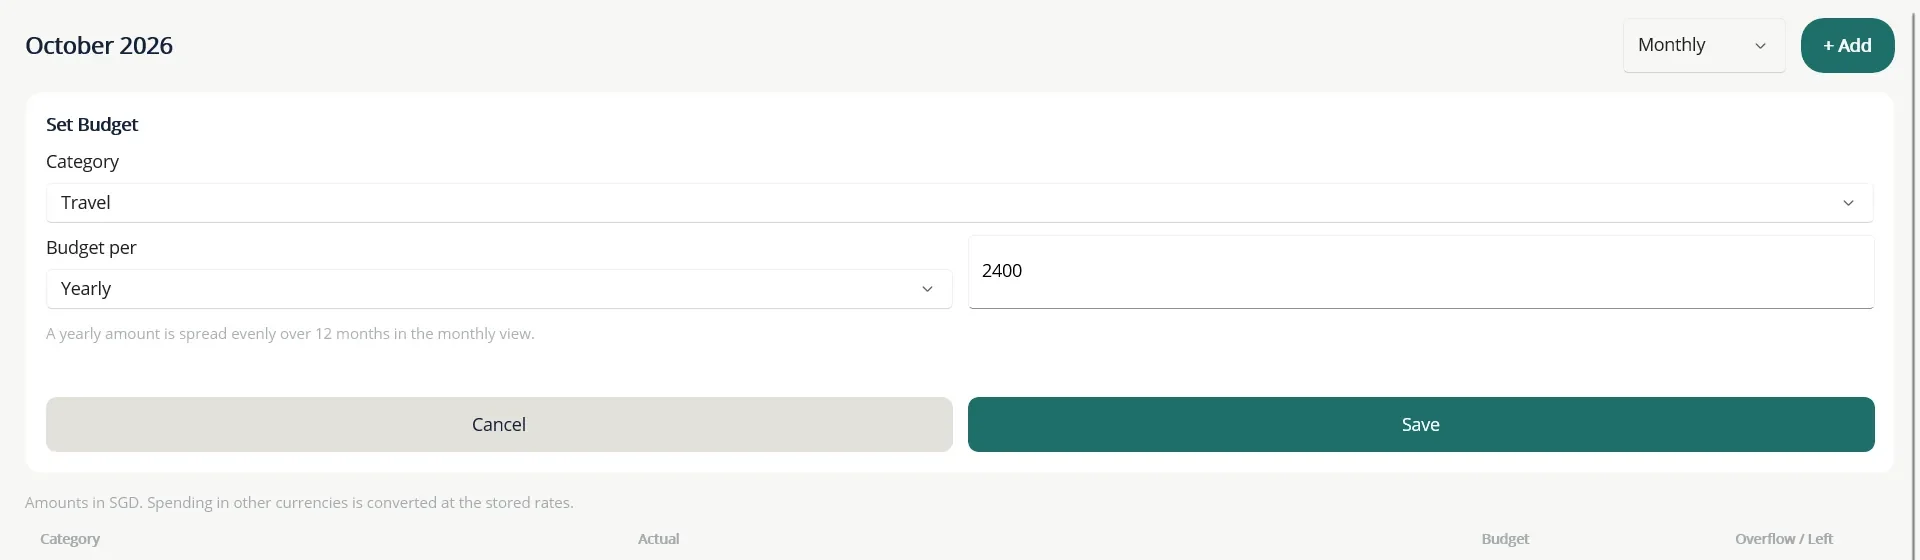
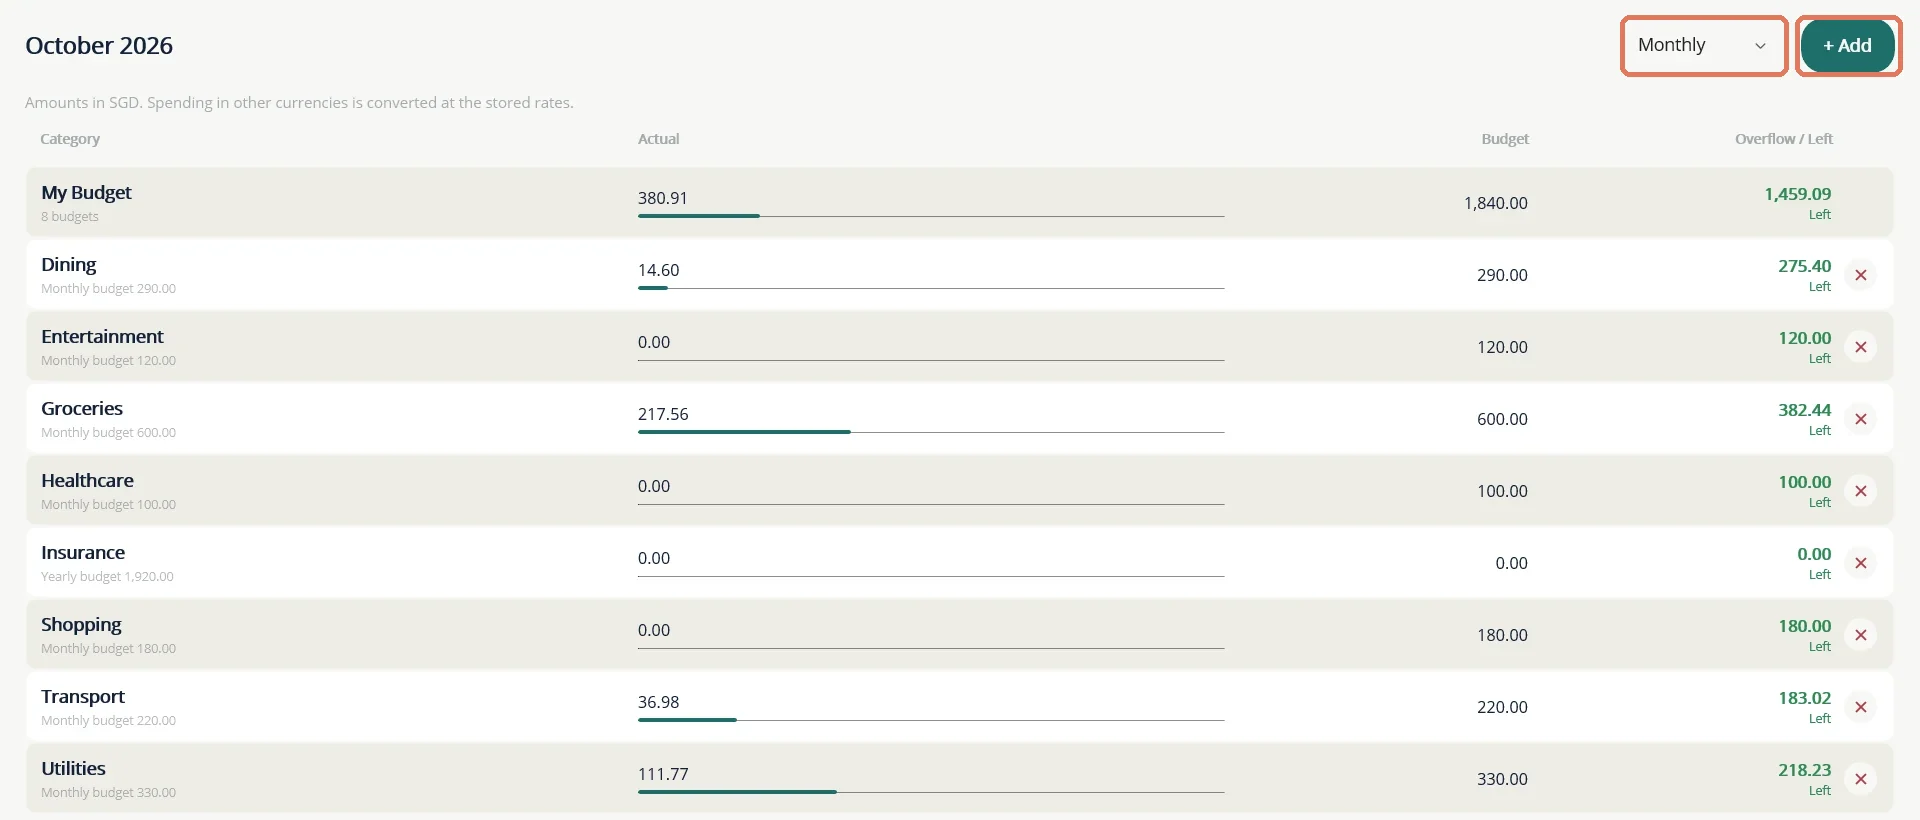
The view picker beside + Add switches between Monthly (this month) and Yearly (calendar year to date). The first row, My Budget, is the total. Each category row shows a bar for actual spending against the budget, and the amount left or overspent. The cross removes a budget.
15 The Calendar
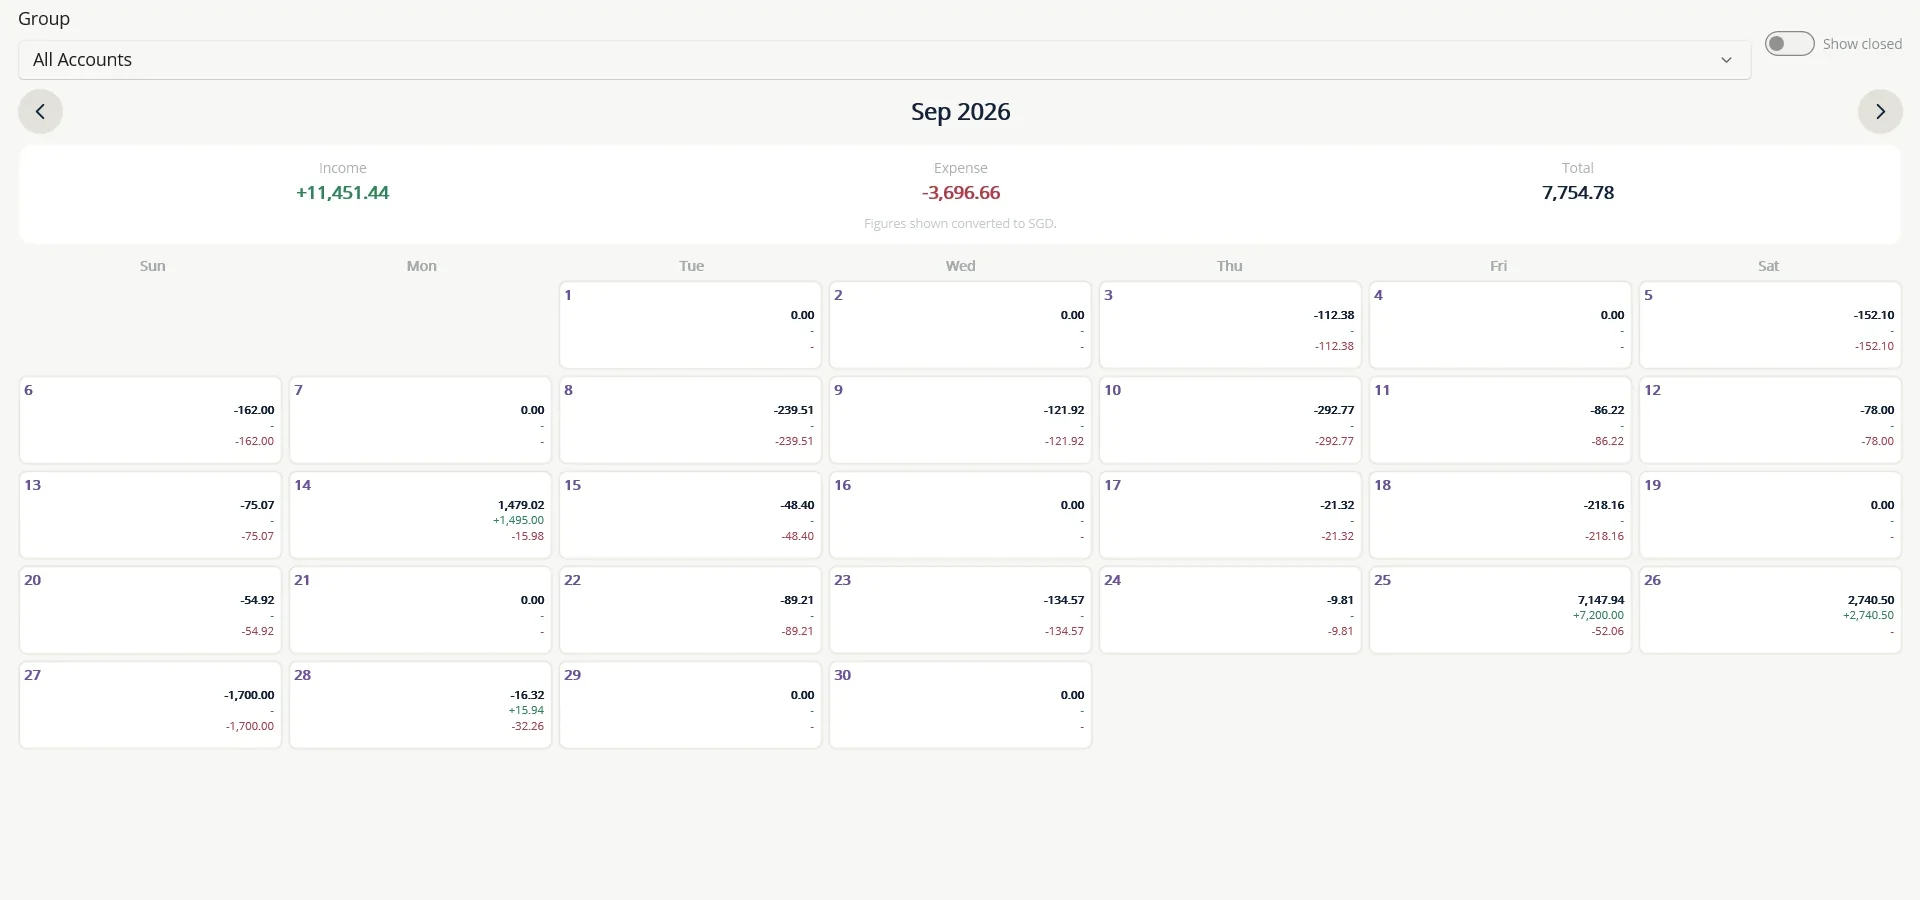
Open More... then Calendar for a month-at-a-glance view. Each day shows the income, expense and total for that day, and the top of the page totals the month. Use the arrows to change month and the Group picker to look at one group of accounts. The first day of the week is set in Settings.
16 Reminders on the Dashboard
Two panels on the Dashboard keep you from missing dates. Each has its own days-ahead picker, so you choose how far in advance you want to see things.
- Scheduled Transactions lists Planner items that are due soon. Past-due items show in red. Tap a row to open the Planner and post it.
- Alerts lists fixed deposit payouts and maturities, loan instalments, and bond coupons and maturities that are overdue or coming up. Tap an alert to open the account, where you record it.
Closed accounts never raise alerts. Alerts do not post anything. They only point you to the right place.
Investments
17 Shares and ETFs
TurtleNest records what you did with shares and ETFs: what you bought, what you sold, dividends or distributions, and the charges. It also records the money that moved through a bank account. It does not fetch prices. The value that counts in your net worth comes from the valuation entries you add yourself (see Mutual funds and valuation entries).
Share accounts (Equities Account, kept under Trading) and ETF Account (kept under Investments) work the same way. ETFs say "units" and "distribution" where shares say "quantity" and "dividend", and ETFs have no Demat reconciliation.
Pick the account the money moves through
Every trade is paid from or into a settlement account, a Bank, Cash, Digital Wallet or CPF account chosen on each trade. If your broker holds a cash balance for you, such as Interactive Brokers or Tiger, set that cash up as a Digital Wallet account and use it as the settlement account. Moving money from your bank to the broker is then an ordinary transfer.
Record a buy
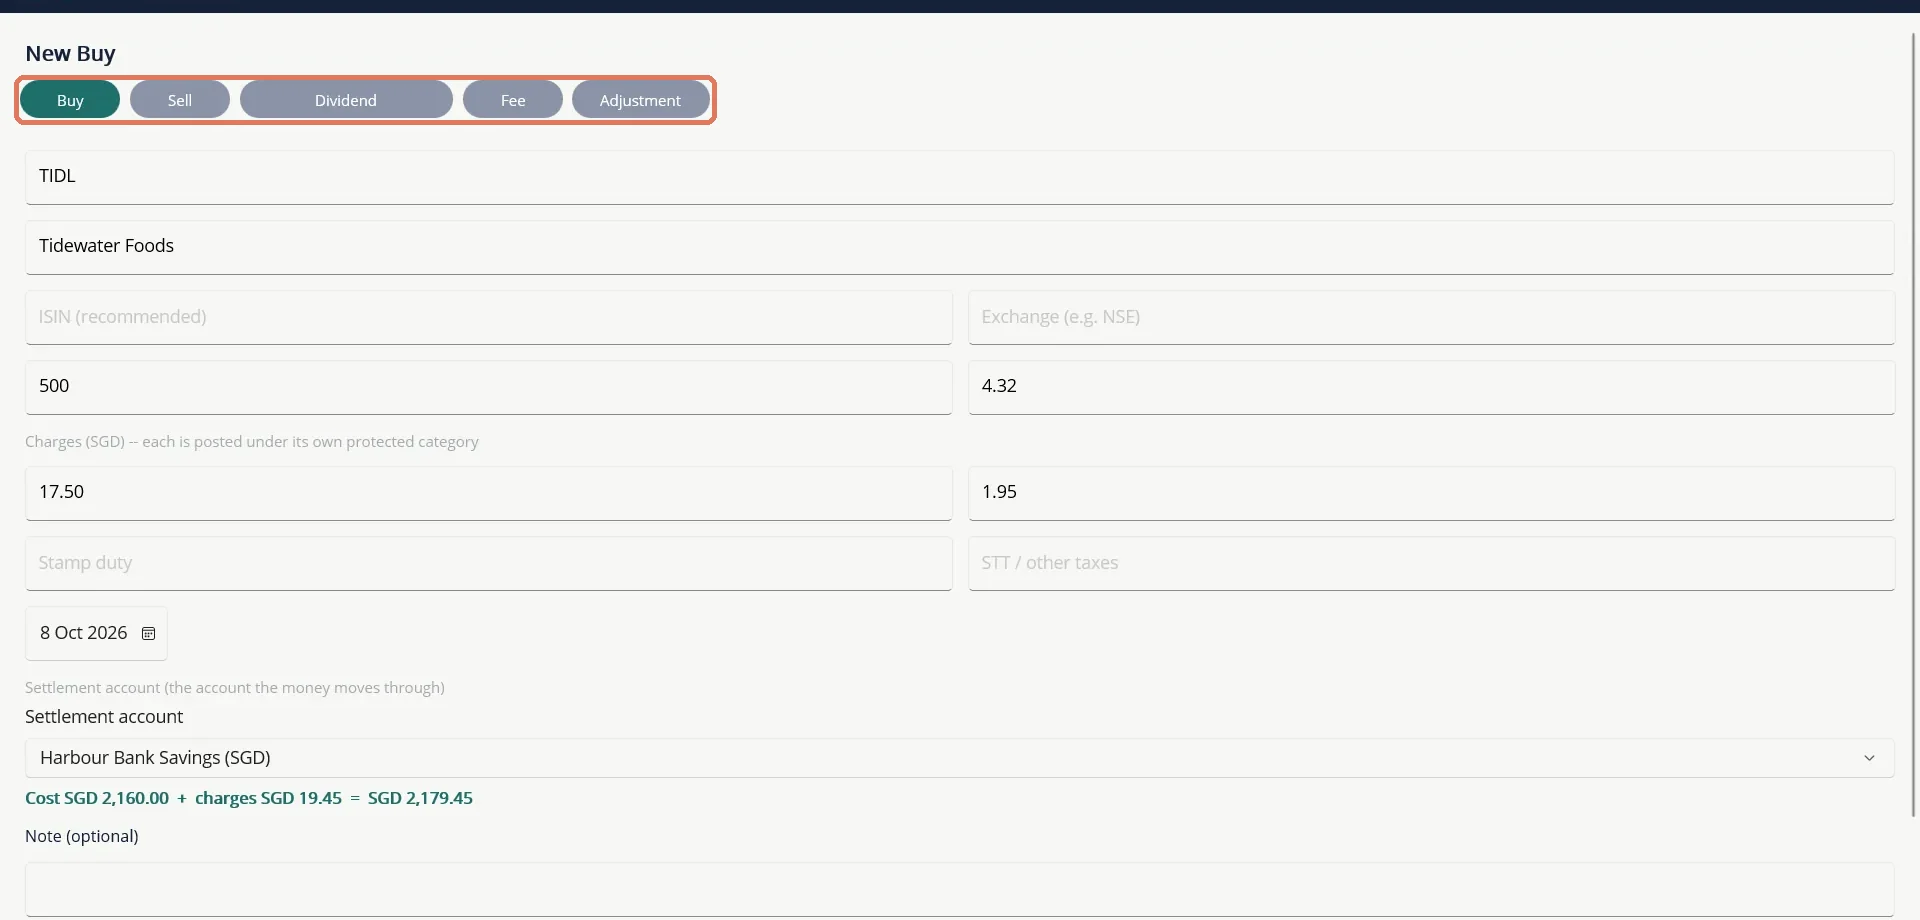
- Open the share account and choose Add Trade. The form opens on Buy.
- Type the symbol and company name. Add the ISIN if you have it. TurtleNest uses the ISIN to recognise the same stock later, and falls back to the symbol when there is none.
- Enter the quantity and the price per share, in the account's currency.
- Enter the charges your broker took, each in its own box: brokerage, transaction charges, stamp duty and STT or other taxes. Leave blank what does not apply.
- Check the date and choose the Settlement account.
- Read the preview line, for example "Cost 2,160.00 + charges 19.45 = 2,179.45", then Save.
On the settlement account a trade appears as two rows when there are charges: the cost or proceeds, which is a transfer-style row that does not count as an expense, and one charges row split by category (brokerage, transaction charges, stamp duty and taxes). These rows are locked. To change or delete a trade, do it from the share account's Trades tab and the bank rows follow.
The other entry types
- Sell: quantity, price and charges. The proceeds come into the settlement account.
- Dividend (shown as Distribution for ETFs): the gross amount and any tax withheld. The net amount is credited to the settlement account as income.
- Fee: an account fee, such as a custody or platform charge.
- Adjustment: changes the quantity without moving any money. Use it for a bonus issue, a share split, a merger or demerger, or to bring in shares you already held before you started using TurtleNest (an Opening holding). For ETFs the reasons are unit split, unit consolidation, fund merger and opening holding.
See your trades and holdings
The share account has three tabs: Valuation, Trades and Holdings.
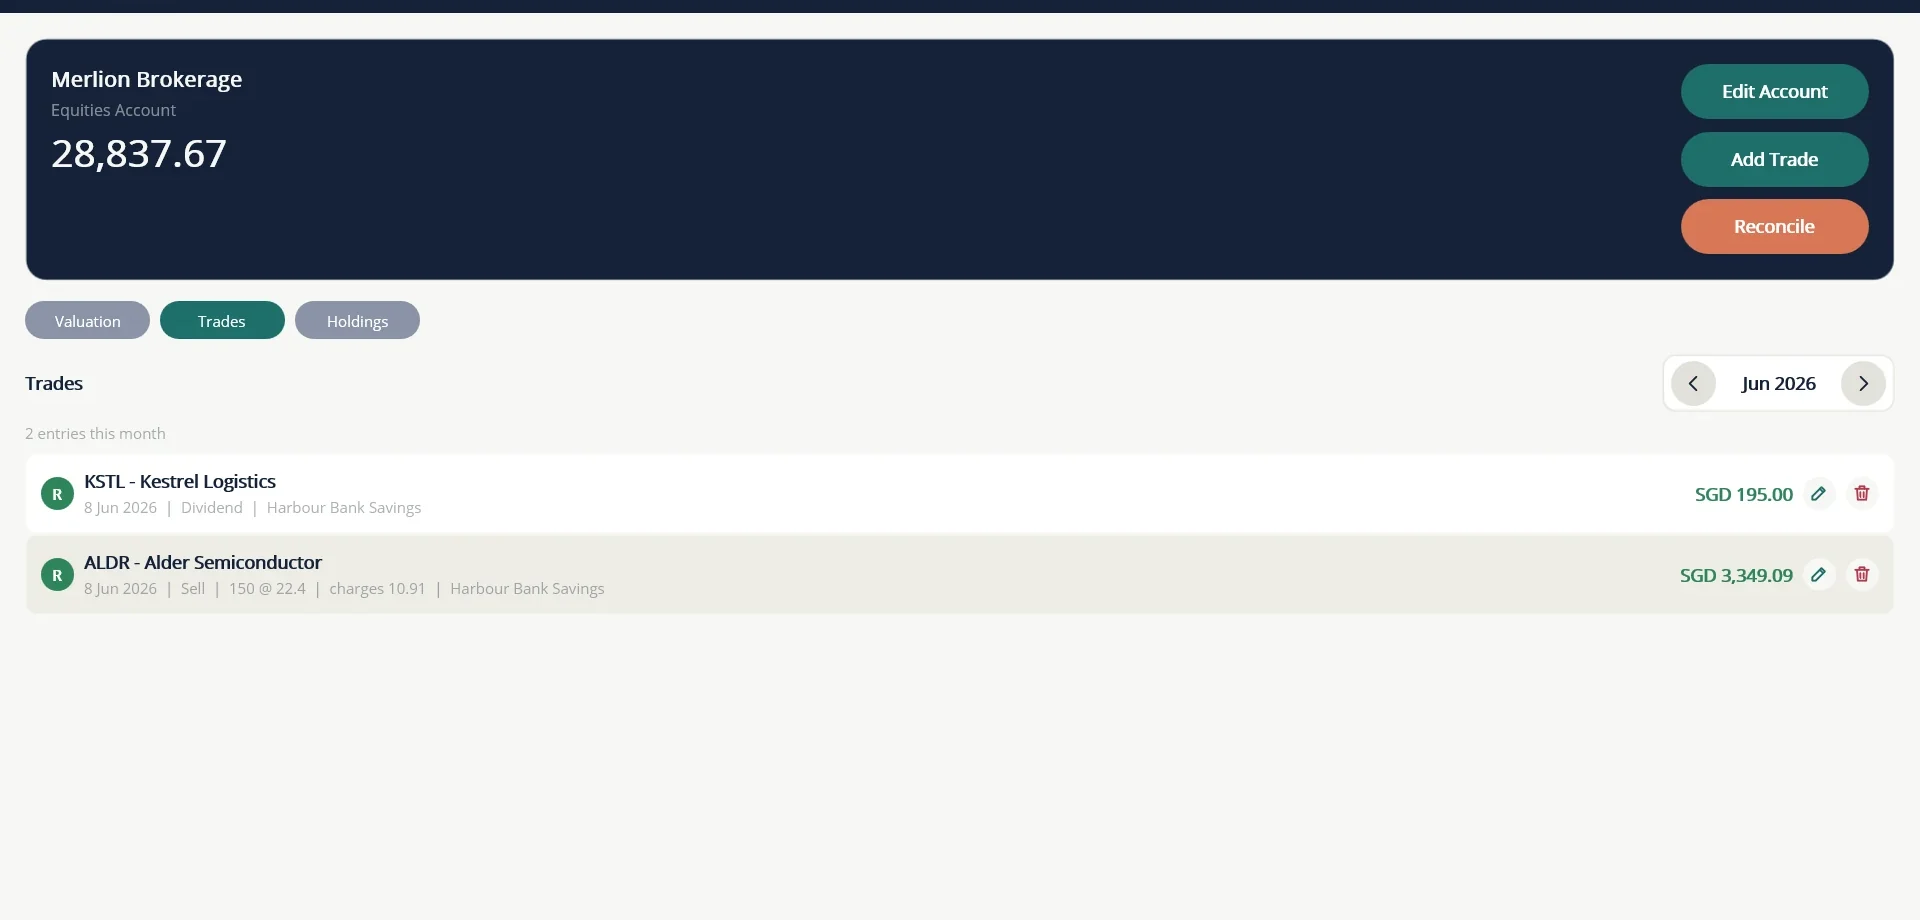
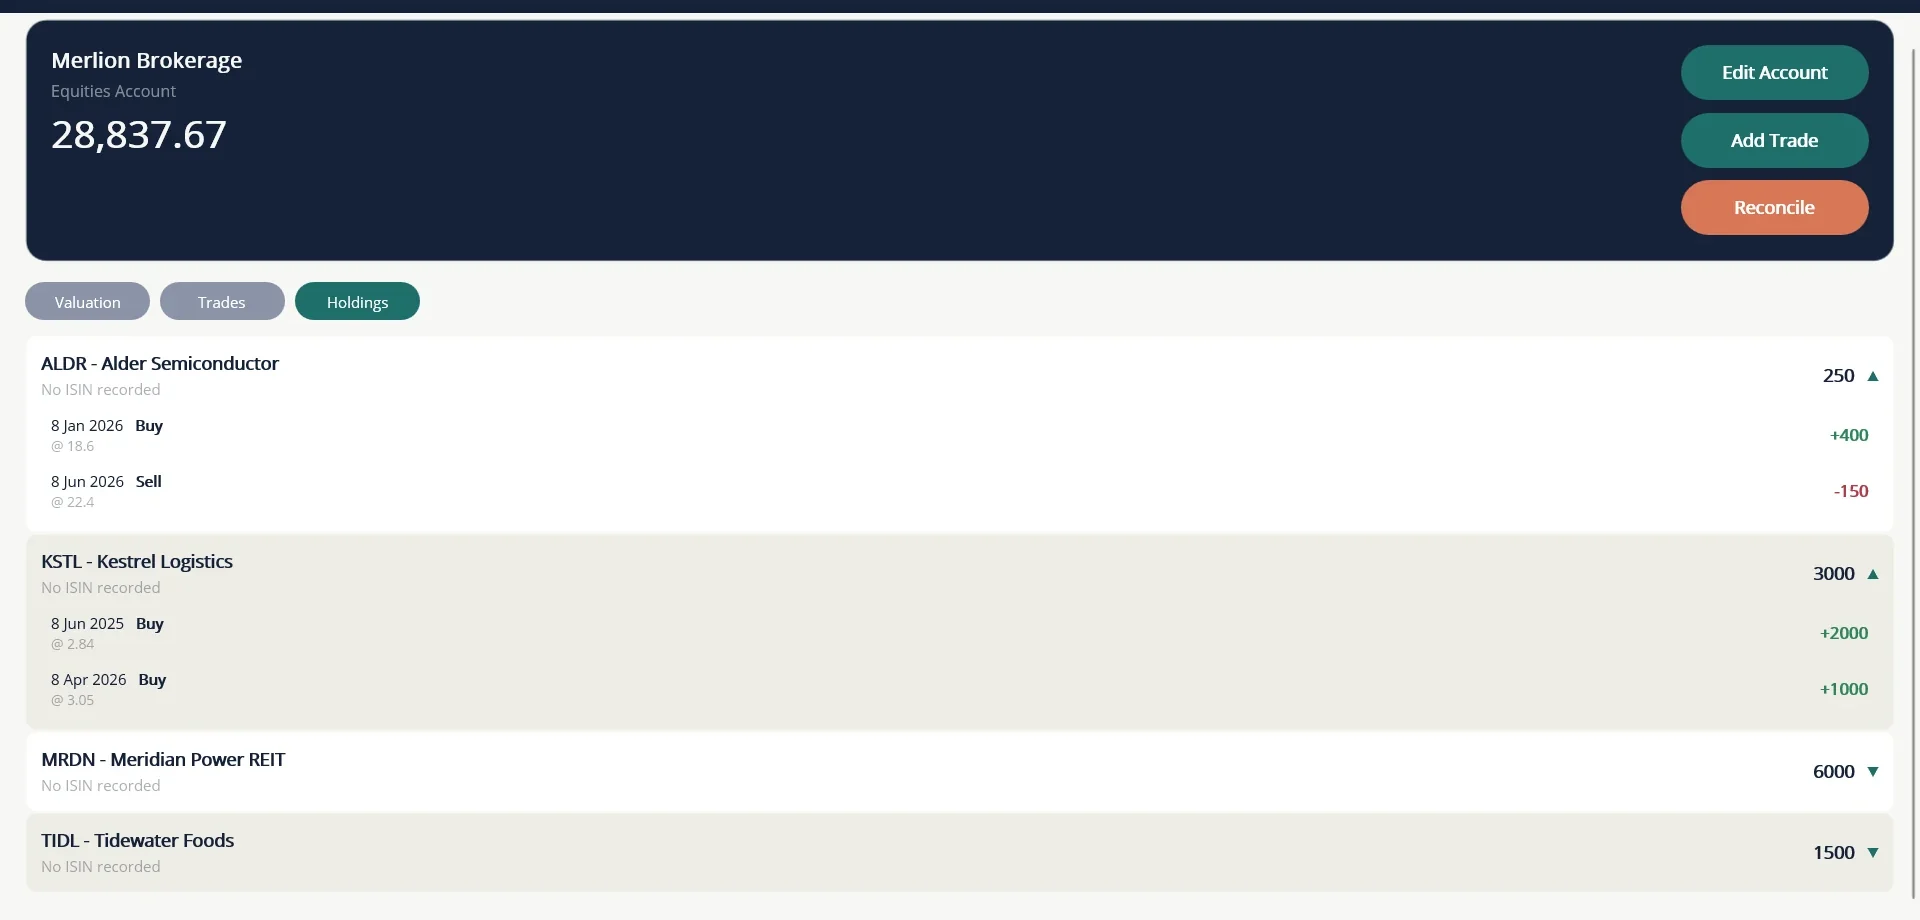
Holdings are quantities only. If a quantity is negative, a buy or an adjustment is probably missing. Tap a stock to see the buys and sells behind its quantity.
When the broker and bank use different currencies
Prices are in the share account's currency. If the settlement account uses another currency, a field appears for the amount that actually left or arrived in the settlement currency. TurtleNest pre-fills it from the stored exchange rates. Overwrite it with the figure on your bank statement, and the bank rows will match. Charges are entered in the settlement currency.
Check your Demat statement
If you hold shares in a Demat account, use Reconcile to check that your records agree with your broker's holding statement.
- On the share account choose Reconcile.
- Pick the Statement date.
- Type, beside each stock, the quantity your statement shows. Add any stock that is on the statement but not in your records.
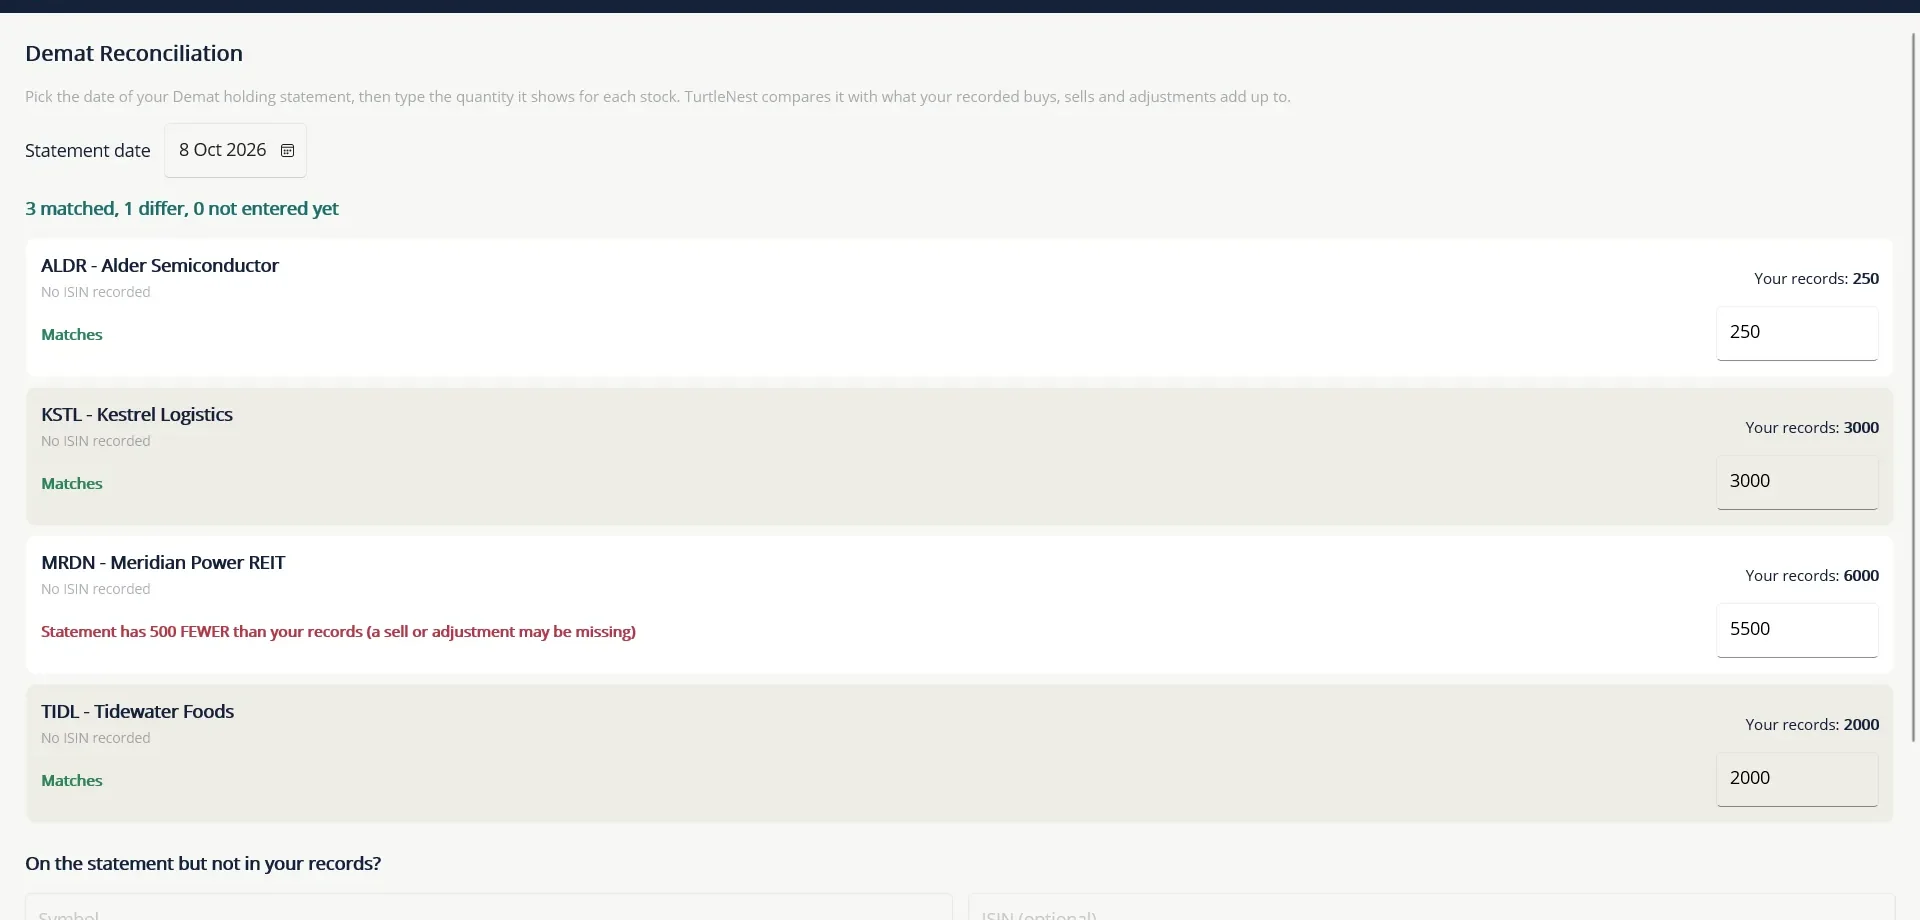
Stocks that match show Matches. When there is a difference, TurtleNest says by how much and hints at what to look for, such as a missing sell or adjustment. This is a quantity check only. It never changes your records or your marks.
18 Bonds
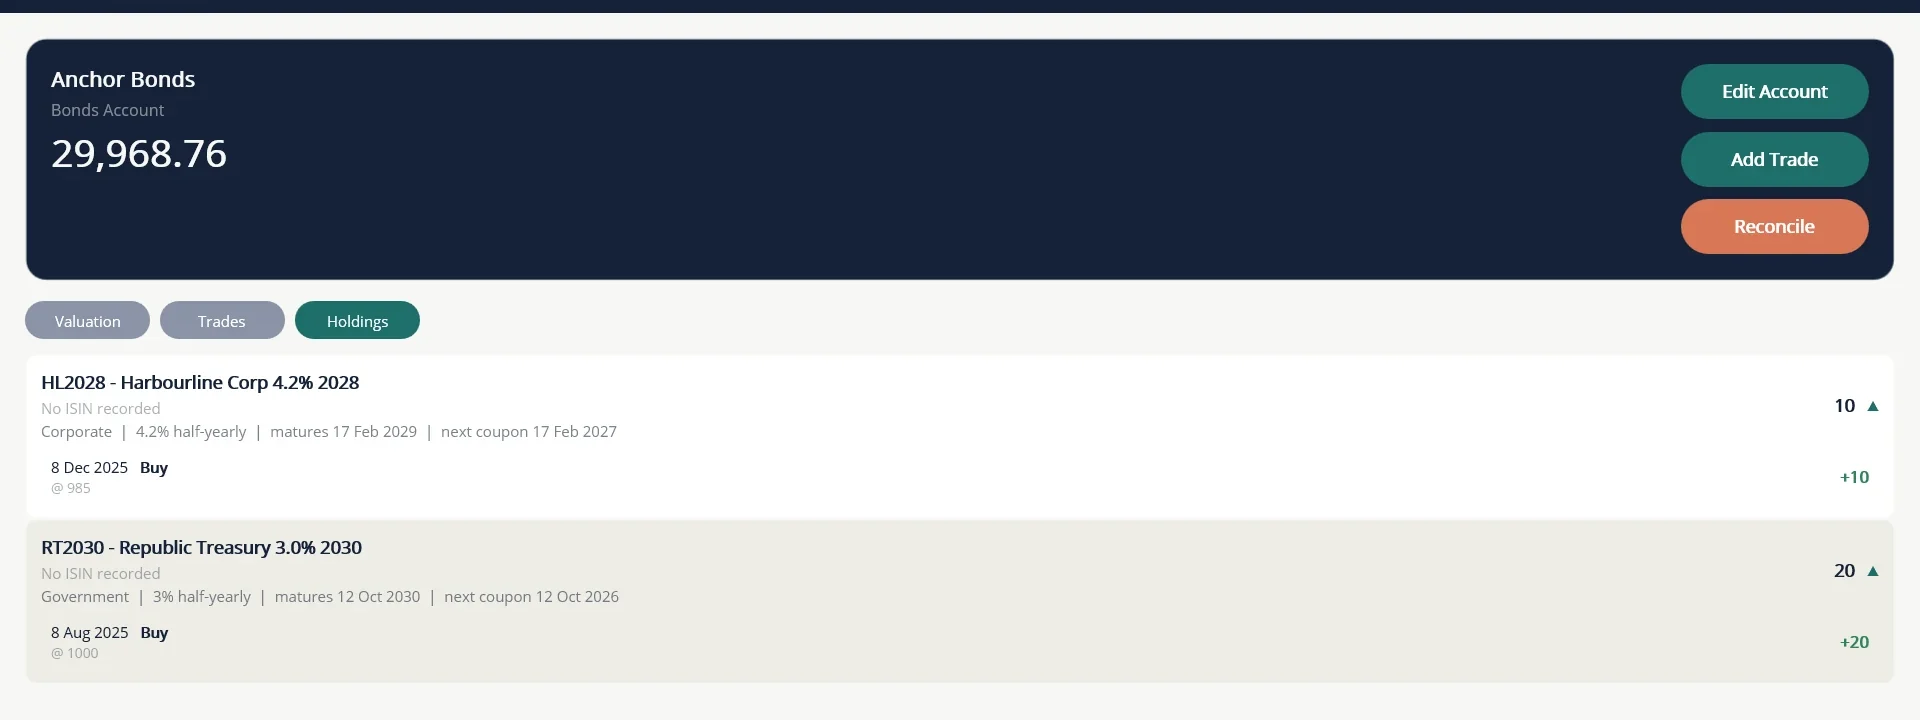
A Bonds Account works like a share account, but each bond also has a coupon, a maturity date and a face value. Use one account per broker or holder and put many bonds in it. It covers Demat-held bonds as well as bonds held outside Demat, such as savings bonds.
Record a bond purchase
- Open the bonds account and choose Add Trade, then Buy.
- Enter the bond's symbol and name, then its terms: bond type, face value per unit, coupon rate, how often the coupon is paid, the maturity date, and whether the rate is floating. Tick Held outside Demat if it is not in a Demat account.
- Enter the units, the price per unit and any charges.
- If you bought on the secondary market, enter the Accrued interest you paid in its own field. Do not add it to the price.
- Choose the settlement account and Save. The terms are remembered for the next entry on that bond.
Coupons, redemption and rate changes
- Coupon: record interest as it arrives. The form suggests units x face value x rate, but always replace it with the amount actually received. Interest is credited to the settlement account.
- Redemption: record the maturity, call or early redemption, with the price per unit and any interest part. For a discount bond, type the discount gain in the interest field.
- Rate change: records a new coupon rate from a date, with no cash. Use it for floating-rate bonds.
- Sell, Fee and Adjustment work as for shares.
TurtleNest reminds you of the next coupon or maturity in the Planner and on the Dashboard, but never posts it for you. The Holdings tab shows a red note when a bond has passed its maturity date but is still held, as a reminder to record the redemption.
19 Mutual funds and valuation entries
Some accounts, such as a mutual fund, have no day-to-day transactions to enter. You note down their value now and then, and TurtleNest charts it. This is also how your share and ETF accounts get the market value that feeds net worth.
Add a valuation entry
- Open the account and stay on the Valuation tab.
- Choose + Add beside History. The entry form opens. The button turns into ^ while the form is open, and tapping it closes the form.
- Type the Balance, which is the account's value on that date, and pick the date.
- For a mutual fund you can switch on Use Units / NAV and enter your units and the NAV instead. TurtleNest works out the balance.
- For other accounts, choose the Period the entry covers (day, week, month or year).
- Choose Save.
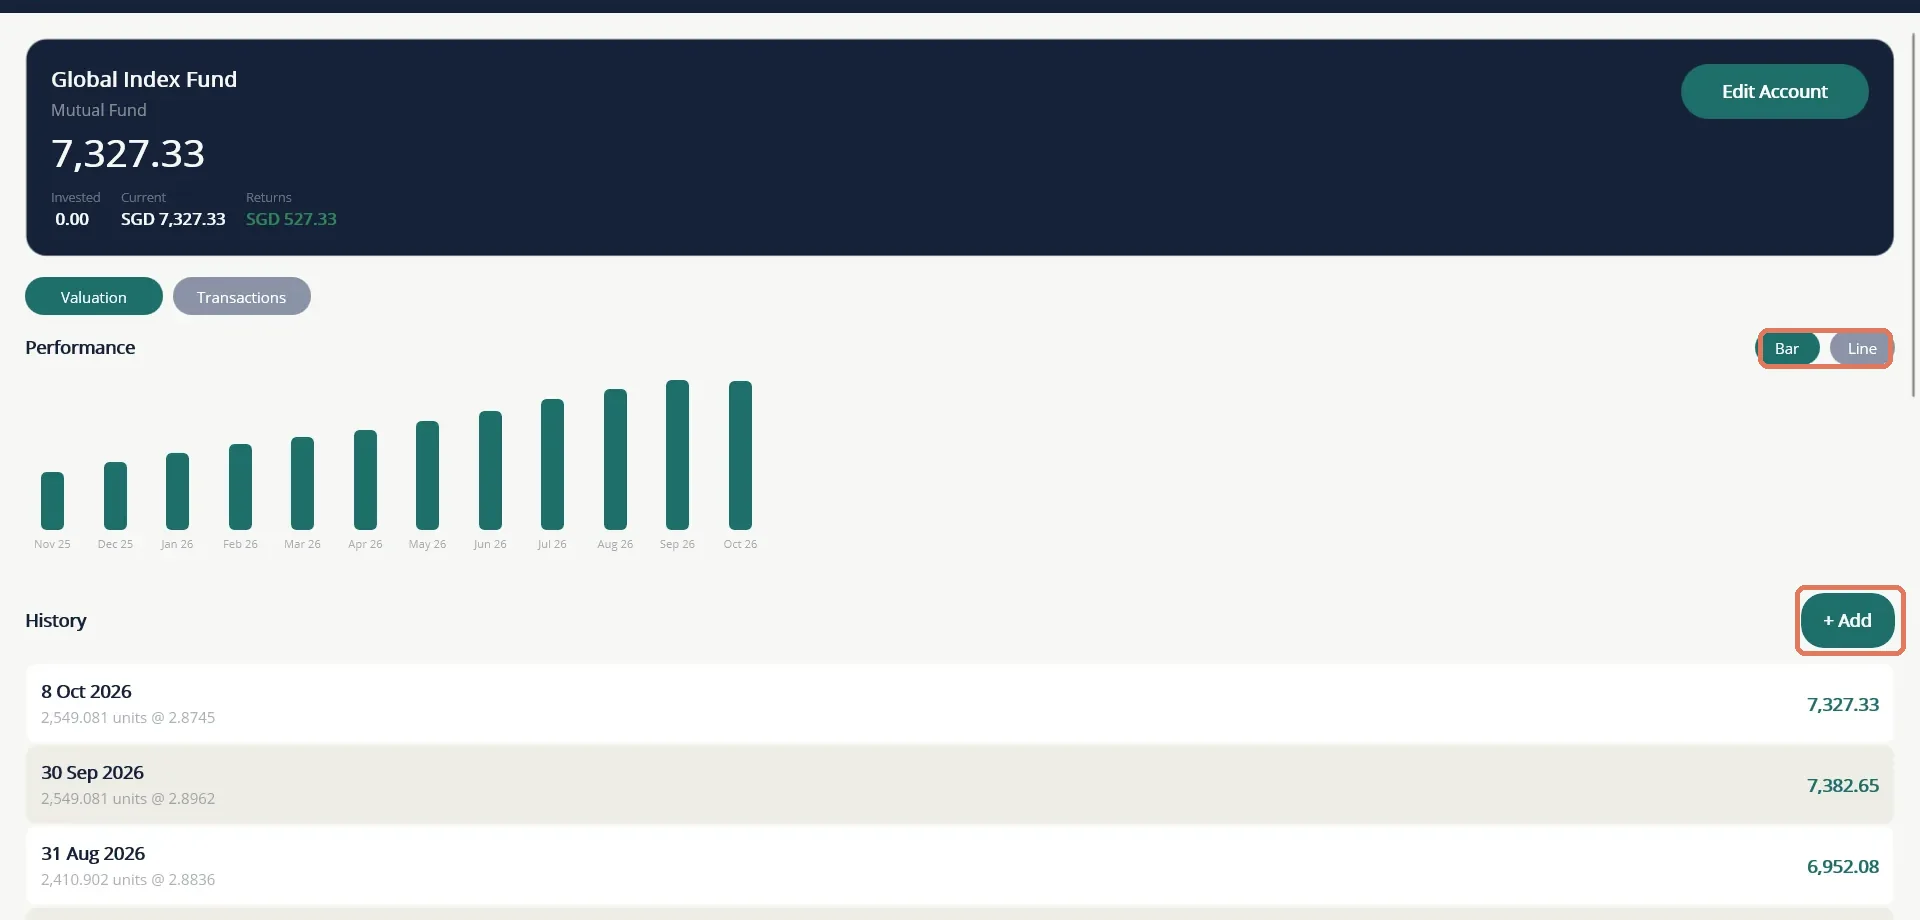
A mutual fund's header shows Invested, Current and Returns. A second tab, Transactions, lists deposits and withdrawals made as transfers to or from the fund.
20 CFD trading
A CFD Account records the money you put into a trading account and what it earns or loses. It works like a bank account for money in and out, and you add the outcome of your trading as trade results. TurtleNest does not record each open position or price. It records results, which can be a single trade, a day or a whole month.
Put money in and take money out
Move money to and from the CFD account with a transfer, from the account's Add Transaction screen and its Transfer tab. A transfer is not a profit or a loss, so your deposits and withdrawals never distort the results. See Move money between accounts.
Record a trade result
- Open the CFD account and choose Add Transaction. The first tab is Trade Result.
- Type the Result (P&L, +/-): a positive number for a profit and a negative number for a loss.
- If you want to keep them, enter the Swap and Commission. Type a charge as a negative number. TurtleNest adds the swap and commission to the result, so the balance moves by the total of the three.
- Check the date, add a Note if you wish, and choose Save.
Each result appears in the account as Trade Result — Profit, Trade Result — Loss or Trade Result — Breakeven. Tap the pencil beside a result to change it.
Import your trade history from MetaTrader
If you trade on MetaTrader 4 or 5, you can bring closed trades in from the history file written by the P&L Calendar, instead of typing each result. The P&L Calendar blog explains how to download the history as a CSV file.
- Save the CSV file somewhere on your computer.
- Open the CFD account with Edit Account and type the file's location in Linked File Path, for example
C:\Broker\MT5\statement.csv. Save. - On the Accounts list, choose Import CSV on that account's row. This button appears only for a CFD account that is open and has a file path.
- Read the message that appears above the list. It says how many trades were new, how many were ignored as duplicates and how many rows could not be read.
See how you are doing
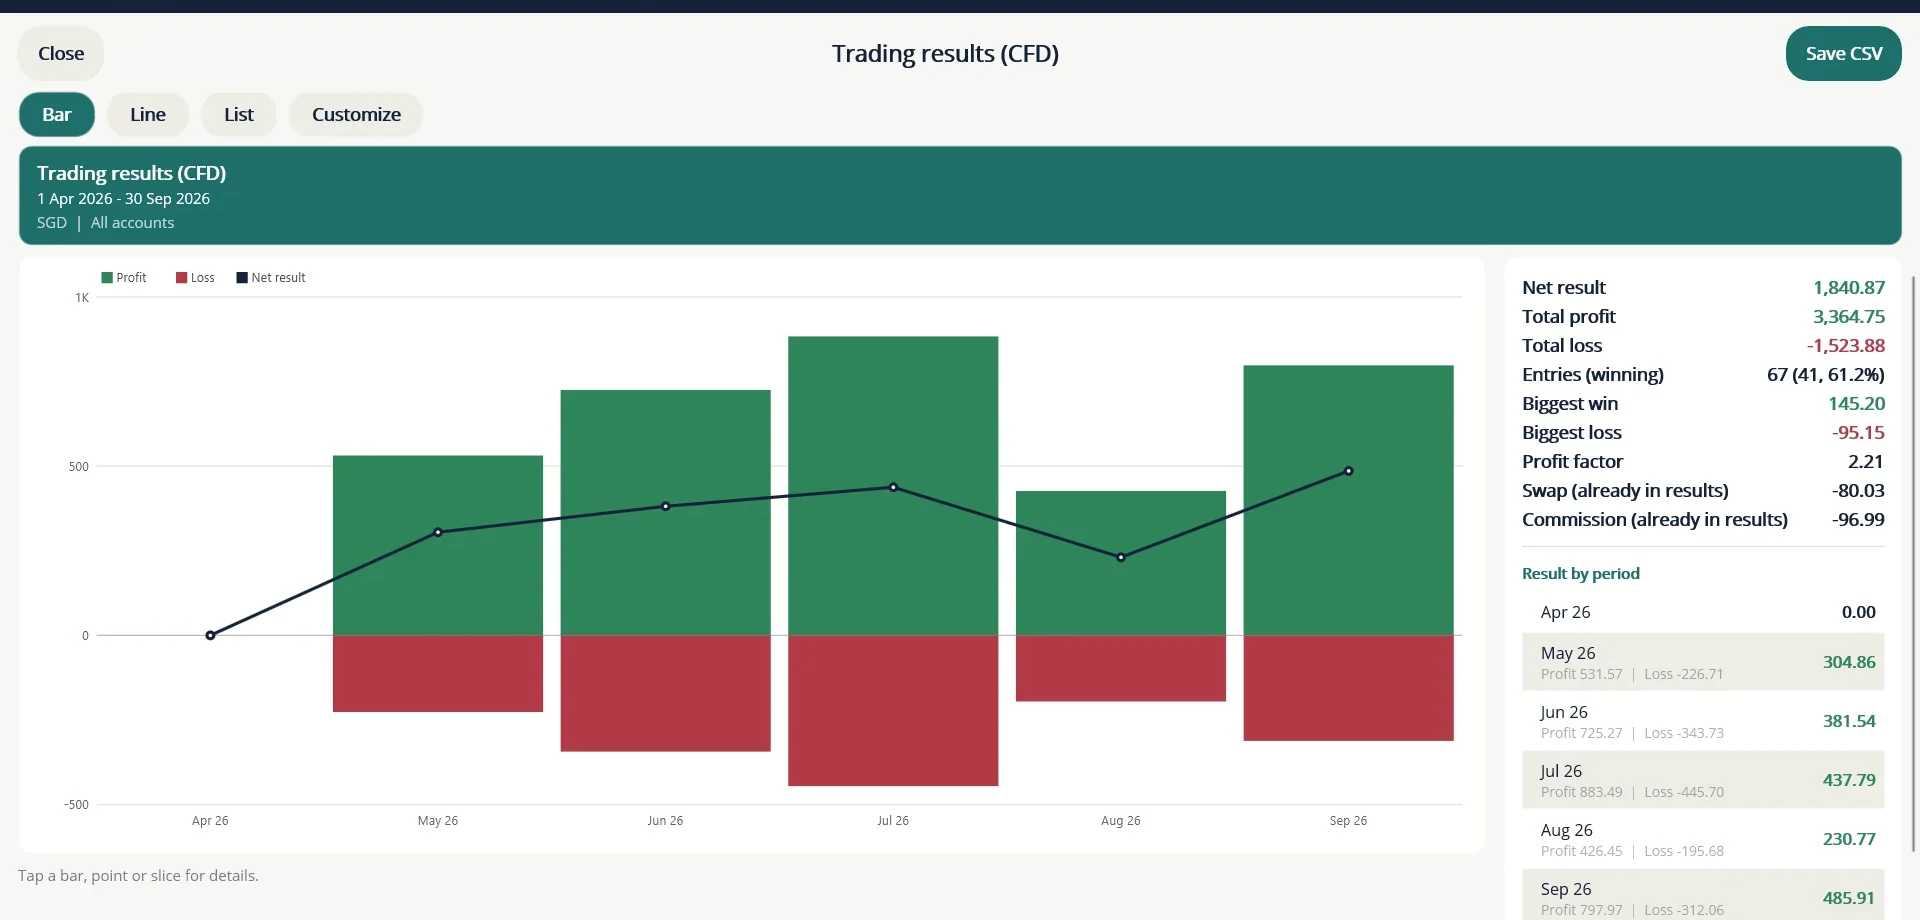
Open More..., then Reports, then Trading results (CFD). The bars show profit above the line and loss below it, and the line is the net result for each period. On the right you see the net result, total profit and loss, how many entries won, the biggest win and loss, the profit factor, and the swap and commission already counted in your results. Customize changes the period, the grouping (day, week, month, quarter, year) and which accounts to include.
Because results can be entered as monthly totals, the win count is per entry, not per trade. TurtleNest shows what you recorded. It is not a trading journal and it does not judge your trades.
21 Retirement accounts
A Retirement Account is for money that is set aside for retirement and cannot be spent freely: Singapore's CPF, Malaysia's EPF, a 401(k), or a similar scheme. It counts in your net worth, but the Dashboard shows it on its own Retirement line so you do not mistake it for money you can use. Use one account for each pot of money your scheme keeps separately.
Example: Singapore CPF
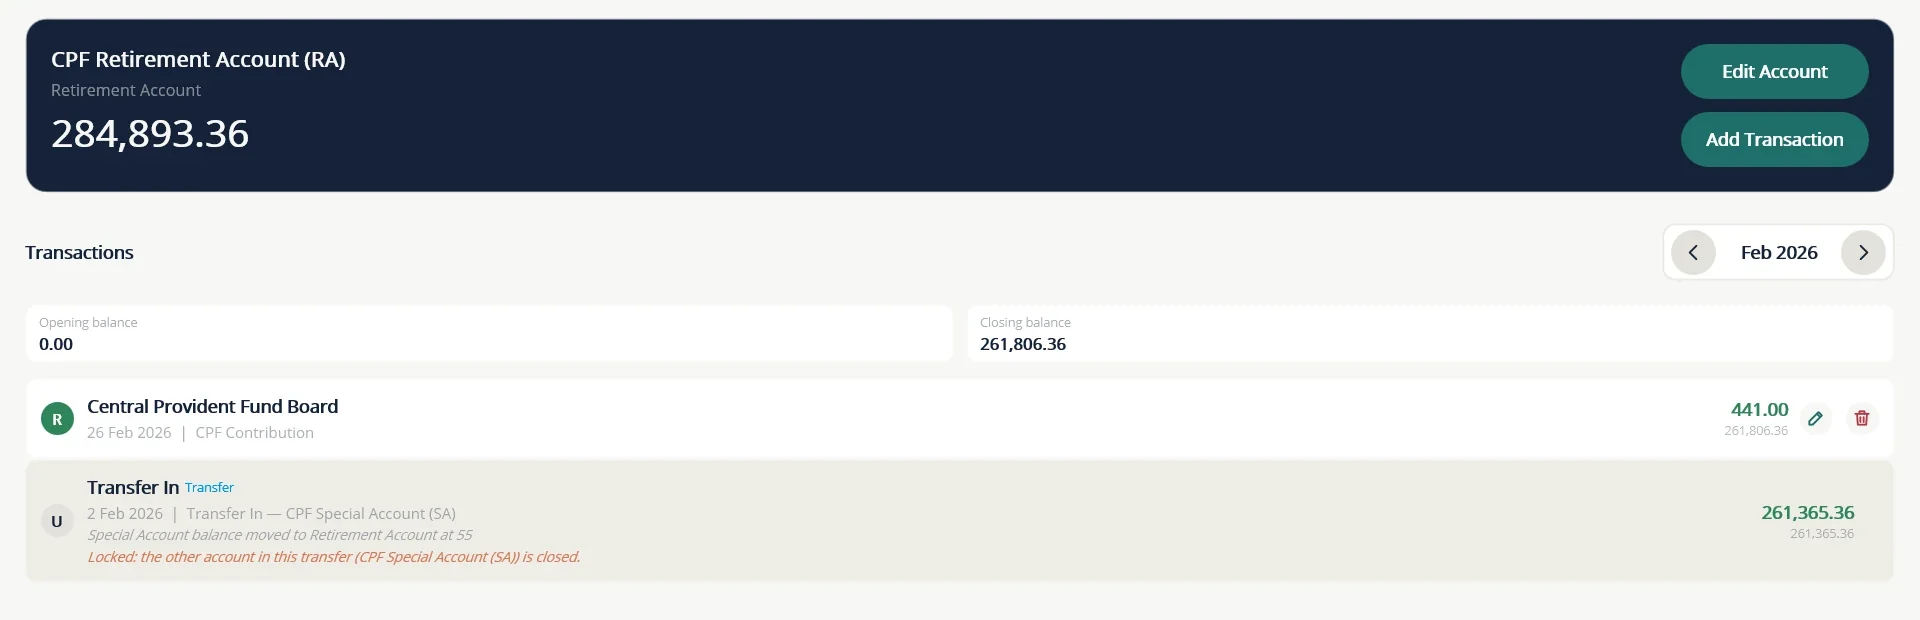
CPF keeps up to four balances: the Ordinary Account (OA), the Special Account (SA), the MediSave Account (MA) and, from age 55, the Retirement Account (RA). Which of these you hold depends on your age. At 55, the balance in your Special Account moves to your Retirement Account, and the Special Account is left empty. TurtleNest follows the same pattern: one Retirement Account in TurtleNest for each CPF account you hold, named as you like, for example CPF Ordinary Account (OA). The examples in this chapter use made-up balances.
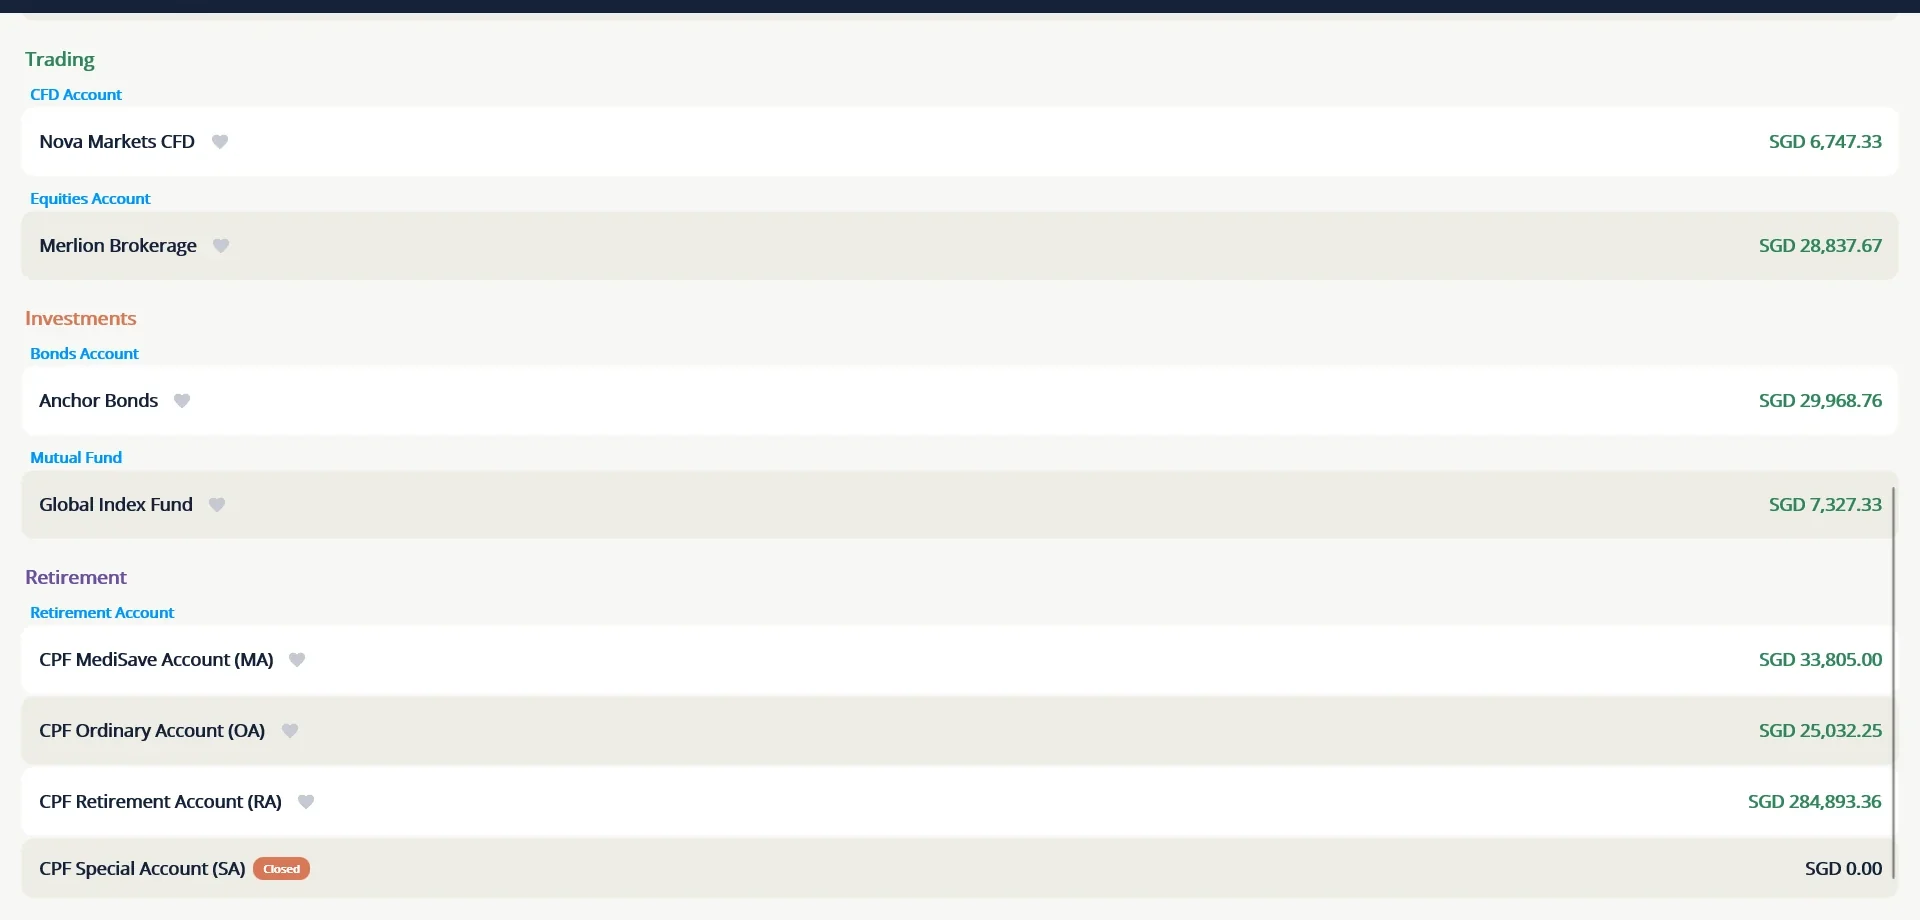
Add a retirement account
- If Retirement Account is not in the Add Account list, switch it on under More..., then Settings, then Account types.
- Choose + Add on the Accounts tab and set Account Type to Retirement Account.
- Name the account, choose its currency and enter the balance it has on the day you start tracking it as the Opening Balance.
- Choose Save. Repeat for each balance you hold.
Record what happens
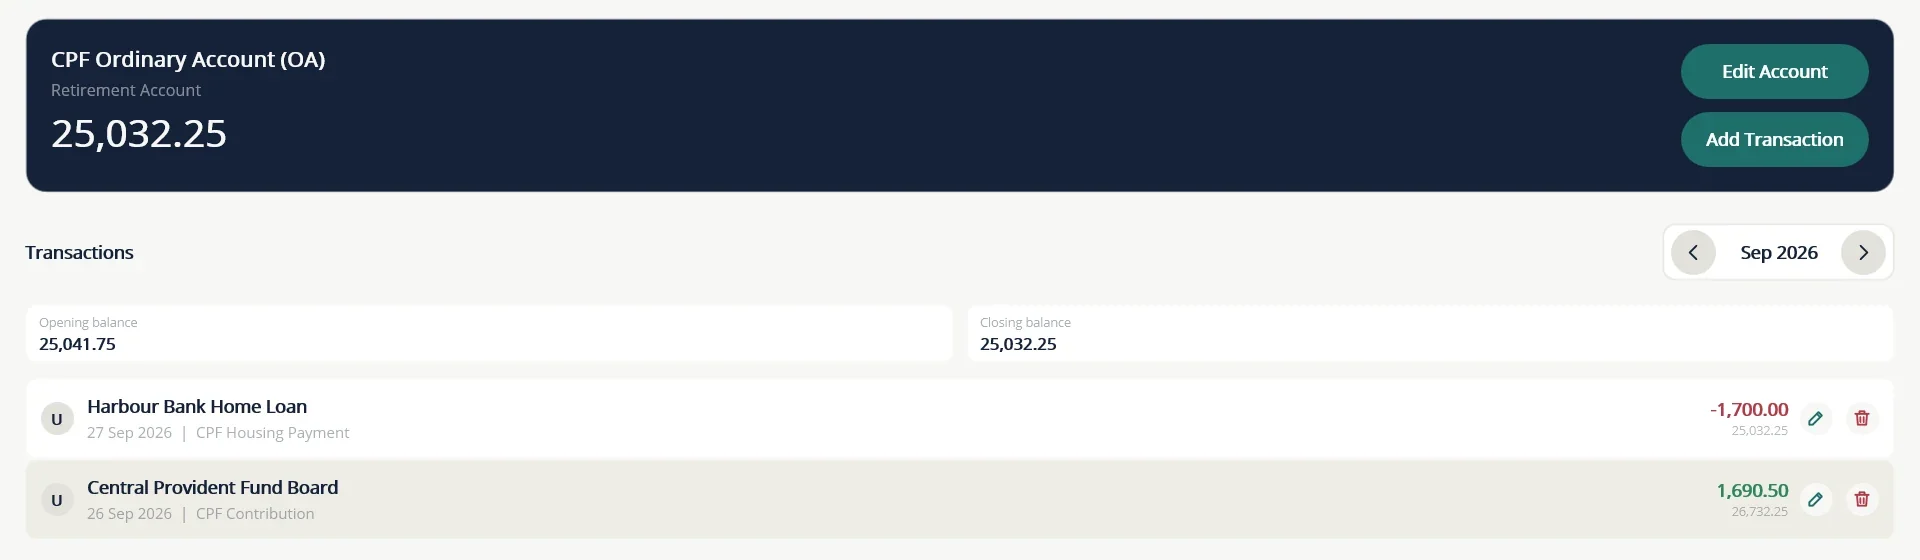
Treat the account like a bank account. Open it, choose Add Transaction, and record each movement as an ordinary income or expense. Give each kind its own category so the report can tell them apart. For example:
- Contributions from you and your employer are income. Use a category such as CPF Contribution.
- Interest is income. CPF works out interest every month but credits it once a year, at the end of December, so enter it on that date, under a category such as CPF Interest.
- Housing payments taken from your Ordinary Account and insurance premiums paid from MediSave are expenses, each with a category of its own.
Moves between accounts
Use a Transfer when money moves from one of your accounts to another, because a transfer is not income or expense. A cash top-up from your bank into the Retirement Account is a transfer. So is the move from the Special Account to the Retirement Account at 55: transfer the whole balance, then open the Special Account with Edit Account, switch on Account is closed and save. A closed account stays in your history and is hidden from the list unless you switch on Show closed.
The Retirement report
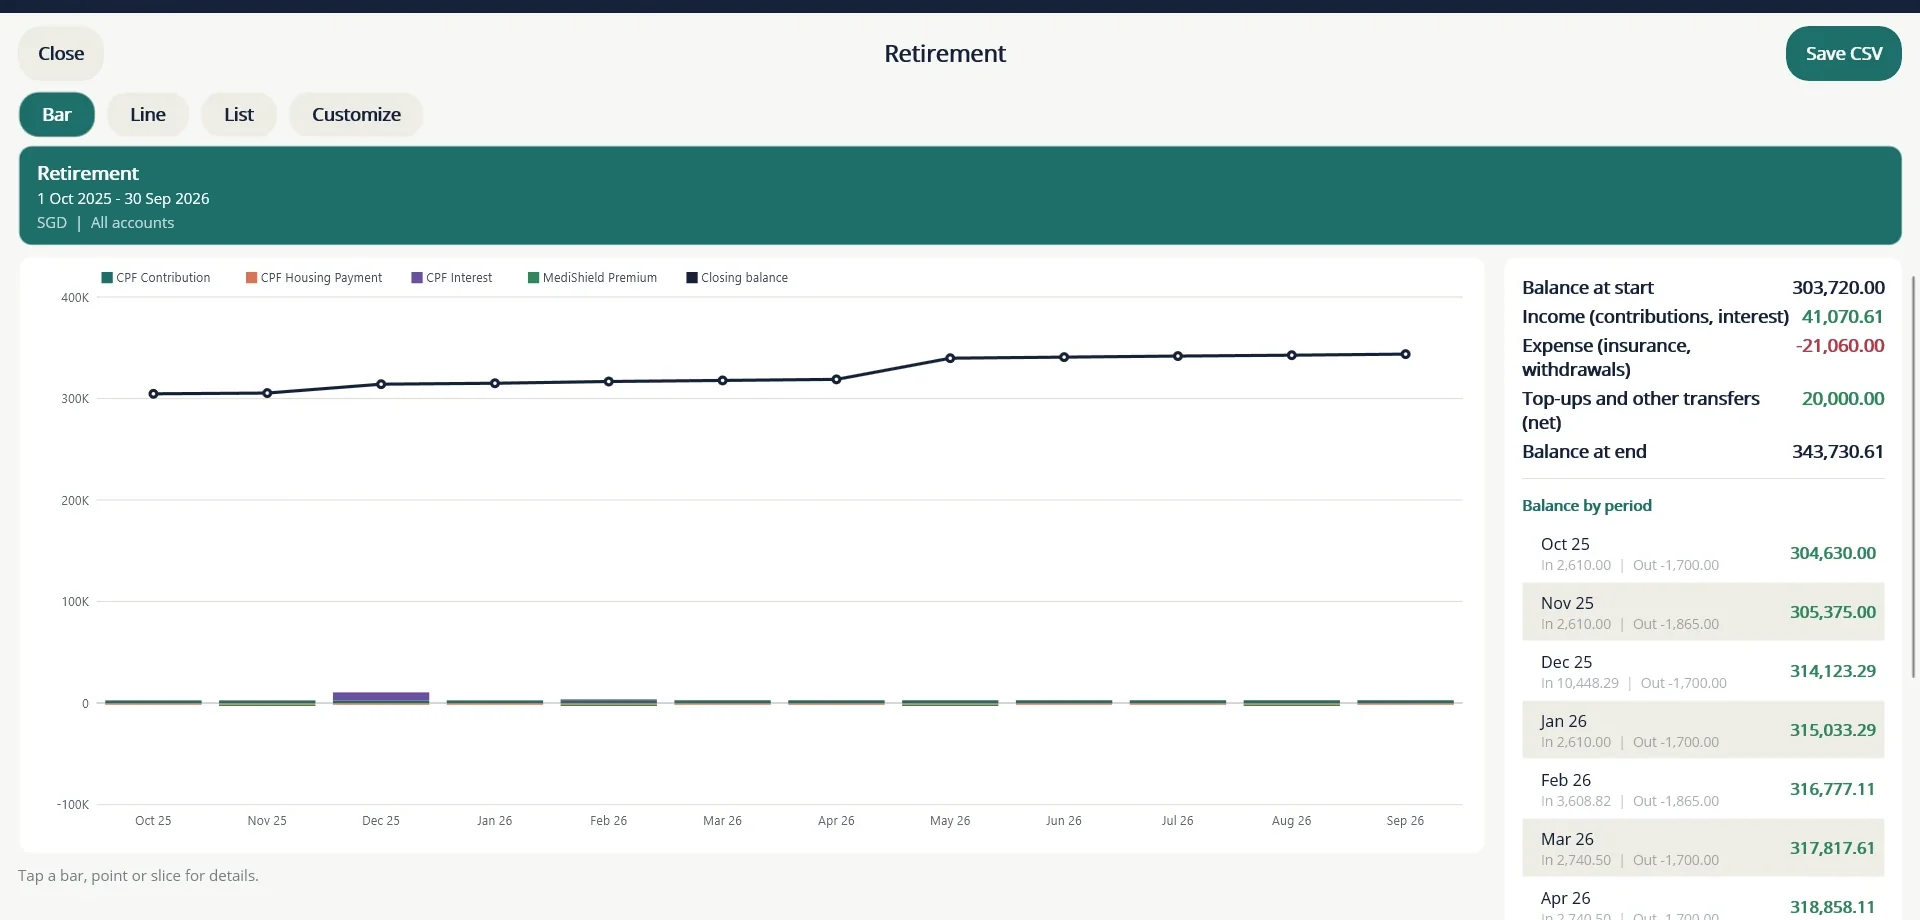
Open More..., then Reports, then Retirement. The bars show what came in (contributions and interest) above the line and what went out (housing payments and insurance) below it, one colour for each category. The list on the right shows the balance at the end of each period. Moves between your own accounts are not bars. They appear in the summary as Top-ups and other transfers (net).
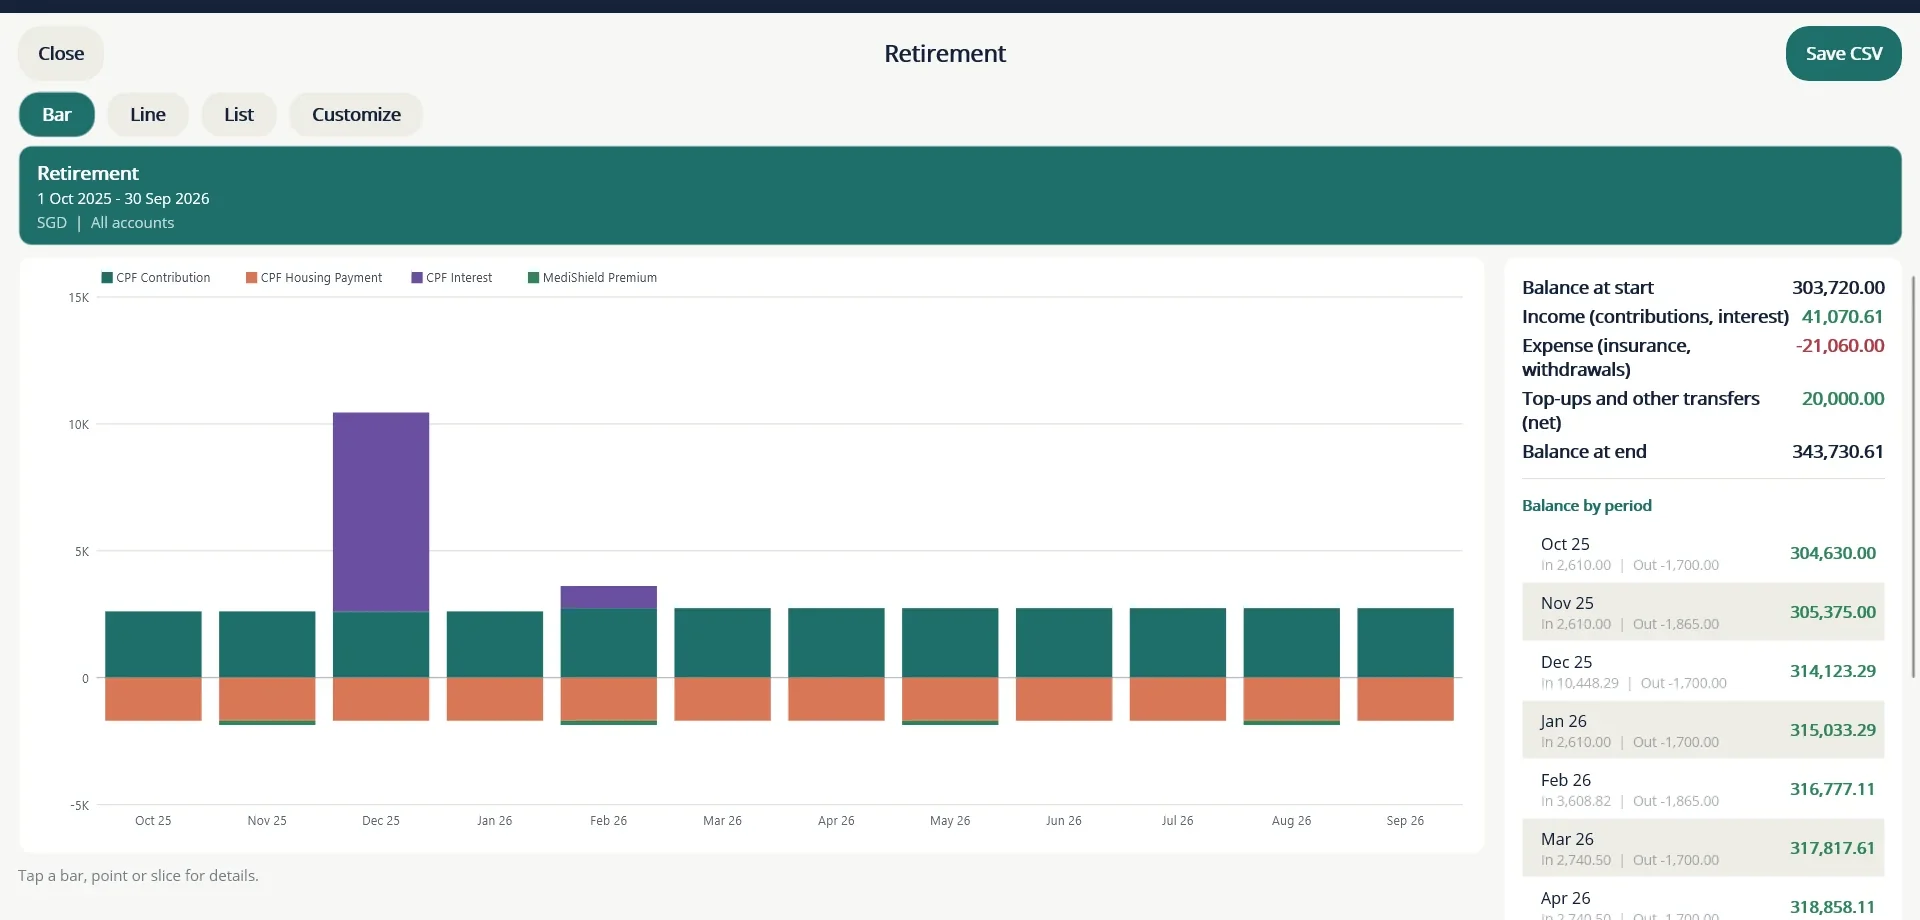
Your balance is far larger than a month's contributions, so a balance line drawn on the same scale flattens the bars. For that reason the line is off by default. Open Customize and switch on Show closing balance line to see how the balance grows.
22 Fixed deposits
A Fixed Deposit keeps the terms of the deposit on the account and builds a schedule of the interest you should receive. It is always tied to a Linked Bank Account, which is where the interest and the principal are paid.
Set up a deposit
- Add an account of type Fixed Deposit and choose the Linked Bank Account.
- Enter the Deposited Amount, the Rate of Interest, the Start / Deposit Date and the Maturity Date.
- Choose the Payout Frequency: Monthly, Quarterly, Half-yearly, Annually or On Maturity.
- If tax is deducted at source, enter the TDS Rate. Use the rate on your bank's TDS certificate or statement.
- Choose Generate Schedule, then Save.
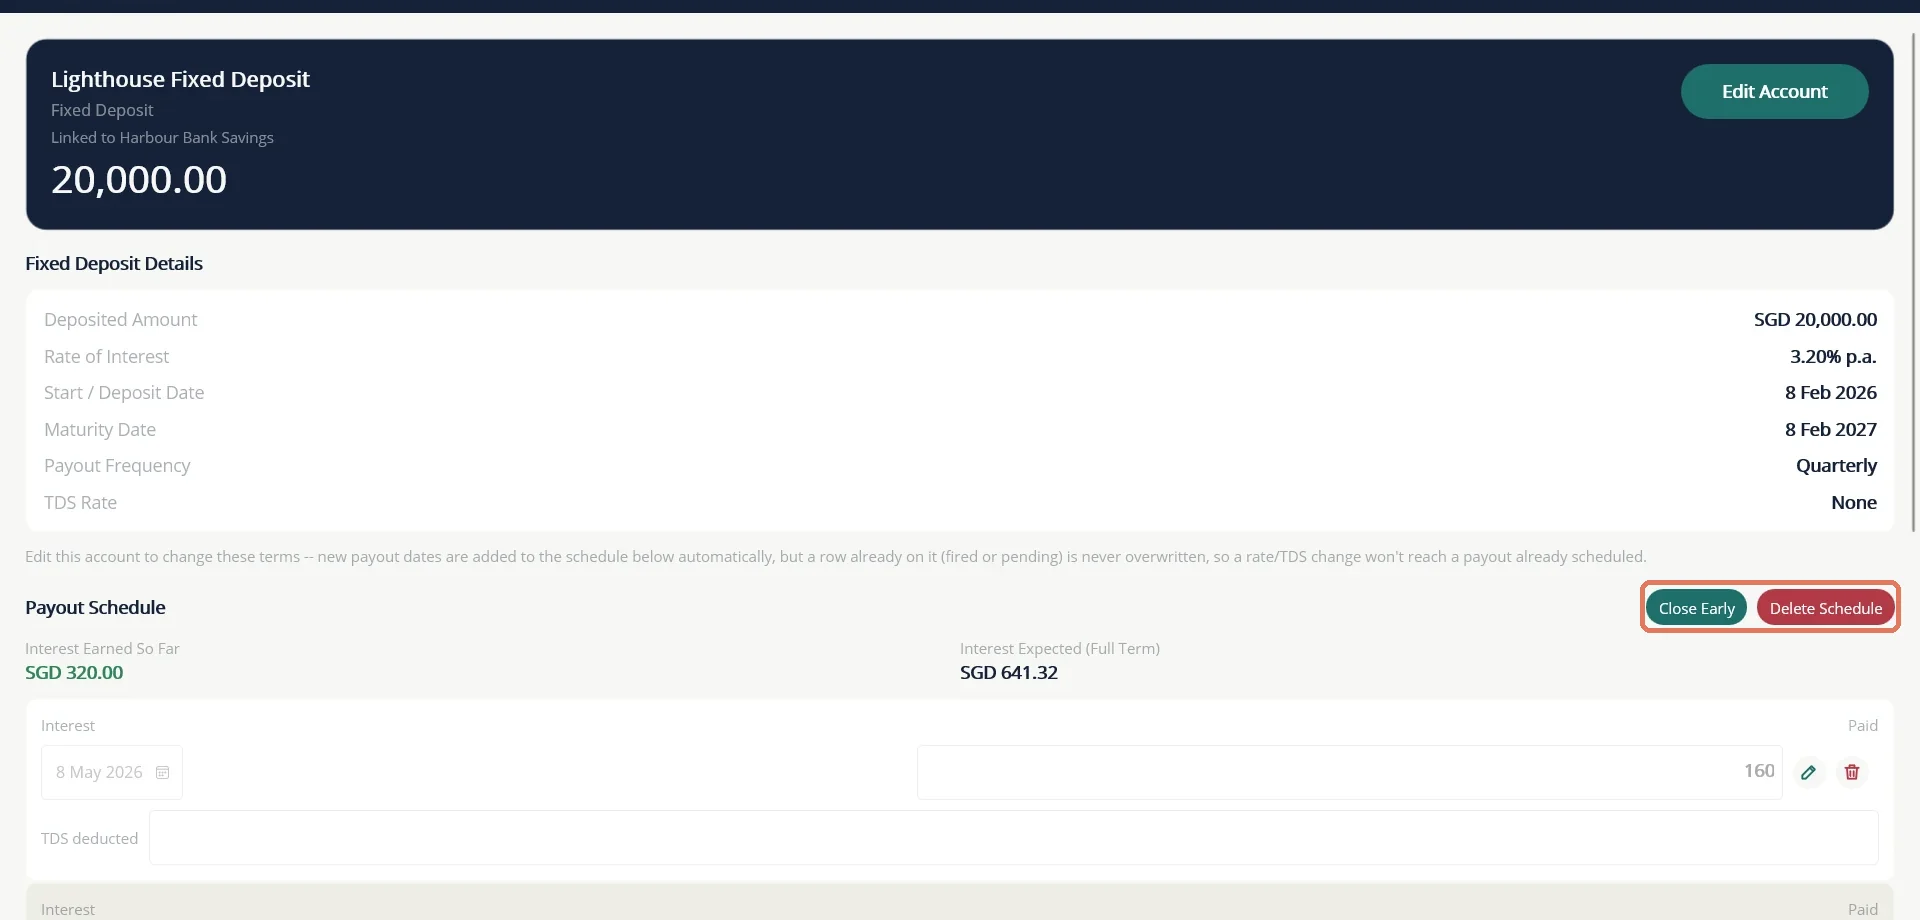
The schedule has one row for each interest payout, after tax, and a final Principal row at maturity. TurtleNest never posts these rows by itself. When the bank pays, open the row and:
- change the date, amount or TDS deducted with the pencil if the bank's figures differ, and save with the tick;
- choose the row's Transfer button to post it. Interest is credited to the linked bank account as interest income, and the principal comes back as a transfer, not as income, which brings the deposit to zero.
Close a deposit early
Choose Close Early on the schedule heading, and enter the closure date, the principal returned, the gross interest the bank paid (after any penalty rate) and the TDS deducted. Pending rows are removed, the interest and principal are posted, and the deposit is marked closed. Deleting the closing principal row reopens it.
Renewals
A renewed deposit is a new deposit, because it usually has a new rate and number. Add it as a new Fixed Deposit account. If the interest was reinvested, record it as the new deposit's amount.
Fixed deposit payouts and maturities appear as Dashboard alerts and in the Cash flow forecast and Fixed deposit maturities reports. They do not appear in the Planner.
Loans and IOUs
23 Loans
A Loan account is for a bank or institutional loan, such as a car loan, a home loan or a gold loan. It records what you borrowed and each payment, and splits every payment into principal and interest so your reports are right. The lender's statement remains the source of truth, so you can always replace TurtleNest's suggested figures with the lender's.
TurtleNest handles EMI loans (reducing balance, flat rate or interest-free) and interest-only loans, such as a loan against shares or gold. Money you owe an individual belongs in a Payable account instead.
Set up a loan
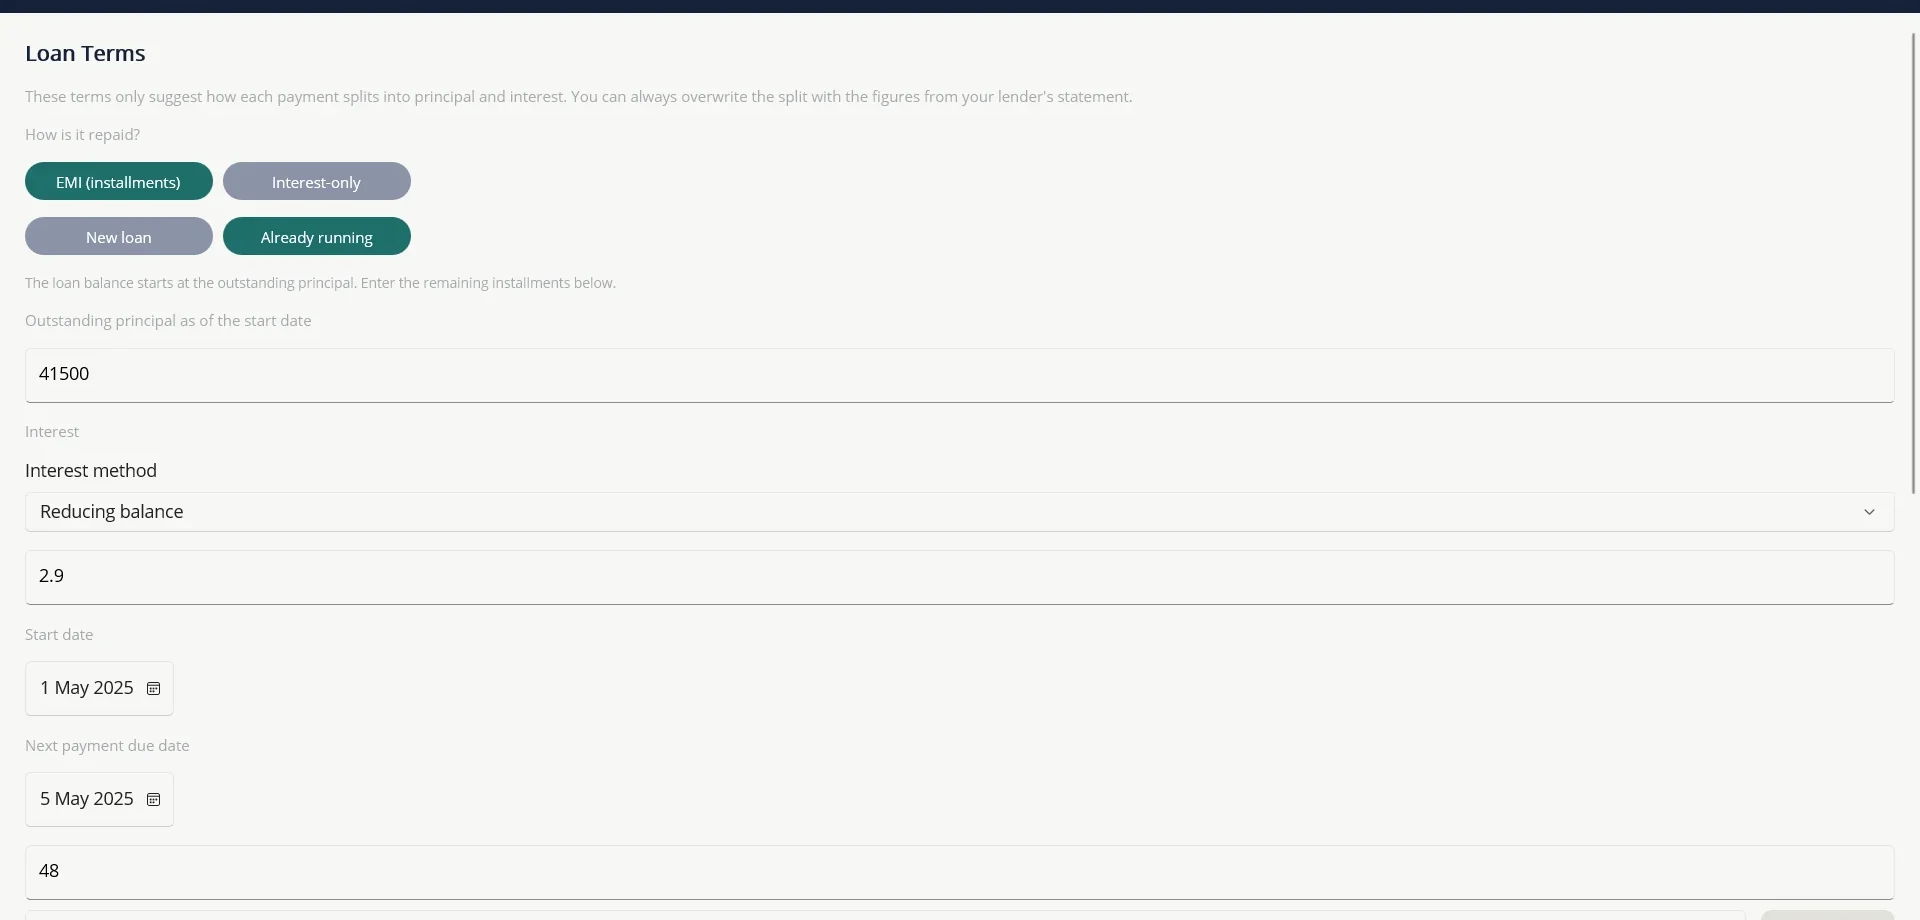
- Add an account of type Loan and choose Save. The Loan Terms screen opens next.
- Choose how the loan is repaid: EMI (instalments) or Interest-only.
- Choose Already running if you took the loan before using TurtleNest, or New loan if you are recording it from the start. A new loan begins at zero and is funded by a Disbursement payment.
- Enter the outstanding principal, the interest method, the rate, the start date, the first payment due date and the number of instalments.
- Save. TurtleNest calculates the EMI and builds the schedule.
If the rate changes later, add a rate change with its effective date and choose either to keep the EMI (the loan ends sooner or later) or to keep the tenure (a new EMI is calculated).
Record a payment
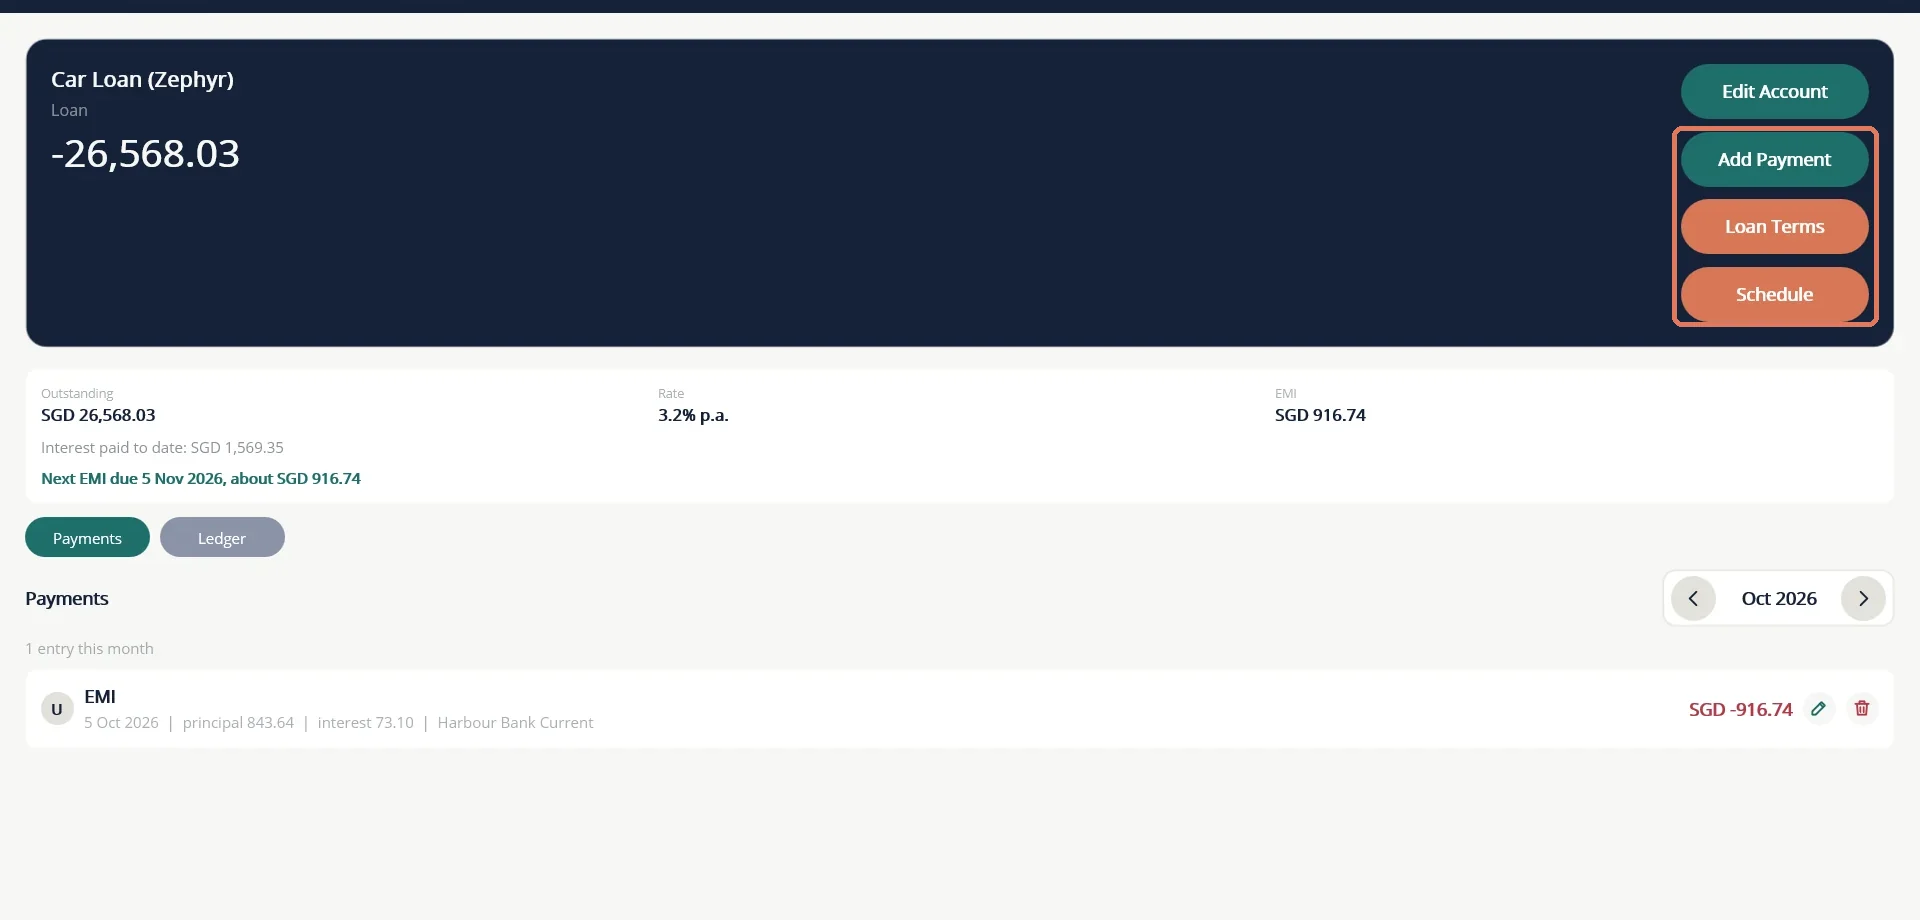
- Open the loan and choose Add Payment.
- Choose the kind: Disbursement, EMI, Interest, Prepayment or Fee.
- The principal and interest boxes are pre-filled from the schedule. Change them to match your lender's statement, and add any charges.
- Choose the account the payment is made from. It must use the same currency as the loan.
- Save. The principal posts as a transfer from your account to the loan, and the interest and fees as one expense split by category.
A Prepayment is principal only, with an optional penalty. You choose whether it shortens the loan (keeping the EMI) or lowers the EMI. Each payment has its own U / C / R badge for ticking off against your statement.
The schedule
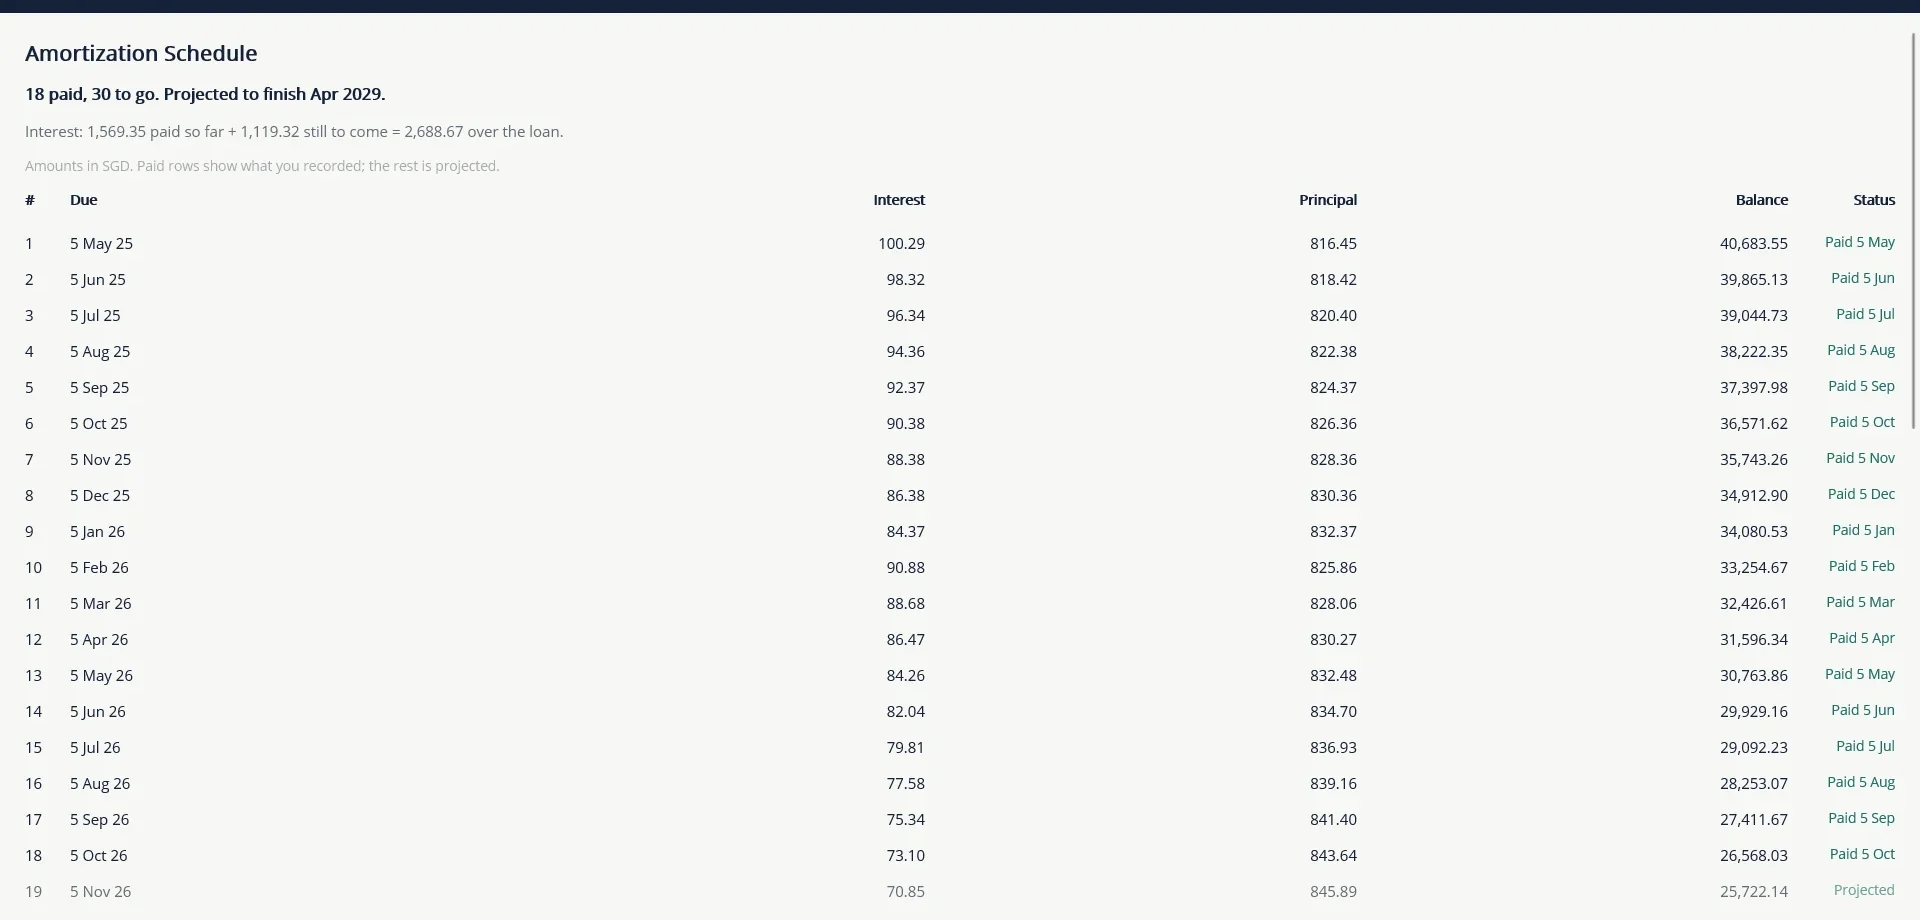
Choose Schedule to see the full amortisation schedule: the due date, interest, principal and balance for every instalment. Paid instalments show the actual figures you recorded, and instalments still to come are shown faded as a projection. The summary above the table shows how many instalments are paid and left, the projected finish month and the interest paid so far and still to come.
24 Credit cards, receivables and payables
Credit cards
A Credit Card account works like a bank account, except that purchases push the balance further below zero. Record each purchase as a negative amount and each payment you make to the card as a transfer from your bank account. The card's negative balance appears under Liabilities on the Dashboard.
Receivable: money owed to you
Create one Receivable account for each person or situation where you have lent money. Lending and repayment are ordinary transfers, so they stay out of income and expense. If you decide the money will never come back, record a write-off as an expense directly on the Receivable account, which books it as a real loss.
Payable: money you owe
The mirror image. Create one Payable account for each person you owe, and use transfers for borrowing and repayment. If the person forgives the debt, record that as a Personal Transfer received on the Payable account, a gift, rather than as income.
Payables and receivables are informal and unscheduled. For a bank loan with instalments and interest, use a Loan account.
Reports
25 Reports
Reports turn your records into charts and tables. Open More... then Reports and pick one from the list. The reports are grouped by what they answer.
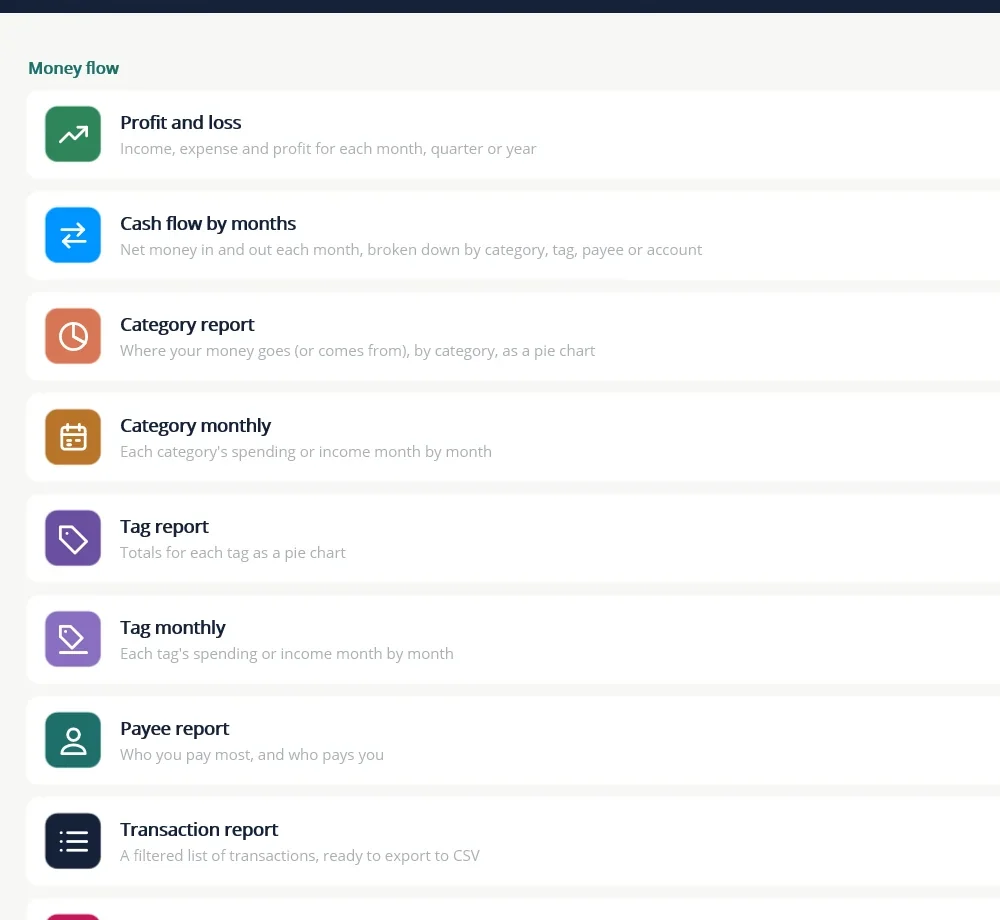
| Group | Reports |
|---|---|
| Money flow | Profit and loss, Cash flow by months, Category report, Category monthly, Tag report, Tag monthly, Payee report and Transaction report (a filtered list you can save as CSV). |
| Budget | Budget report: budget against actual spending by month, quarter or year. |
| Net worth and balances | Net worth, Account balance, Allocation and Savings rate. |
| By account type | Fixed deposit maturities, Fixed deposit interest and TDS, Bond coupons and maturities, Loan balance, Loan interest and principal, Equities: dividends and realised profit, Equity holdings at cost, Trading results (CFD) and Retirement. |
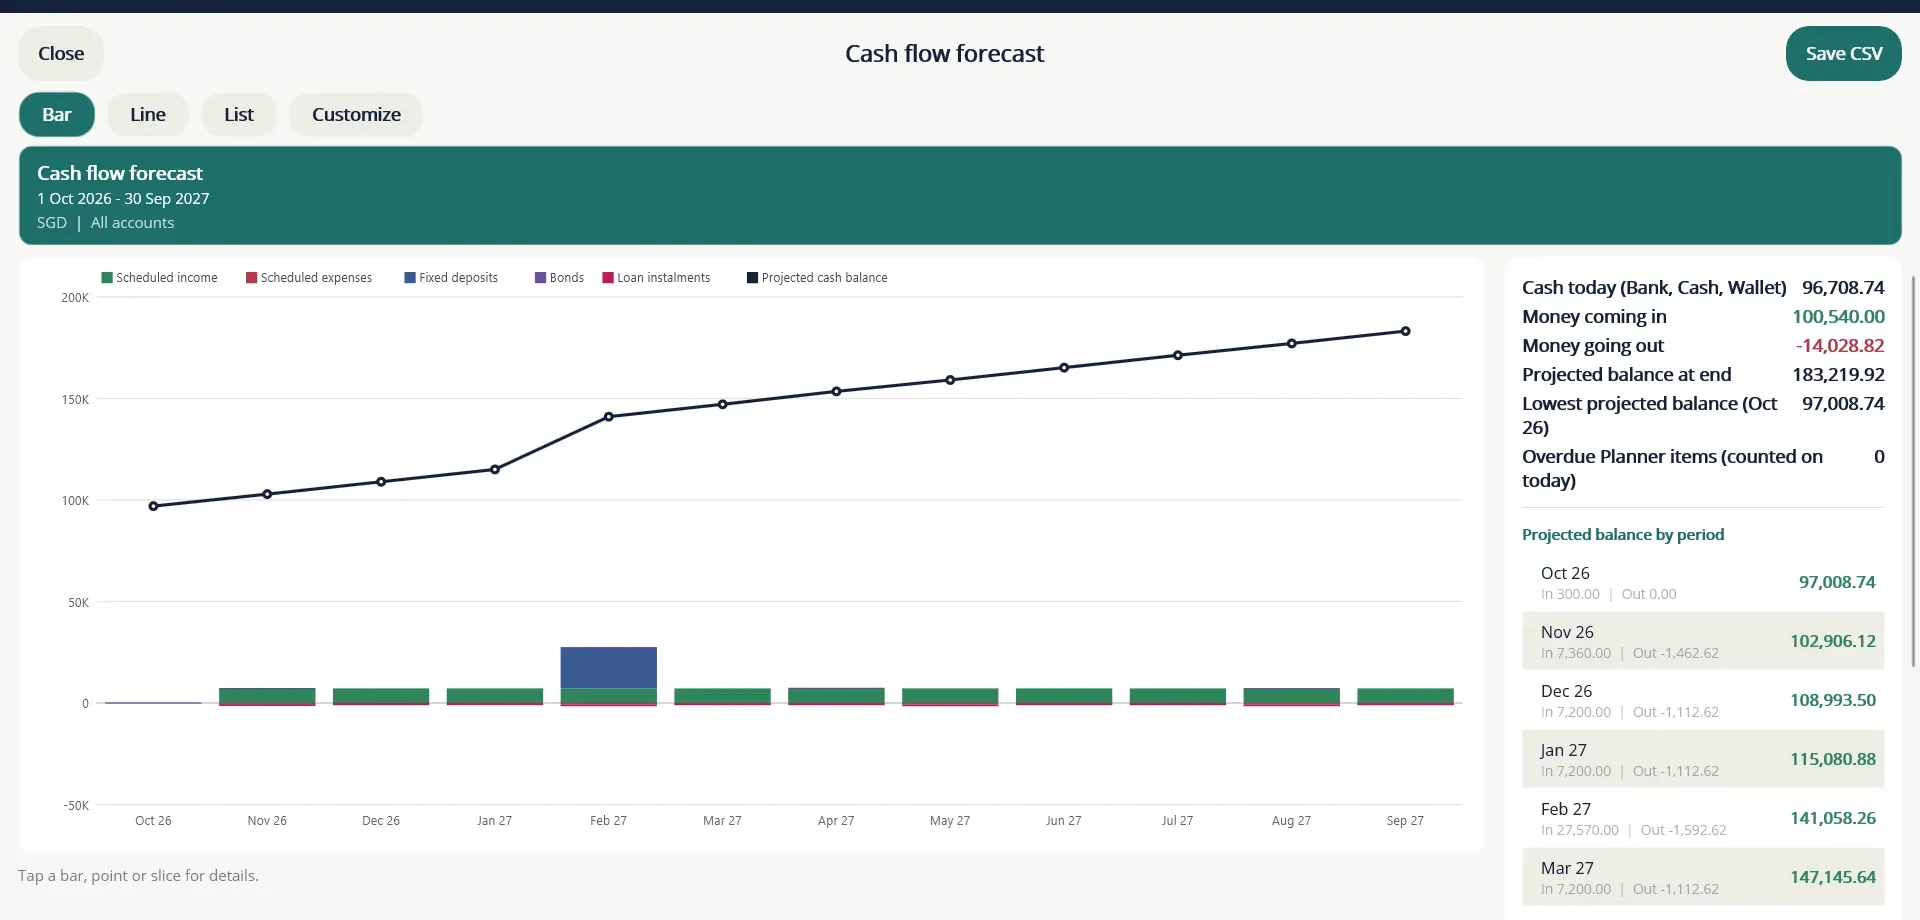
| Looking ahead | Cash flow forecast: money expected in and out over the coming months. |
Read a report
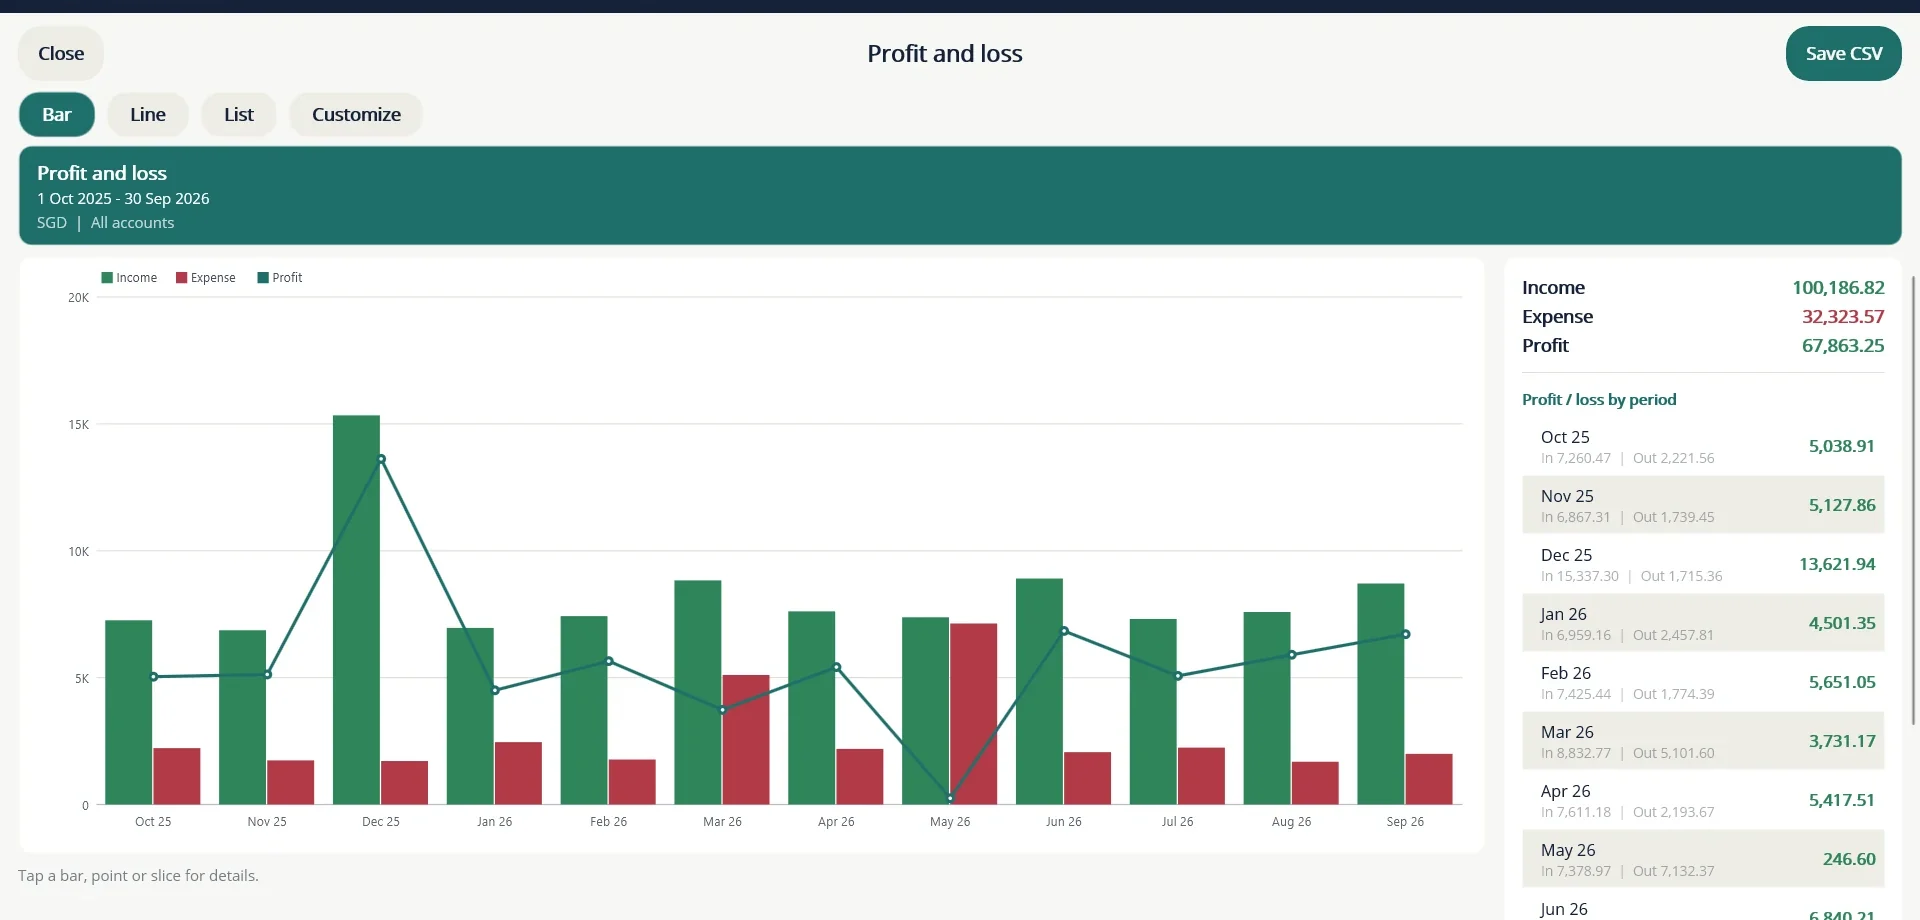
Every report opens as a chart with the period's totals beside it. The buttons at the top switch the view between Bar, Line, Pie (where it makes sense) and List. Tap a bar, point or slice to see its details. Save CSV writes the figures to a file, and Close returns to the list. Transfers between your own accounts are never counted in reports.
Customize a report
Choose Customize to change what a report shows, then Apply and show report.
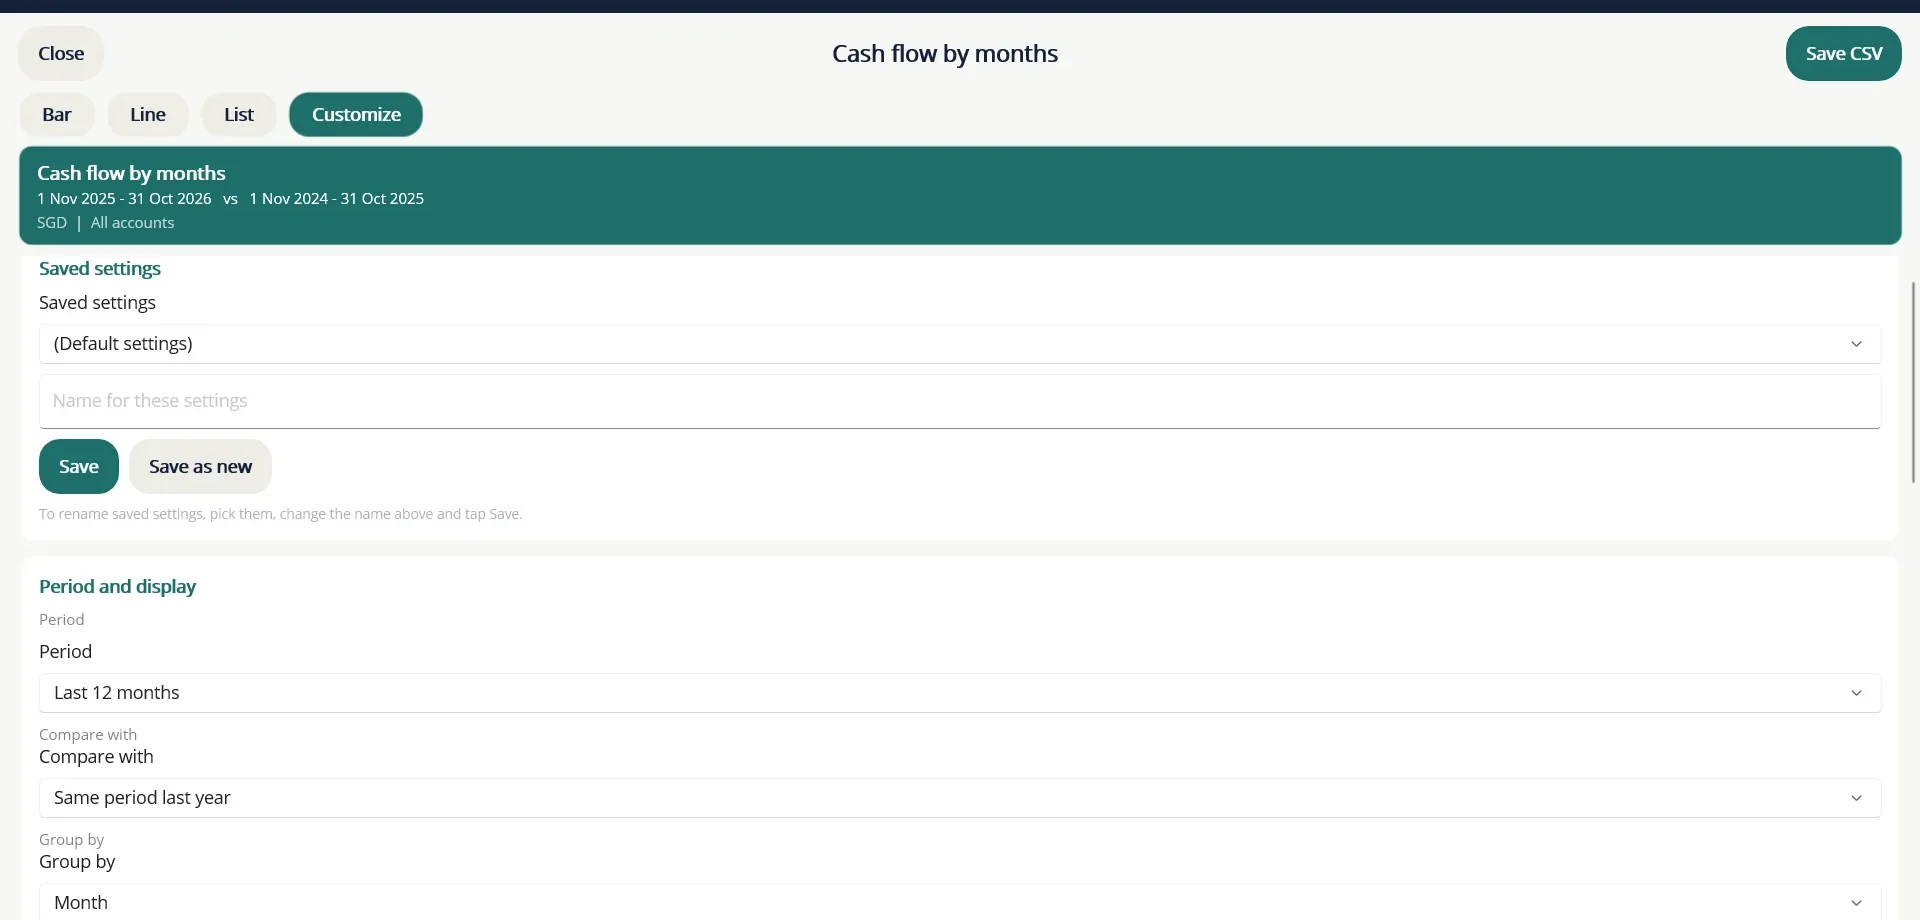
- Period: a ready-made period such as Last 12 months, or a custom From and To.
- Compare with: a second period, for example Same period last year, drawn as a dashed line or extra columns.
- Group by: month, quarter or year, following your financial year.
- Currency, Break down by and How many to list, for reports that offer them.
- Accounts: one account group, and whether to include closed accounts.
- Filters: limit the report to chosen accounts, categories, payees or tags, or to transactions containing some search text.
To keep a setup you use often, type a name under Saved settings and choose Save. Save as new keeps the old one too, and Delete removes a saved setup.
A short tour of the main reports
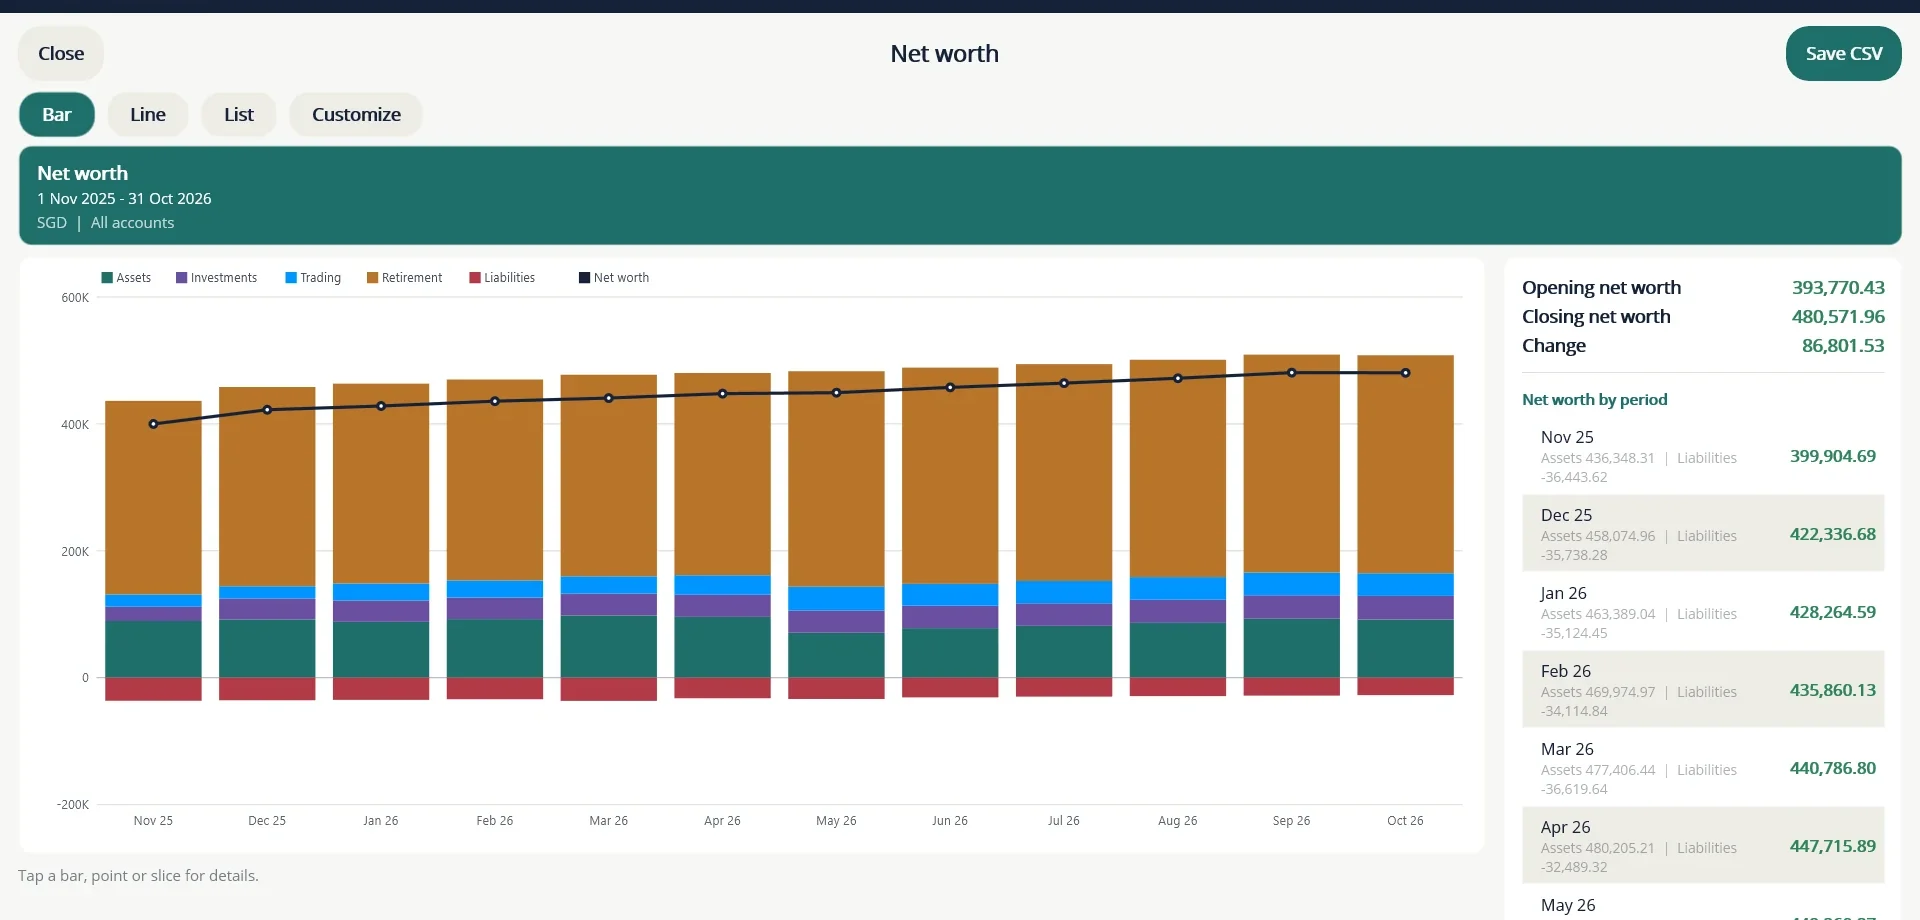
Net worth stacks what you own, by bucket, against what you owe, period by period, with the net line on top.
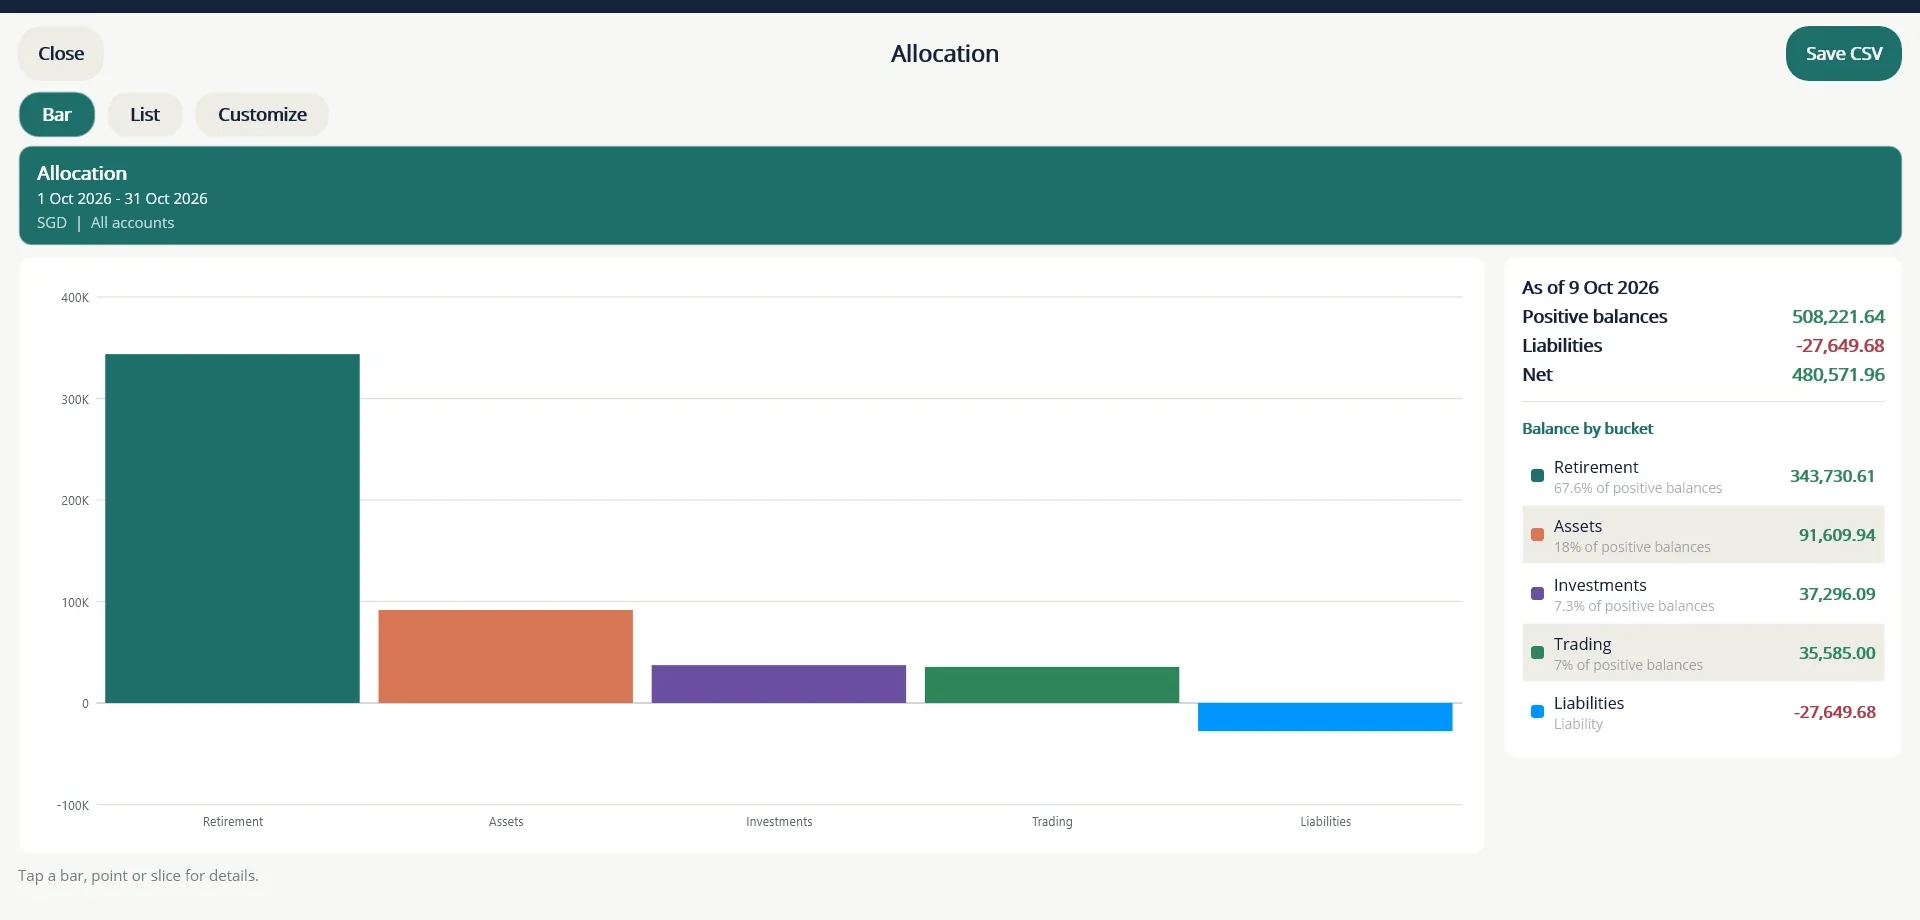
Allocation shows how your money is spread. Choose to view it by bucket, account type, currency or account.
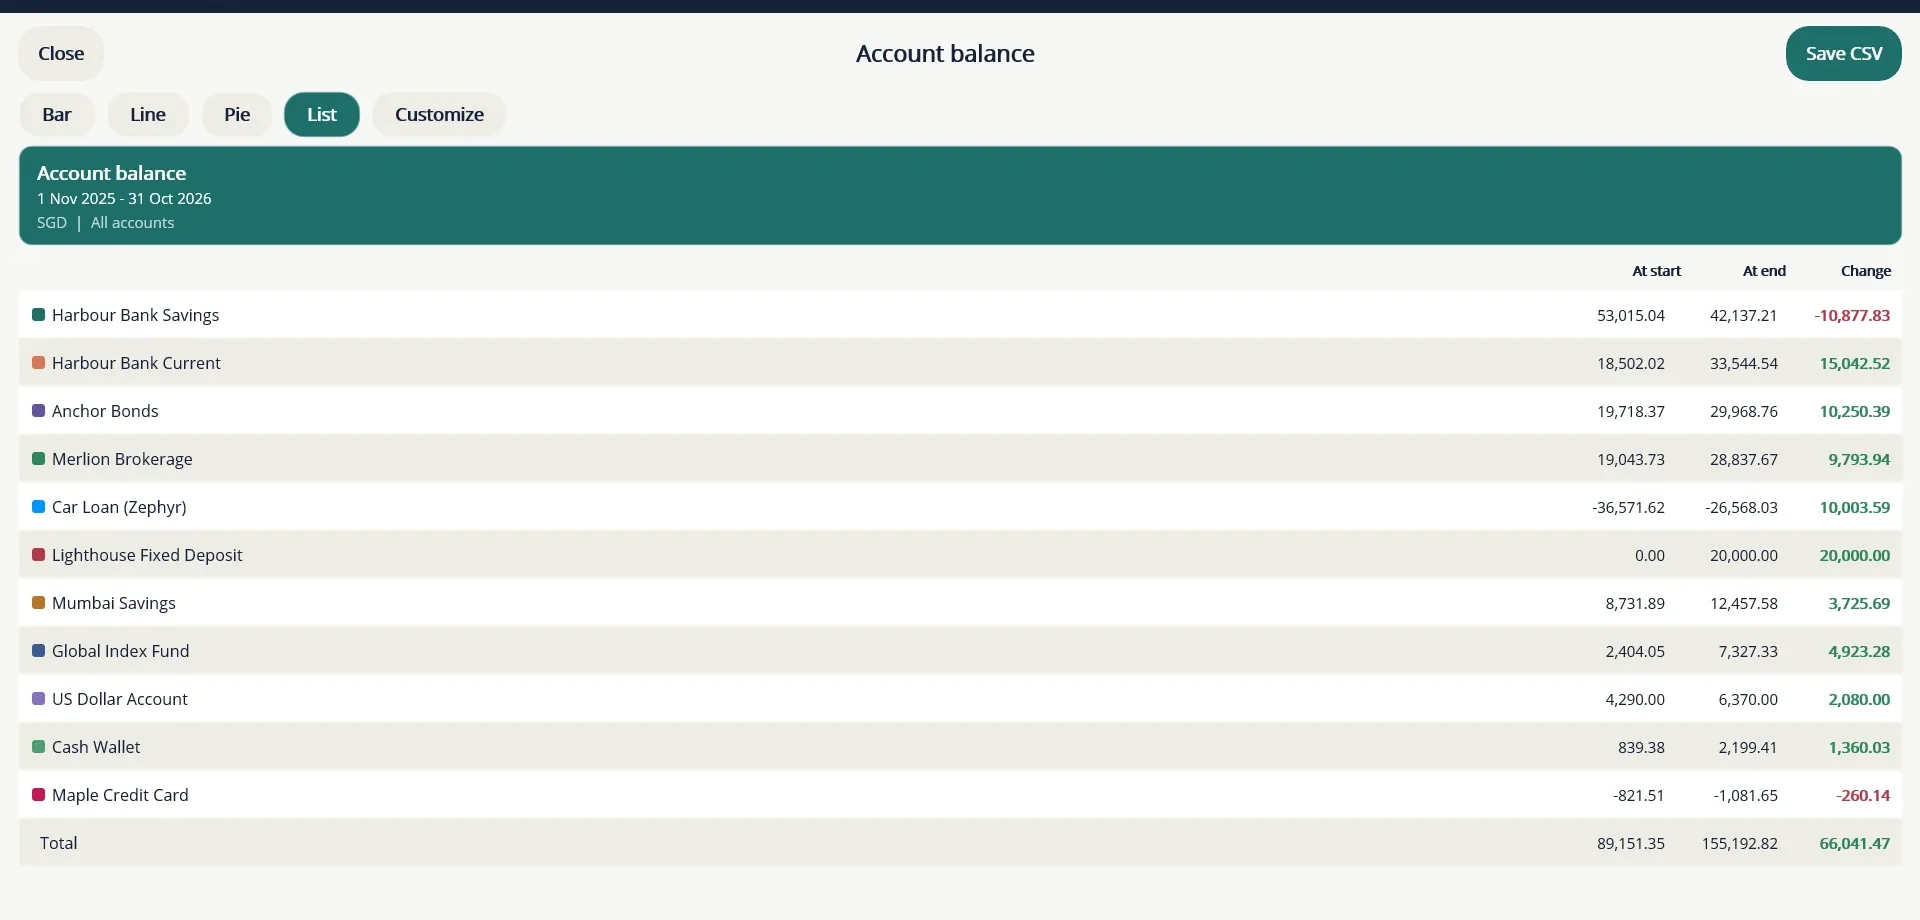
Account balance lists every account with its balance at the start and end of the period and the change. The total matches your net worth.
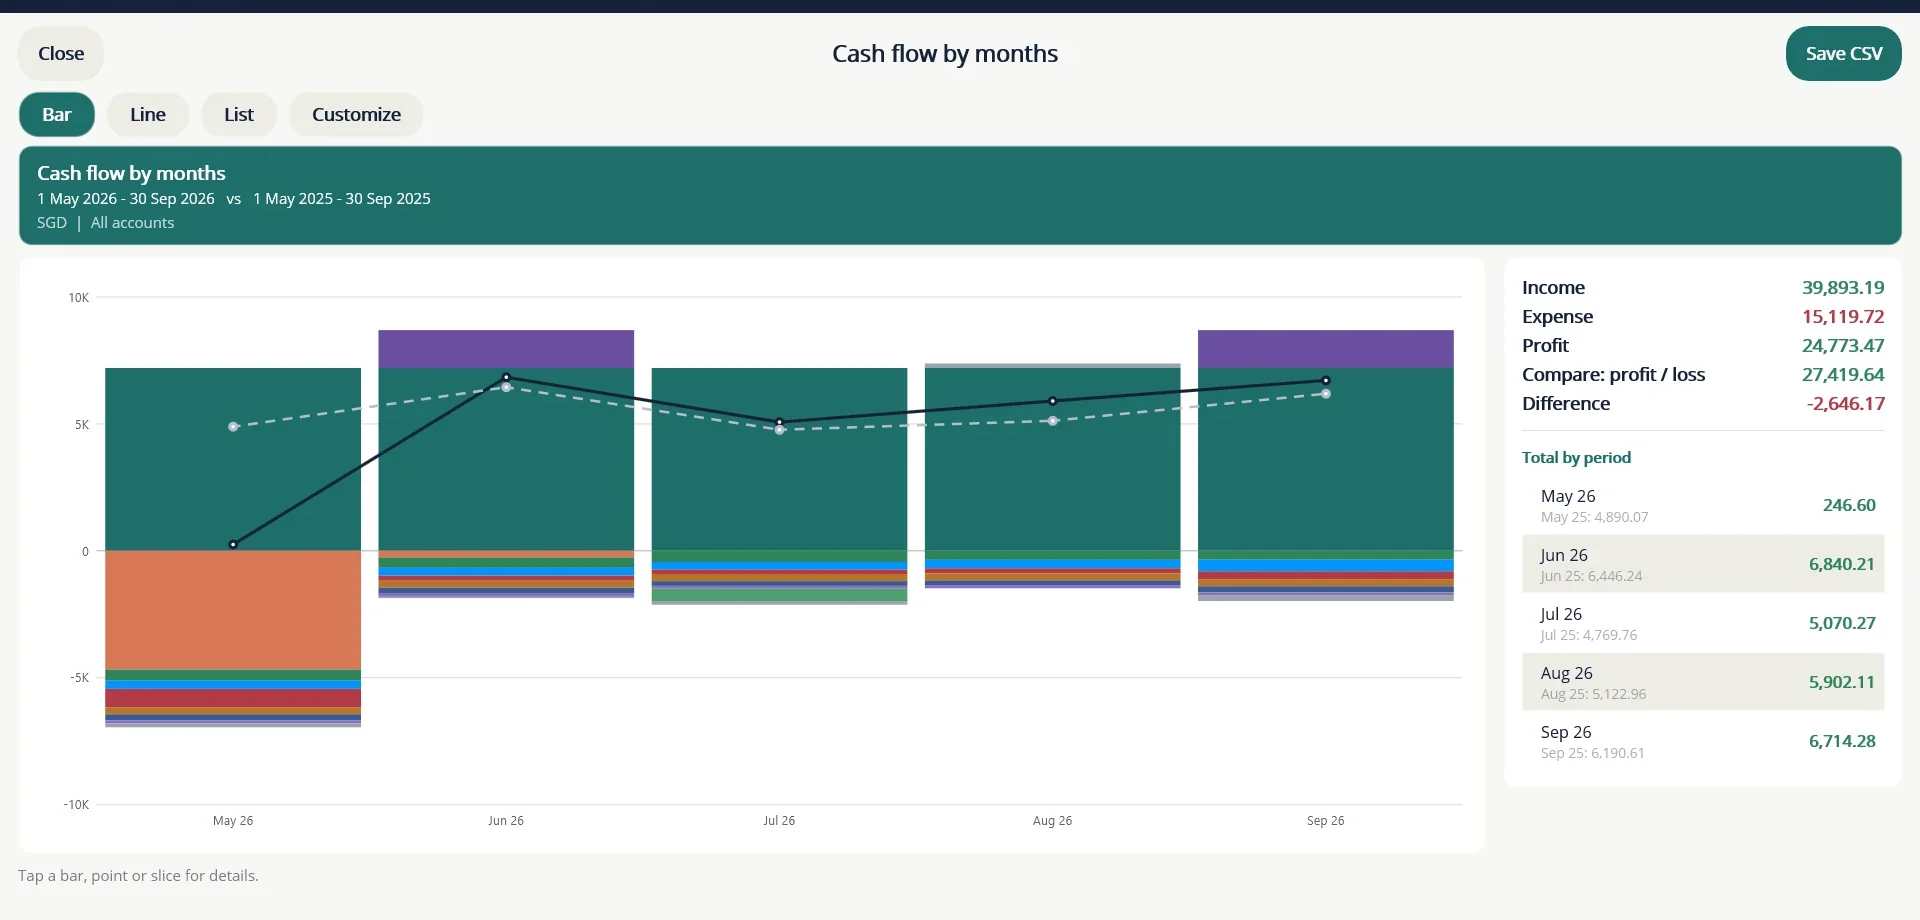
Cash flow by months shows money in and out, split by category. Switch on Compare with to lay the same months of last year over it.
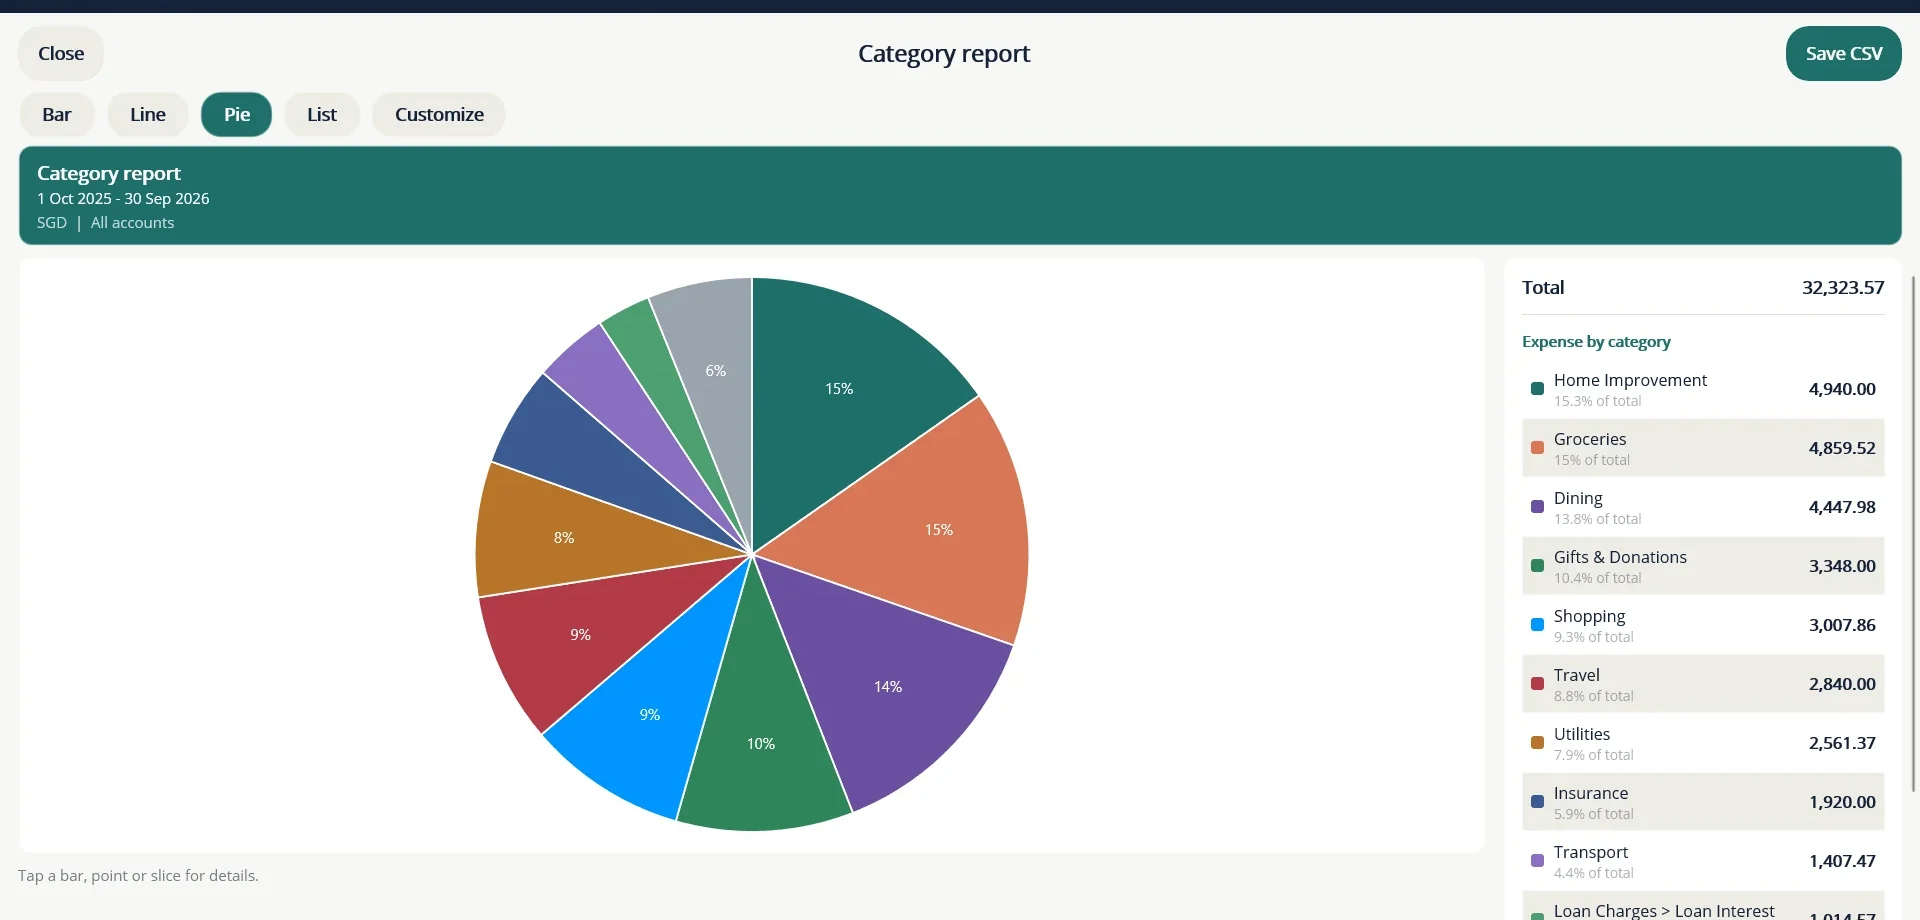
Category report shows where a period's spending went, as a pie with the list beside it.
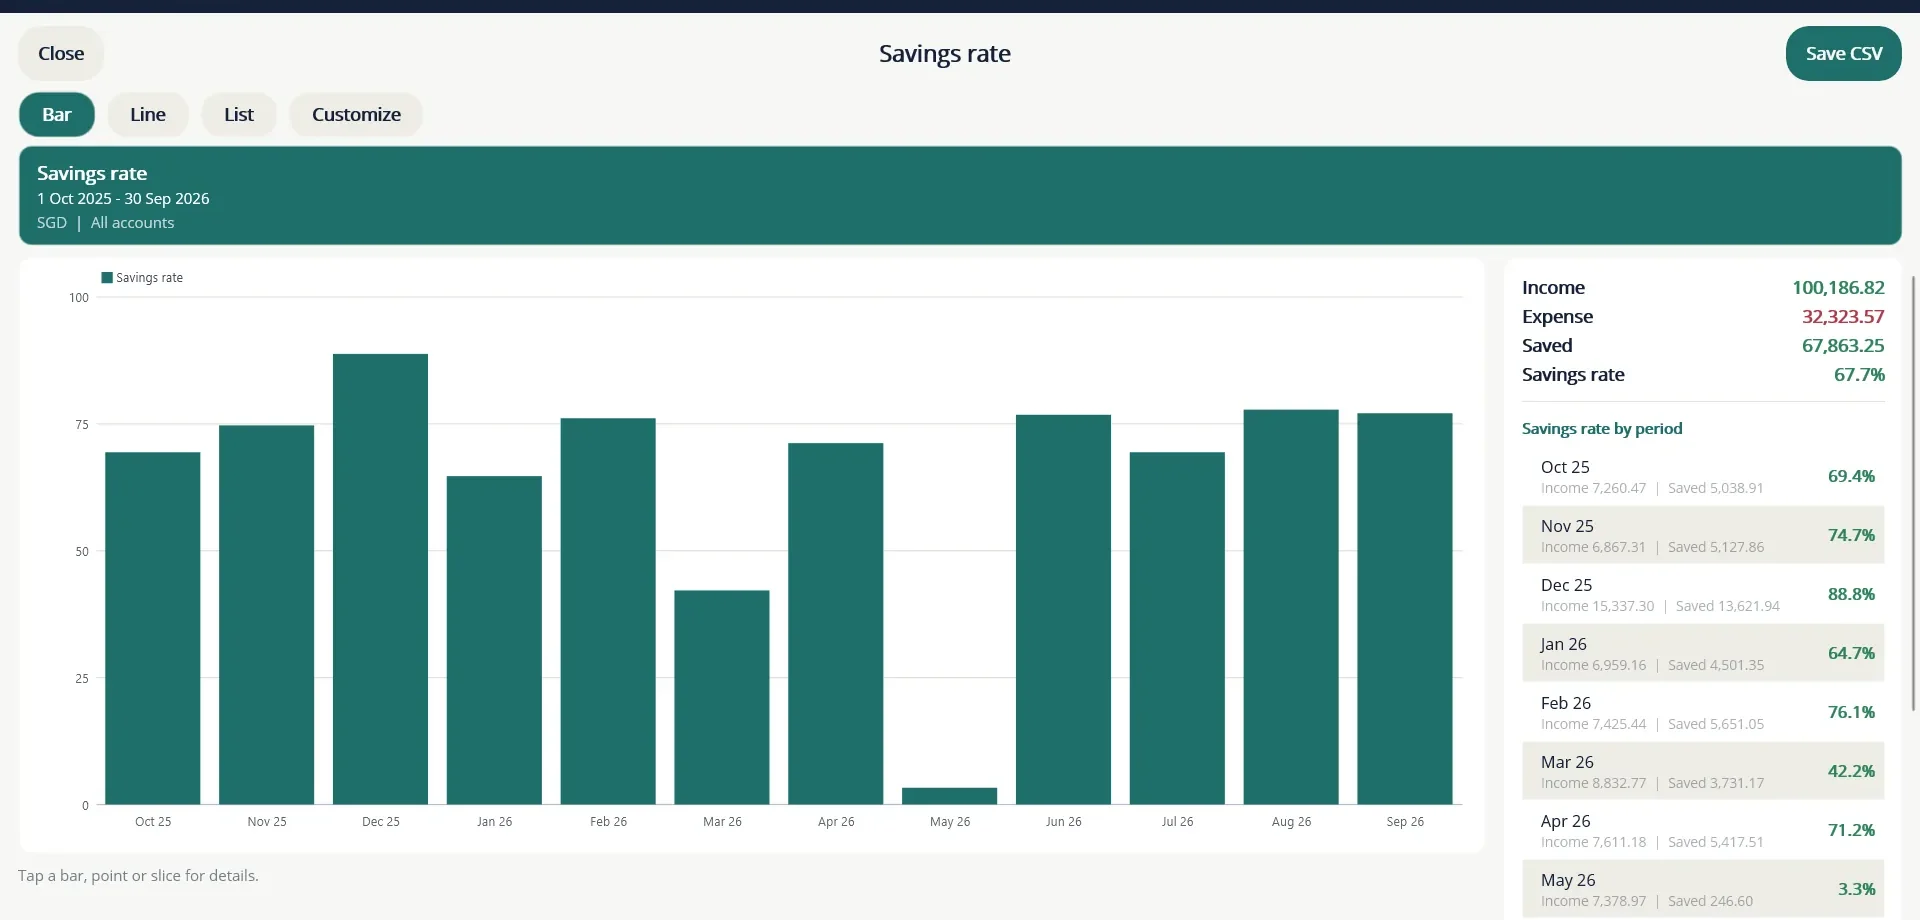
Savings rate is the share of your income that you kept in each period.
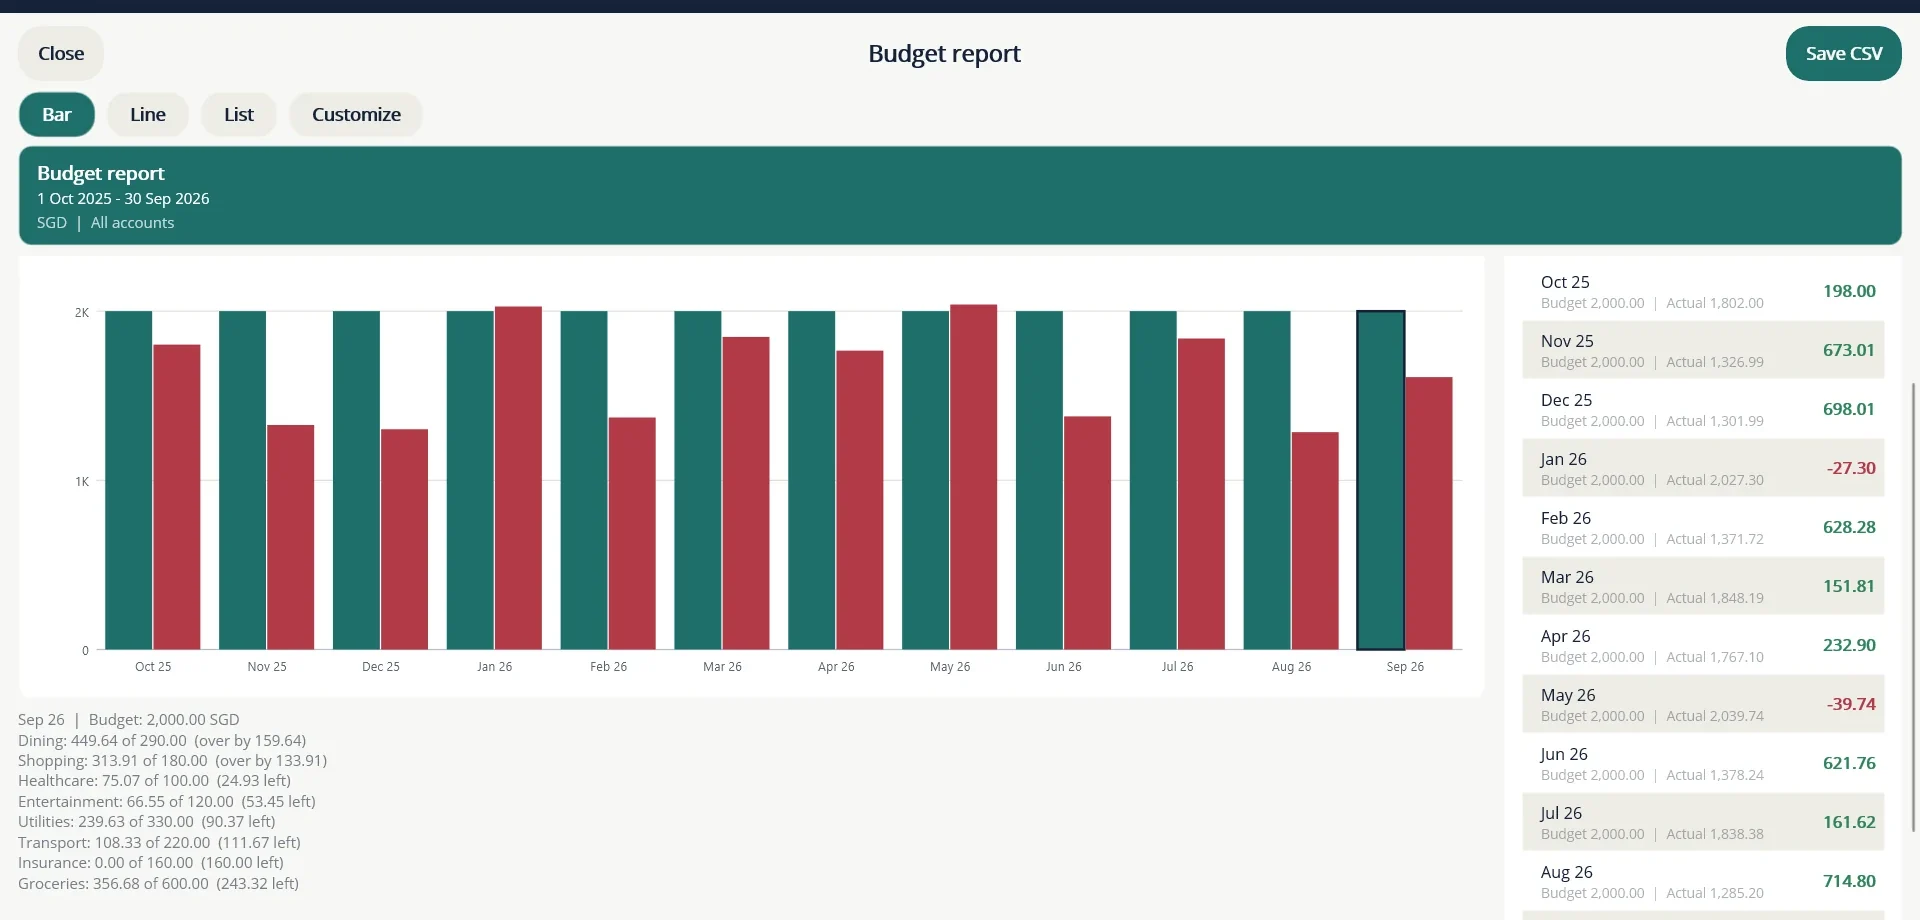
Budget report compares budget with spending month by month. Tap a month to see each budgeted category, worst overspend first.
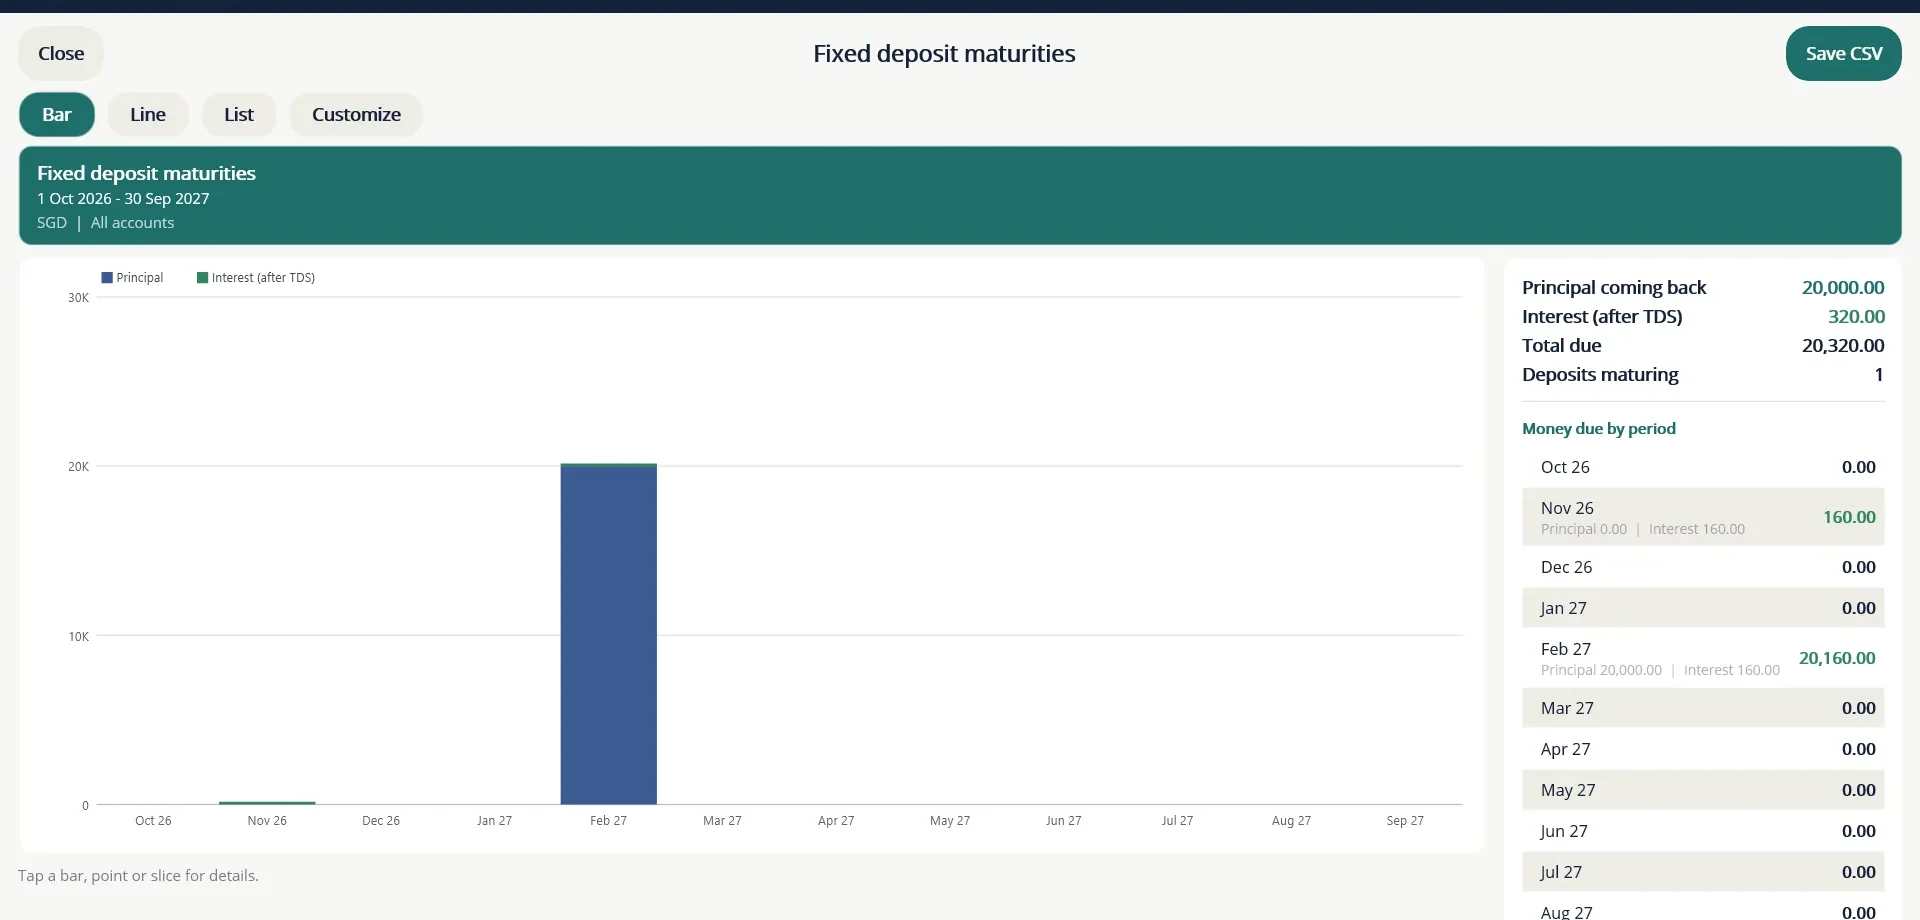
Fixed deposit maturities shows the principal and interest still to come, month by month, like a maturity ladder.
Cash flow forecast projects your cash balance forward using everything TurtleNest already knows is coming: Planner items, fixed deposit payouts, bond coupons and loan instalments. The panel beside the chart shows your cash today, money coming in and going out, the projected balance at the end, the lowest projected balance and how many Planner items are overdue.
Protect your data
26 Lock, passwords and the recovery key
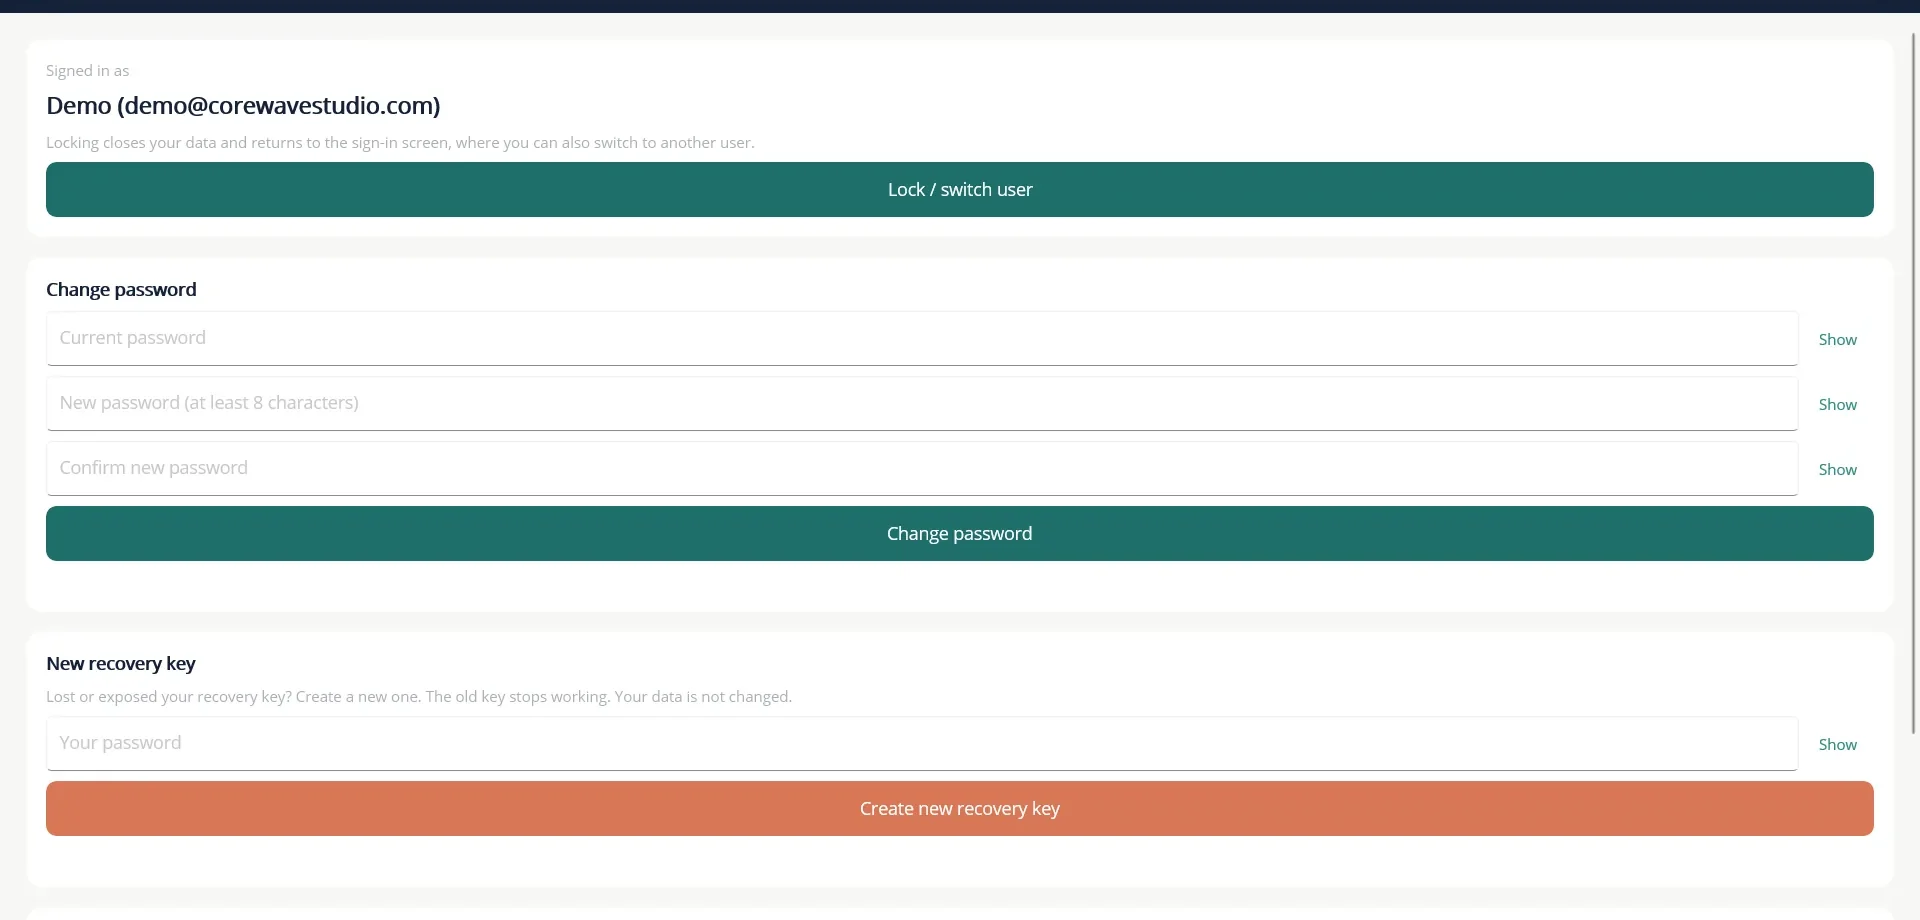
Open More... then Account & Security.
Lock or switch user
Choose Lock / switch user to close your data and return to the sign-in screen. Use it when you step away from the computer, or to let someone else sign in. Nothing from your session stays on screen.
Change your password
- Type your Current password.
- Type the new password, at least 8 characters, and confirm it.
- Choose Change password. Your data does not need re-encrypting, so this is quick.
Make a new recovery key
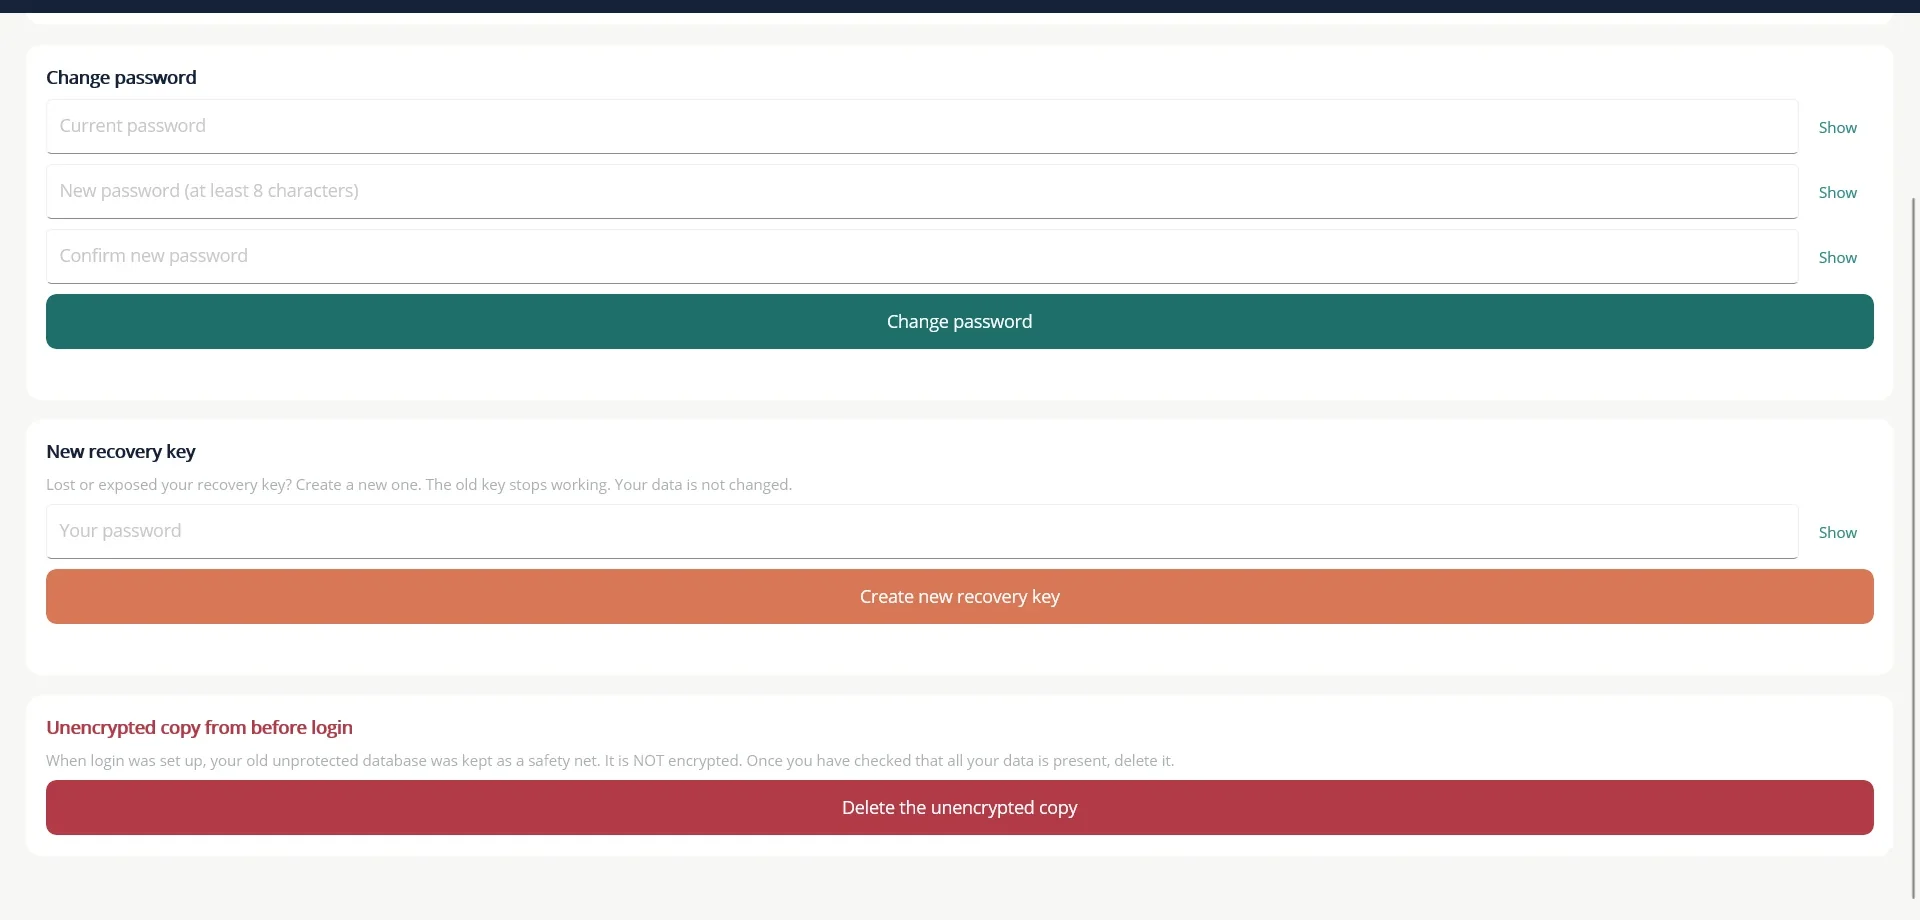
If you lose your recovery key, or think someone else has seen it, enter your password and choose Create new recovery key. The old key stops working immediately, and the new one is shown once for you to copy or write down. Your data is not changed.
The unencrypted copy
If you used TurtleNest before logins were added, your old unprotected database was kept as a safety net when your login was created. It is not encrypted. Once you have checked that all your data is present in your login, choose Delete the unencrypted copy. The red section only appears when such a copy exists.
27 Back up and restore
A backup is a single encrypted file. Keep copies somewhere other than this computer, such as a USB drive or a cloud drive. A backup is useless to anyone without your password or recovery key.
Make a backup
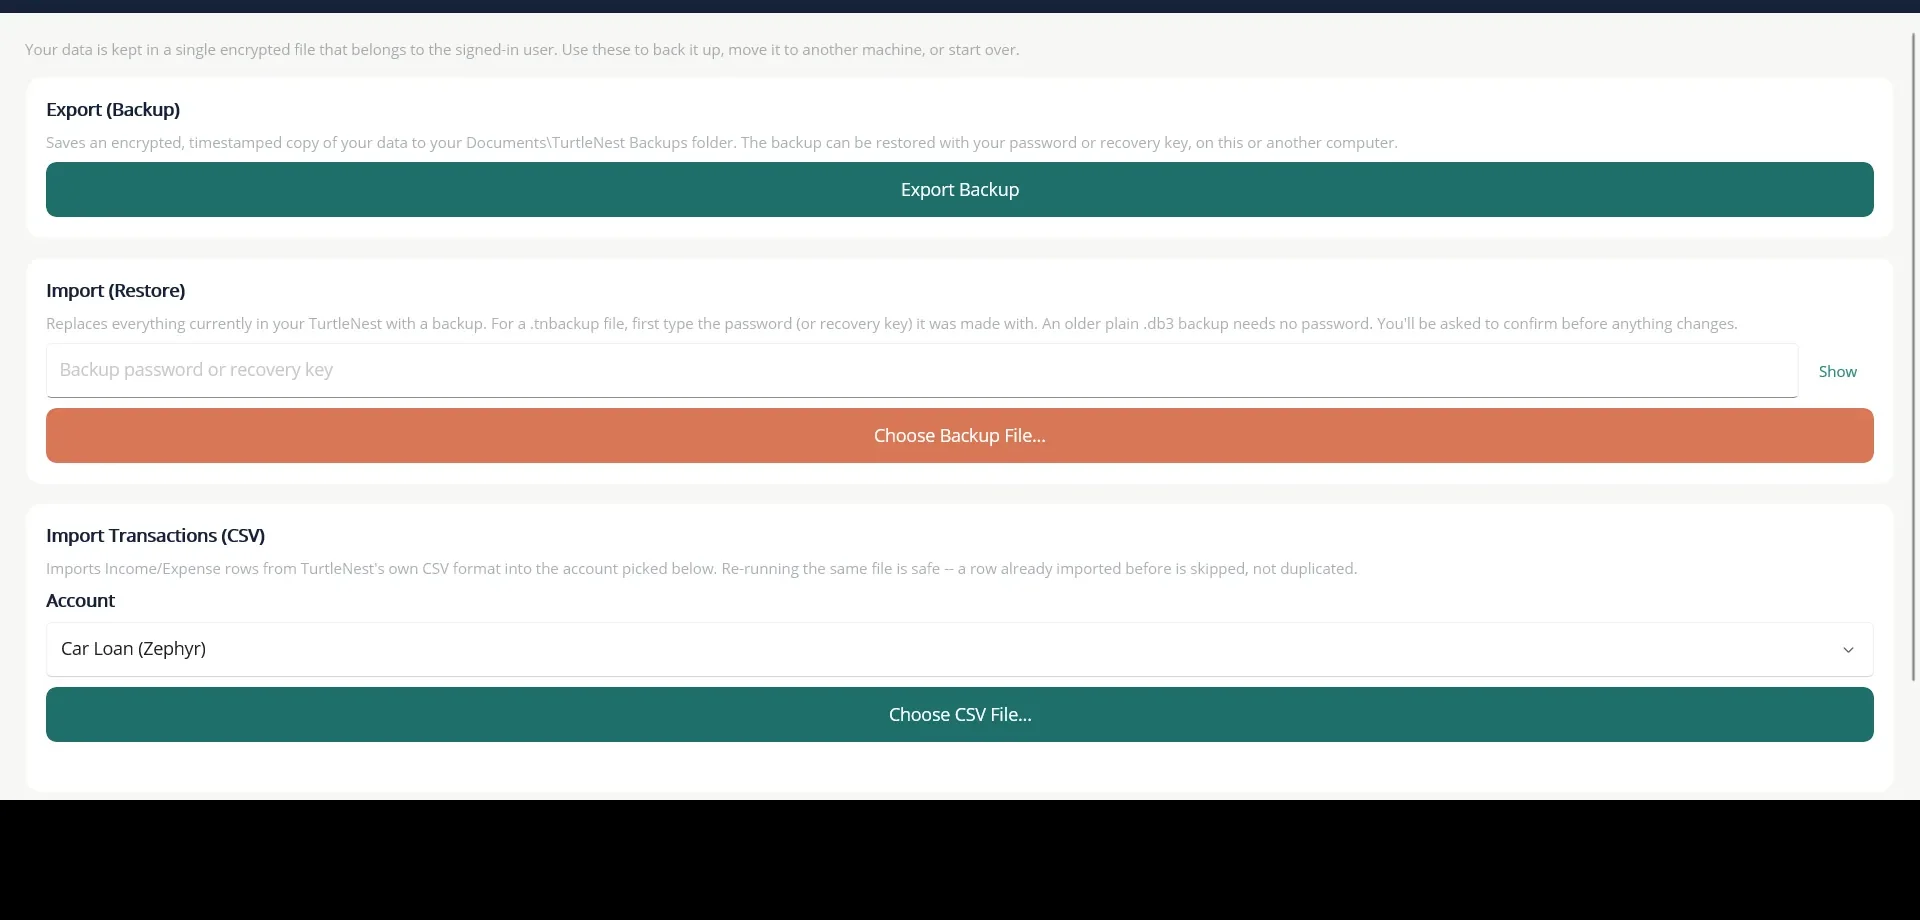
- Open More... then Database.
- Choose Export Backup.
- TurtleNest saves a dated .tnbackup file in the TurtleNest Backups folder inside your Documents folder, and tells you where.
Restore a backup
- Open Database.
- Under Import (Restore), type the password, or the recovery key, that the backup was made with.
- Choose Choose Backup File... and pick the file.
- Confirm. TurtleNest reloads with the restored data, which stays protected by your current password.
An older plain .db3 backup needs no password. To open a backup on another computer, choose Add another user on the sign-in screen, then Restore a backup from another computer. The new login keeps the original password and recovery key.
Import transactions from a CSV file
Under Import Transactions (CSV), choose the account and a file in TurtleNest's own format, with these columns: Date, Payee, Amount, Category, SubCategory, Note, Tag. Categories, subcategories and tags must already exist, as they are never created for you. If you import the same file twice, rows already imported are skipped, not duplicated.
Start over
Clear Database permanently deletes every account, transaction, category and setting in your login. You are asked to confirm first. Make a backup before you use it.
Reference
28 Account types at a glance
Each type lands in one bucket on the Dashboard and behaves in one of three ways. Ledger accounts keep a balance from an opening balance plus transactions. Valuation accounts keep a balance from entries you add now and then. Trade-log accounts record trades, with money moving through a settlement account.
| Account type | Bucket | How it works | Use it for |
|---|---|---|---|
| Bank Account | Assets | Ledger | Current, savings and other bank accounts. |
| Cash Account | Assets | Ledger | Your physical wallet or cash at home. |
| Digital Wallet | Assets | Ledger | PayLah!, PayPal, Amazon Pay, or a broker's cash balance. |
| Fixed Deposit | Assets | Terms and payout schedule, tied to a bank account | Term deposits. See chapter 22. |
| Receivable | Assets | Ledger | Money someone owes you. See chapter 24. |
| Credit Card | Liabilities | Ledger, balance runs negative | Cards you pay off from a bank account. |
| Loan | Liabilities | Terms, payments and an amortisation schedule | Bank or institutional loans. See chapter 23. |
| Payable | Liabilities | Ledger | Money you owe a person. |
| CFD Account | Trading | Ledger with trade results; optional CSV import | Leveraged trading accounts. See chapter 20. |
| Equities Account | Trading | Trade log plus valuation entries; Demat reconciliation | Shares. See chapter 17. |
| ETF Account | Investments | Trade log plus valuation entries | Exchange-traded funds. |
| Bonds Account | Investments | Trade log with coupons and redemption | Government, corporate, tax-free, gold and savings bonds. See chapter 18. |
| Mutual Fund | Investments | Valuation entries, with units and NAV | Funds you note down now and then. See chapter 19. |
| Retirement Account | Retirement | Ledger | CPF, EPF, 401(k) or any locked-away retirement scheme. Use one account for each separate balance, for example CPF OA, SA, MA and RA. See chapter 21. |
29 Good to know
- TurtleNest records, it does not advise. It does not connect to banks, fetch prices or recommend anything. The lender's, bank's and broker's statements are the source of truth.
- Nothing posts by itself. Planner items, fixed deposit payouts, loan instalments and bond coupons are reminders. You post or record each one.
- Transfers are not income or expense. They never change your profit and loss.
- Locked rows follow their parent. Rows created by a trade or a loan payment are changed from the investment account's Trades tab or the loan's Payments list.
- Closed accounts are read-only. Reopen an account in Edit Account to make corrections. Transfers cannot involve a closed account.
- Accounts with history cannot be deleted. This includes accounts with trades or loan payments, and settlement accounts that a trade uses.
- Holdings are quantities. They come from recorded trades. Net worth uses your valuation entries.
- Everything is in your base currency on the Dashboard. Refresh rates after adding a foreign-currency account.
- Your data is encrypted per login. Without your password or recovery key, nobody can open it, including the makers of TurtleNest.
- TurtleNest does not calculate tax. Rules differ from country to country, so there are no tax reports. Figures such as realised profit (average cost method) and fixed deposit interest after TDS are for your own records. Export a report as CSV to give the figures to an accountant.
- Windows only for now. Android and cloud sync are planned. Until sync exists, each computer keeps its own data, so use backups to move it.
30 Questions and answers
- I forgot my password. Is my data lost?
- No, if you saved your recovery key. Choose Forgot password (use recovery key) on the sign-in screen. See chapter 2.
- I lost both my password and my recovery key.
- The data cannot be opened. This is by design, so that nobody else can open it either. A backup does not help, because it needs the same password or key.
- The net worth looks wrong after I added a foreign account.
- Open More... then Currencies and choose Refresh Live Rates, or type the rate in by hand.
- I cannot edit a transaction. It shows red text.
- The row was created by a trade or a loan payment, or the account is closed. Change it from the parent screen. See chapter 11.
- Why is an account type missing from the Add Account list?
- It is switched off in More... then Settings then Account types. See chapter 4.
- A Planner item did not post.
- It never posts by itself. Open the Planner and choose Post.
- Does TurtleNest prepare my tax return?
- No. It records your accounts and shows reports, but it does not work out tax. Save a report as CSV if your accountant needs the figures.
- Why does my CPF Special Account show zero?
- At 55 its balance moves to the Retirement Account. Record that as a transfer and close the Special Account. See chapter 21.
- My shares' value is not changing.
- TurtleNest does not fetch prices. Add a valuation entry on the account's Valuation tab. See chapter 19.
- My holdings show a negative quantity.
- A buy or an adjustment is probably missing. Use Demat reconciliation to find which stock differs, then add the missing entry.
- How do I move TurtleNest to a new computer?
- Make a backup, copy the file across, and restore it using Add another user then Restore a backup from another computer. See chapter 27.
- Where is my backup saved?
- In the TurtleNest Backups folder inside your Documents folder. TurtleNest tells you the full path when it saves.